Set up App Hub

This document provides instructions for setting up App Hub to build, operate, and manage applications on Google Cloud. It's intended for people who set up and administer App Hub.

If you are setting up App Hub, the primary tasks are as follows:

  1. Decide whether to create a new App Hub host project or use an existing project as your host project.
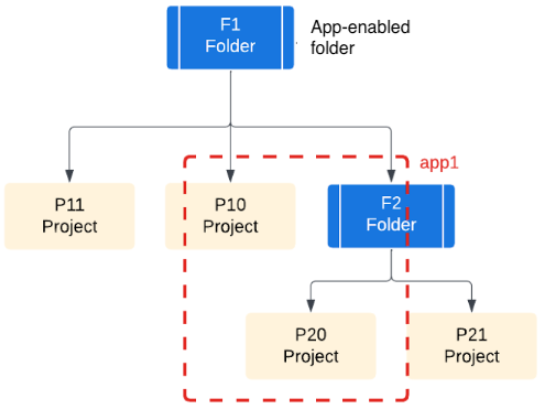
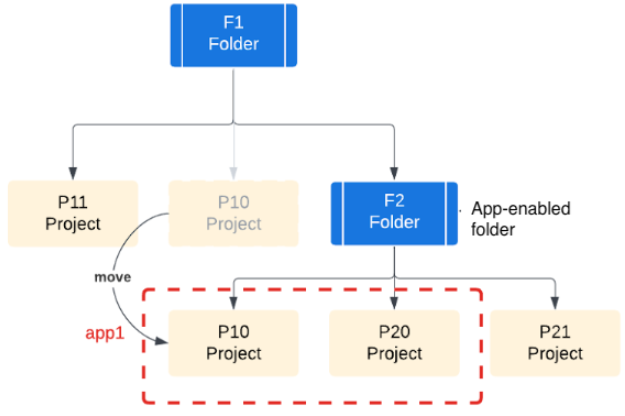
    • If you plan to have more than one host project, we strongly recommend that you create them in the same folder.
    • Host projects in App Hub are not the same as Shared VPC host projects and don't have the same requirements. For example, you don't need a Shared VPC network to use App Hub. In this document, all references to host projects are to App Hub host projects.
    • A host project cannot be a service project other than for itself.
  2. Enable the App Hub API in the host project.
  3. Add one or more App Hub service projects to the host project.
    • Service projects in App Hub are not the same as Shared VPC service projects and don't have the same requirements. In this document, all references to service projects are to App Hub service projects.
  4. Designate App Hub users as App Hub Admins, App Hub Editors, or App Hub Viewers.
  5. Create applications.
  6. Register services and workloads to the application.

Services and workloads

Using App Hub, the resources from service projects attached to the host project are available to you as services and workloads. Registering your services and workloads to an application enable you to observe and monitor the resources. You can designate the following resources as App Hub services and register them to App Hub applications:

  • Forwarding rules
  • URL maps
  • Backend services

You can designate managed instance groups (MIGs), but not individual VMs, as workloads and register them to App Hub applications.

App Hub supports global (Preview) and regional resources. For more information, see App Hub supported resources.

Overall setup process

The following list summarizes the steps to set up App Hub:

  1. Determine which existing resources to include in your application and which projects they belong to.
  2. Create an App Hub host project and enable the App Hub API in the project. Optionally, based on your business's organizational structure, create more than one host project. If you create multiple projects, we recommend creating them in a new folder.
  3. Attach service projects. After you configure a host project, attach service projects with underlying resources that your applications need, to the host project. Note the following:
    1. The service projects must be in the same organization as the host project. After you attach a service project to a host project, you can't move it to a different organization. To move the service project to a different organization, you must follow the instructions in this document to remove or detach the service project attachment to the host project. You can then attach the service project to a different organization.
    2. A service project can't be attached to more than one host project.
    3. A host project can be its own service project, but it can't be a service project for any other host project.
    4. After you attach service projects to a host project, querying the host project for services or workloads automatically returns all services and workloads in all of the service projects.
  4. Create an application to organize multiple workloads and services. Note the following:
    1. Make sure the application has a name that is unique in the host project and location.
    2. A service project can be attached to a host project with multiple applications, but its individual resources can be registered to only one application.
  5. Query for services and workloads and register them to your application. After you create an application, you query the host project for available services and workloads. The queries run against the host project and all service projects that are attached to the host project. They also return all services and workloads in those projects. Note the following:
    1. You can only register a service or workload to a single application.
    2. You must register services and workloads from a specific region to a regional application in the same region or to a global application. The instructions and commands that follow assume that all resources are in the same region. For information on which regions you can designate, see Locations.
    3. Registered services and workloads aren't affected by updates to the underlying infrastructure resource. In other words, if you delete the underlying resources that act as services and workloads, App Hub doesn't delete the associated workloads and services from your application. You have to separately unregister the workload or service.

Prerequisites

Before you set up App Hub, complete the following tasks.

  1. Decide which existing project is the host project or create a new project to be the host project. We strongly recommend that you create a new project.
  2. Ensure that you have decided which individuals hold the Identity and Access Management (IAM) roles for App Hub: App Hub Admin, App Hub Editor, and App Hub Viewer.

Note the following:

  • Host projects can have one or more service projects attached.
  • A service project can't be attached to more than one host project.
  • The person attaching a service project to a host project must have the IAM role App Hub Admin in both the service project and host project. For more information, see App Hub roles and permissions.

Set up App Hub

In this section, you create an example App Hub architecture.

In the example, an organization has three service projects, with their infrastructure resources deployed in the projects as follows:

  • Service Project 1 has two infrastructure resources, Service 1 and Service 2.
  • Service Project 2 has three infrastructure resources, Service 3, Workload 1, and Workload 2.
  • Service Project 3 has three infrastructure resources, Service 4, Workload 3, and Workload 4.

Ensure that the projects you choose for creating the example contain the resources described in this section, or be prepared to adjust the example as you go through the instructions.

The following sections contain the instructions for creating an App Hub example. You create a host project and add service projects to the host project, then create an application and attach services and workloads to the application. The example has three service projects, but you can add fewer or more.

The example assumes that any service projects that you add already exist and they contain services and workloads that you add to your application. Before you create the example, determine which service projects contain the services and workloads that you want to include in the application.

Enable App Hub

In this section, you select or create a new host project, enable the App Hub API, and grant appropriate roles and permissions to individuals in your organization. You also attach service projects to the host project.

Console

  1. In the Google Cloud console, go to the project selector page.

    Go to project selector

  2. Select or create a Google Cloud project, to be your App Hub host project.

  3. Enable the required API.

    Enable the API

  4. If you are the project creator, you are granted the basic Owner role (roles/owner). By default, this IAM role includes the permissions necessary for full access to most Google Cloud resources.

    If you aren't the project creator, required permissions must be granted on the project to the appropriate principal. For example, a principal can be a Google Account (for end users) or a service account (for applications and compute workloads). To get the permissions that you need to complete this tutorial, ask your administrator to grant you the following IAM roles on your project:

    1. In the Google Cloud console, go to the IAM page.

      Go to IAM

    2. Click Grant access. The Grant access pane opens.

    3. In the New principals field, enter the email address of the individual who will administer App Hub, the App Hub Admin role in the host project.

    4. Click Select a role and in the Filter field, enter App Hub.

    5. Select the App Hub Admin role and click Save.

    6. In each of the App Hub service projects, grant the App Hub Admin role to the same user.

  5. In the Google Cloud console, go to the App Hub Settings page.

    Go to Settings

  6. On the Settings page, click Attach projects.

  7. Do one of the following:

    • From the list of projects, select the checkboxes for the projects you want to add as service projects.
    • Search for projects and then select the projects to add as service projects.
  8. Click Select. The Attached Service Project(s) table displays the selected service projects.

  9. Click Close.

gcloud

  1. In the Google Cloud console, activate Cloud Shell.

    Activate Cloud Shell

    At the bottom of the Google Cloud console, a Cloud Shell session starts and displays a command-line prompt. Cloud Shell is a shell environment with the Google Cloud CLI already installed and with values already set for your current project. It can take a few seconds for the session to initialize.

  2. Make sure that the most recent version of Google Cloud CLI is installed. Run the following command from the Cloud Shell:

    gcloud components update
  3. Create or select a new project, HOST_PROJECT_ID, to be the host project for App Hub.

    • Create a Google Cloud project:
      gcloud projects create HOST_PROJECT_ID
    • Select the Google Cloud project that you created:
      gcloud config set project HOST_PROJECT_ID
  4. Enable the App Hub API in the host project that you just created.

    gcloud services enable apphub.googleapis.com \
        --project=HOST_PROJECT_ID
    
  5. If you are the project creator, you are granted the basic Owner role (roles/owner). By default, this IAM role includes the permissions necessary for full access to most Google Cloud resources.

    If you aren't the project creator, required permissions must be granted on the project to the appropriate principal. For example, a principal can be a Google Account (for end users) or a service account (for applications and compute workloads). To get the permissions that you need to complete this tutorial, ask your administrator to grant you the following IAM roles on your project:

    1. Optionally, grant the individuals who will administer App Hub, the App Hub administrator role in the host project. Repeat the following command for each administrator.

      gcloud projects add-iam-policy-binding HOST_PROJECT_ID \
          --member='user:HOST_PROJECT_ADMIN' \
          --role='roles/apphub.admin'
      

      Replace HOST_PROJECT_ADMIN with the user who has the App Hub Admin role in the host project. This value has the format username@yourdomain, for example, robert.smith@example.com.

    2. Grant the App Hub Admin role in the service projects to the individuals who administer App Hub. They must have the App Hub Admin role to add service projects to the host project. You need at least one person with this role for each service project. A single person can have the role in multiple service projects.

      gcloud projects add-iam-policy-binding SERVICE_PROJECT_1 \
          --member='user:HOST_PROJECT_ADMIN' \
          --role='roles/apphub.admin'
      
      gcloud projects add-iam-policy-binding SERVICE_PROJECT_2 \
          --member='user:HOST_PROJECT_ADMIN' \
          --role='roles/apphub.admin'
      
      gcloud projects add-iam-policy-binding SERVICE_PROJECT_3 \
          --member='user:HOST_PROJECT_ADMIN' \
          --role='roles/apphub.admin'
      

      Replace the following:

      • SERVICE_PROJECT_1: the first of three service projects in this example.
      • SERVICE_PROJECT_2: the second of three service projects in this example.
      • SERVICE_PROJECT_3: the third of three service projects in this example.
  6. Add your service projects to the App Hub host project.

    gcloud apphub service-projects add SERVICE_PROJECT_1 \
        --project=HOST_PROJECT_ID
    
    gcloud apphub service-projects add SERVICE_PROJECT_2 \
        --project=HOST_PROJECT_ID
    
    gcloud apphub service-projects add SERVICE_PROJECT_3 \
        --project=HOST_PROJECT_ID
    

Optional: Add service projects to the host project's metrics scope

You can view the system metrics for the applications in your host project by adding the service projects as resource containers to the host project's metrics scope. An App Hub host project acts as a scoping project that hosts a metrics scope. The metrics scope of a Google Cloud project defines the set resource containers whose time-series data the host project can chart and monitor. For more information about resource containers, metrics scope, and scoping projects, see Cloud Monitoring: Data model.

To view the system metrics for an application, you must manually add or delete the monitored service projects, as required, from the host projects. However, if you are using the host project as its own service project, since the App Hub applications are in the same project, don't add the project to the metrics scope.

Make sure you have the following IAM roles:

Console

  1. In the Google Cloud console, go to the  Settings page:

    Go to Settings

    If you use the search bar to find this page, then select the result whose subheading is Monitoring.

  2. Select Metric Scope.

    The Metric Scope tab lists the resources monitored by the current Google Cloud project. It also lists the Google Cloud projects whose metrics scope includes the current Google Cloud project.

  3. To add Google Cloud projects to the metrics scope:

    1. In the Google Cloud Projects pane, click Add Projects.
    2. In the Add Google Cloud projects dialog, click Select Projects, and then select the checkboxes for the required service projects that you'd like to monitor.
    3. To save your changes, click Add Projects.

      The Settings page is displayed with the table on that page updated to list your selections.

After you add projects to a metrics scope, it takes about 60 seconds for changes to propagate through all Monitoring systems.

For more information on configuring the metrics scopes using the Google Cloud console, see Configure a metrics scope.

gcloud

To add your service projects as a monitored resource container to the App Hub host project:

gcloud beta monitoring metrics-scopes create projects/SERVICE_PROJECT_1 \
    --project=HOST_PROJECT_ID
gcloud beta monitoring metrics-scopes create projects/SERVICE_PROJECT_2 \
    --project=HOST_PROJECT_ID
gcloud beta monitoring metrics-scopes create projects/SERVICE_PROJECT_3 \
    --project=HOST_PROJECT_ID

For more information on configuring the metrics scopes using the Google Cloud CLI, see Configure a metrics scope by using the API.

Create an application

If you don't already have one, create an application to be the container for your services and workloads. Based on the scope of your services and workloads on your service projects, create a global (Preview) or regional application.

  • A global application (Preview) lets you register discovered services and workloads from regional and global Google Cloud resources.
  • A regional application lets you register discovered services and workloads from regional Google Cloud resources.

Note that after you create an application, you can't change the application scope. For more information on global and regional applications, see Global and regional App Hub applications.

Console

  1. Make sure that you're in the host project.
  2. In the Google Cloud console, go to the App Hub Applications page.

    Go to Applications

  3. Click Create application.

  4. On the Create application page, in the Choose application region and name pane, based on the scope of services and workloads you'd like to register to the application, do one of the following:

    • To create an application that lets you register services and workloads from a global location, select Global (Preview).

    • To create an application that lets you register services and workloads from a single location:

      1. Select Regional.
      2. Select a Region.
  5. Enter the Application name and click Continue.

  6. Optionally, add more details for the application in the fields that follow. For more information, in this document, see Update an existing App Hub application.

  7. Click Create.

gcloud

  1. Create a new application called APPLICATION_NAME and give it a display name, APPLICATION_DISPLAY_NAME.

    gcloud apphub applications create APPLICATION_NAME \
      --scope-type=SCOPE_TYPE \
      --project=HOST_PROJECT_ID \
      --location=REGION
    

    Replace the following:

    • APPLICATION_NAME: the name of your application. The name must include only lowercase alphanumeric characters without spaces.
    • SCOPE_TYPE: the scope of your application that defines which services and workloads are available for you to register to the application. Use one of the following values:
    • REGION: the region of the application. Depending on the --scope-type, give this the value us-east1 or global (Preview).
  2. List the applications in your host project.

    gcloud apphub applications list \
      --project=HOST_PROJECT_ID \
      --location=REGION
    

    The output is similar to the following:

    ID                DISPLAY_NAME              CREATE_TIME
    APPLICATION_NAME  APPLICATION_DISPLAY_NAME  2023-10-31T18:33:48
    
  3. Get details for the application that you created.

    gcloud apphub applications describe APPLICATION_NAME \
      --project=HOST_PROJECT_ID \
      --location=REGION
    

    The command returns information in YAML format, similar to the following.

    createTime: '2023-10-31T18:33:48.199394108Z'
    displayName: APPLICATION_DISPLAY_NAME
    name: projects/HOST_PROJECT_ID/locations/REGION/applications/APPLICATION_NAME
    scope:
      type: SCOPE_TYPE
    state: ACTIVE
    uid: [APPLICATION_UID]
    updateTime: '2023-10-31T18:33:48.343303819Z'


Update an existing App Hub application

You can also update your application's attributes after the application is created.

Console

  1. In the Google Cloud console, go to the App Hub Applications page.

    Go to Applications

  2. From the list of applications, click Edit for the application that you'd like to update.

  3. Edit fields as required and click Save.

  4. Optional: In the Criticality list, to indicate the importance of the application, select one of the following:

    • Mission critical
    • High
    • Medium
    • Low
  5. Optional: In the Environment list, to indicate the stage of the software lifecycle, select one of the following:

    • Production
    • Staging
    • Development
    • Test
  6. Optional: Add the following details as required for Developer Owners, Operator Owners, and Business Owners. Note that you must enter the owner's email address if you add a display name.

    1. Enter an owner's display name.
    2. Enter the owner's email address. This value must have the format username@yourdomain, for example, 222larabrown@gmail.com.
  7. Repeat these steps for each developer, operator, and business owner.

  8. Click Save.

gcloud

  1. Update your application with the criticality-type, environment-type, and owner type attributes:

    gcloud apphub applications update APPLICATION_NAME \
      --display-name='APPLICATION_DISPLAY_NAME' \
      --criticality-type='CRITICALITY_LEVEL' \
      --environment-type='ENVIRONMENT' \
      --developer-owners=display-name=DISPLAY-NAME-DEVELOPER,email=EMAIL-DEVELOPER \
      --operator-owners=display-name=DISPLAY-NAME-OPERATOR,email=EMAIL-OPERATOR \
      --business-owners=display-name=DISPLAY-NAME-BUSINESS,email=EMAIL-BUSINESS \
      --project=HOST_PROJECT_ID \
      --location=REGION
    

    Replace the following:

    • APPLICATION_DISPLAY_NAME: the display name of your application.
    • CRITICALITY_LEVEL: indicates how critical an application, service, or workload is to your business operations. Provide one of the following values:
      • MISSION_CRITICAL
      • HIGH
      • MEDIUM
      • LOW
    • ENVIRONMENT: indicates the stages of the software lifecycle. Provide one of the following values:
      • PRODUCTION
      • STAGING
      • DEVELOPMENT
      • TEST
    • DISPLAY-NAME-DEVELOPER, DISPLAY-NAME-OPERATOR, and DISPLAY-NAME-BUSINESS: display names of the developer, operator, and business owners, respectively.
    • EMAIL-NAME-DEVELOPER, EMAIL-NAME-OPERATOR, and EMAIL-NAME-BUSINESS: email addresses of the developer, operator, and business owners, respectively. These values must have the format username@yourdomain, for example, 222larabrown@gmail.com.
  2. List the applications where the attribute environment-type has the value PRODUCTION.

    gcloud apphub applications list \
        --filter='attributes.environment.type=PRODUCTION' \
        --project=HOST_PROJECT_ID \
        --location=REGION
    

    The output is similar to the following:

    ID                DISPLAY_NAME              CREATE_TIME
    APPLICATION_NAME  APPLICATION_DISPLAY_NAME  2023-10-31T18:33:48
    

Register services and workloads

When you register infrastructure services and workloads to an application, the services and workloads get registered as App Hub resources. Use a global application (Preview) to register resources that are global or spread across multiple regions. Use a regional application to register resources from the same region as the application. If you are using the placeholders to create the application with gcloud CLI, the services and workloads in the three service projects are as follows:

  • Service Project 1 has two infrastructure resources, Service 1 and Service 2.
  • Service Project 2 has three infrastructure resources, Service 3, Workload 1, and Workload 2.
  • Service Project 3 has three infrastructure resources, Service 4, Workload 3, and Workload 4.

Console

  1. In the Google Cloud console, go to the App Hub Applications page.

    Go to Applications

  2. Click the name of your application. The Services and workloads tab is displayed with a list of registered services and workloads that are in your service projects.

  3. For each service or workload you want to register, do the following:

    1. On the Services and workloads tab, click Register service/workload.
    2. On the Register service or workload page, in the Select resource pane, click Browse to select the service or workload as a Resource.
    3. In the Select resource pane, choose a service or workload and click Select.
    4. In the Select resource pane, enter a Name for the service or workload and click Continue.
    5. Optionally, in the Add attributes pane, add more details for the service or workload in the fields that follow. For more information, in this document, see Update an existing App Hub application. Note that you can select values for Criticality and Environment fields that are different from the values you set when you create the application.
    6. Click Continue.
    7. Optionally, in the Add owners section, add more details about the owners of the service or workload in the fields that follow. For more information, in this document, see Update an existing App Hub application.
    8. Click Register.

The Services and workloads tab displays the registered service or workload. For more information on the registration statuses, see the properties and attributes of App Hub.

gcloud

  1. Add an individual with App Hub Editor permissions.

    gcloud projects add-iam-policy-binding HOST_PROJECT_ID \
      --member='user:APP_HUB_EDITOR' \
      --role='roles/apphub.editor'
    

    Replace APP_HUB_EDITOR with the user who has the App Hub Editor role in the host project. This value has the format username@yourdomain, for example, robert.smith@example.com.

  2. List discovered workloads from service project 2, which is attached to the host project. This command returns workloads that are available to be registered to an application.

    gcloud apphub discovered-workloads list \
      --filter='workload_properties.gcp_project=projects/SERVICE_PROJECT_2' \
      --project=HOST_PROJECT_ID \
      --location=REGION
    

    The output is similar to the following, which includes unregistered MIGs:

    ID                           WORKLOAD_REFERENCE                                                                                                      WORKLOAD_PROPERTIES
    [DISCOVERED_WORKLOAD_ID_1]   {'uri': '//compute.googleapis.com/projects/[SERVICE_PROJECT_2_NUMBER]/regions/REGION/instanceGroups/testing-mig-1'}     {'gcpProject': 'projects/SERVICE_PROJECT_2', 'location': 'REGION'}
    [DISCOVERED_WORKLOAD_ID_2]   {'uri': '//compute.googleapis.com/projects/[SERVICE_PROJECT_2_NUMBER]/regions/REGION/instanceGroups/testing-mig-2'}     {'gcpProject': 'projects/SERVICE_PROJECT_2', 'location': 'REGION'}
    

    Copy the workload ID from the output to use in the next step.

  3. Register a workload from the previous step to your application.

    gcloud apphub applications workloads create WORKLOAD_NAME \
      --discovered-workload='projects/HOST_PROJECT_ID/locations/REGION/discoveredWorkloads/DISCOVERED_WORKLOAD_ID_2' \
      --display-name='mywebserver-deployment1' \
      --application=APPLICATION_NAME \
      --project=HOST_PROJECT_ID \
      --location=REGION
    

    Replace the following:

    • WORKLOAD_NAME: a name to register the workload as.
    • DISCOVERED_WORKLOAD_ID_2: the workload ID from the output of the previous step.
  4. Repeat the previous two steps to filter and register the workloads you want from Service Project 3.

  5. Optional: You can update the workloads with criticality-type, environment-type, and owner attributes.

    gcloud apphub applications workloads update WORKLOAD_NAME \
      --application=APPLICATION_NAME \
      --criticality-type='CRITICALITY_LEVEL' \
      --environment-type='ENVIRONMENT' \
      --developer-owners=display-name=DISPLAY-NAME-DEVELOPER,email=EMAIL-DEVELOPER \
      --operator-owners=display-name=DISPLAY-NAME-OPERATOR,email=EMAIL-OPERATOR \
      --business-owners=display-name=DISPLAY-NAME-BUSINESS,email=EMAIL-BUSINESS \
      --project=HOST_PROJECT_ID \
      --location=REGION
    

    Note that you must provide one of the specified values for criticality-type and environment-type but the value can be different from the values you set when you create the application.

  6. List registered workloads in the application.

    gcloud apphub applications workloads list \
      --application=APPLICATION_NAME \
      --project=HOST_PROJECT_ID \
      --location=REGION
    

    The output is similar to the following:

    ID                DISPLAY_NAME                 WORKLOAD_REFERENCE                                                                                                    CREATE_TIME
    WORKLOAD_NAME     mywebserver-deployment1      {'uri': '//compute.googleapis.com/projects/[SERVICE_PROJECT_2_NUMBER]/regions/REGION/instanceGroups/testing-mig-2'}   2023-10-31T18:34:23
    

    Registered, but detached workloads are denoted by an empty value in the WORKLOAD_REFERENCE field. For more information on the registration statuses, see the properties and attributes of App Hub.

  7. List discovered services with forwarding rules in the Service Project 1 that is attached to host project. This command returns services that are available to be registered to an application.

    gcloud apphub discovered-services list \
      --filter='service_properties.gcp_project=projects/SERVICE_PROJECT_1 AND service_reference.uri~"forwardingRules"' \
      --project=HOST_PROJECT_ID \
      --location=REGION
    

    The output is similar to the following:

    ID                           SERVICE_REFERENCE                                                                                                                    SERVICE_PROPERTIES
    [DISCOVERED_SERVICE_ID_1]    {'uri': '//compute.googleapis.com/projects/[SERVICE_PROJECT_1_NUMBER]/regions/REGION/forwardingRules/testing-forwarding-rule-1'}     {'gcpProject': 'projects/SERVICE_PROJECT_1', 'location': 'REGION'}
    [DISCOVERED_SERVICE_ID_2]    {'uri': '//compute.googleapis.com/projects/[SERVICE_PROJECT_1_NUMBER]/regions/REGION/forwardingRules/testing-forwarding-rule-2'}     {'gcpProject': 'projects/SERVICE_PROJECT_1', 'location': 'REGION'}
    

    Copy the service ID, DISCOVERED_SERVICE_ID_2 from the output to use in the next step.

  8. Register the forwarding rule, testing-forwarding-rule-2 in service project 1 as a service.

    gcloud apphub applications services create SERVICE_NAME \
      --discovered-service='projects/HOST_PROJECT_ID/locations/REGION/discoveredServices/DISCOVERED_SERVICE_ID_2' \
      --display-name='mywebserver-service1' \
      --application=APPLICATION_NAME \
      --project=HOST_PROJECT_ID \
      --location=REGION
    

    Replace the following:

    • SERVICE_NAME: a name to register the service as.
    • DISCOVERED_SERVICE_ID_2: the service ID from the output of the previous step.
  9. Repeat the previous steps that list services, filter those services, and register the services in service projects 1, 2, and 3.

  10. Update a service with the criticality-type attribute and the environment-type attribute.

    gcloud apphub applications services update SERVICE_NAME \
      --criticality-type='CRITICALITY_LEVEL' \
      --environment-type='ENVIRONMENT' \
      --application=APPLICATION_NAME \
      --project=HOST_PROJECT_ID  \
      --location=REGION
    
  11. List registered services in the APPLICATION_NAME application and HOST_PROJECT_ID host project.

    gcloud apphub applications services list \
      --application=APPLICATION_NAME \
      --project=HOST_PROJECT_ID \
      --location=REGION
    

    The output is similar to the following for each service:

    ID                DISPLAY_NAME                 SERVICE_REFERENCE                                                                                                                  CREATE_TIME
    SERVICE_NAME      mywebserver-service1         {'uri': '//compute.googleapis.com/projects/[SERVICE_PROJECT_1_NUMBER]/regions/REGION/forwardingRules/testing-forwarding-rule-2'}   2023-11-01T21:38:08
    

    Registered, but detached services are denoted by a empty value in the SERVICE_REFERENCE field.

  12. Filter the services in the APPLICATION_NAME application and HOST_PROJECT_ID host project to those where the environment-type attribute is set to PRODUCTION.

    gcloud apphub applications services list \
      --filter='attributes.environment.type=PRODUCTION' \
      --application=APPLICATION_NAME \
      --project=HOST_PROJECT_ID \
      --location=REGION
    

The App Hub setup process is complete.

Add or remove service projects

You can modify service project attachments to make different infrastructure resources available to group into an application.

To view the system metrics for applications in your host project, after you add a service project to a host project, add the service projects as resource containers to the host project's metrics scope. For more information, in this document, see Add service projects to the host project's metrics scope. When you remove a service project from a host project, consider removing the service projects as resource containers from the host project's metrics scope (if you had previously opted to view the system metrics of the applications on your host project). For more information, in this document, see the steps to remove the service projects from the metrics scope of the host project.

Console

To add a service project to a host project:

  1. In the Google Cloud console, go to the App Hub Settings page.

    Go to Settings

  2. On the Settings page, click Attach projects.

  3. On the pane that opens, search for projects from the displayed list and select the checkboxes for the projects you want to add as service projects.

  4. Click Select. The Attached Service Project(s) table displays the selected projects as the service projects for the host project.

  5. Click Close.

To remove a service project from a host project:

  1. In the Google Cloud console, go to the App Hub Settings page.

    Go to Settings

  2. On the Settings page, select the checkboxes for any projects you want to remove as service projects.

  3. Click Detach projects. The Attached Service Project(s) table refreshes to display only the projects that remain attached to the host project.

gcloud

To add a service project to a host project:

gcloud apphub service-projects add SERVICE_PROJECT_ID \
   --project=HOST_PROJECT_ID
Replace SERVICE_PROJECT_ID with the name of the service project you want to add to the host project.
To remove a service project from the host project:
gcloud apphub service-projects remove SERVICE_PROJECT_ID \
   --project=HOST_PROJECT_ID

View existing applications, services, and workloads

You can view applications in a project, and list services and workloads in an application.

Console

  • To view applications in a project:

    1. In the Google Cloud console, go to the App Hub Applications page.

      Go to Applications

    2. Optional: To filter the application:

      1. In the Filter field, select a filter such as Criticality.
      2. Select High as the value.
        A list of applications of high criticality that is created on the host project, appears.
  • To list services and workloads:

    Applications

    1. In the Google Cloud console, go to the App Hub Applications page.

      Go to Applications

    2. Click the name of an application. A page with a list of services and workloads registered to your application appears.

    3. Optional: To filter the services or workloads:

      1. In the Filter field, select a filter such as Criticality.
      2. Select High as the value.
        A list of services and workloads of high criticality that is registered to the application, appears.

    Services and Workloads

    1. In the Google Cloud console, go to the App Hub Services and Workloads page.

      Go to Services and Workloads

    2. In the Region list, select the regions from where you'd like to view the services and workloads. For example, select us-east1.
      The Services and Workloads page displays all the services and workloads from the attached service projects associated with us-east1.

    3. Optional: To filter the services or workloads:

      1. In the Filter field, select a filter such as Environment.
      2. Select Production as the value.
        A list of services and workloads in the production environment that is registered to an application, appears.

gcloud

  • To view applications in a project:

    gcloud apphub applications list \
      --project=HOST_PROJECT_ID \
      --location=REGION
    
  • To list registered services in an application:

    gcloud apphub applications services list \
      --application=APPLICATION_NAME \
      --project=HOST_PROJECT_ID \
      --location=REGION
    
  • To list registered workloads in an application:

    gcloud apphub applications workloads list \
      --application=APPLICATION_NAME \
      --project=HOST_PROJECT_ID \
      --location=REGION
    
  • Optional: To filter the resources based on variable attributes, add a filter command flag to the preceding commands. For example, to list all registered workloads where the criticality-type attribute is set to HIGH:

    gcloud apphub applications workloads list \
      --application=APPLICATION_NAME \
      --filter='attributes.criticality.type=HIGH' \
      --project=HOST_PROJECT_ID \
      --location=REGION
    

    For more information on the attributes that you can filter with, on this page, see Update an existing App Hub application.

Optional: View application metrics

You can view the system metrics for the applications created in your App Hub host project. These metrics correspond to the golden signals—traffic, errors, latency, and saturation—that help monitor the performance and health of the application.

  1. In the Google Cloud console, go to the App Hub Applications page.

    Go to Applications

  2. Click the name of an application.

    The Services and workloads tab is displayed with the metadata of services and workloads registered to your application.

  3. Optional: To change the time period for which the metrics display, use the time-range selector. The default time range is 1 hour.

  4. To view the system metrics of registered services and workloads, click bar_chart Metrics.

    A table is displayed with the following golden signals:

    • Traffic: Incoming request rates on the resource over the selected time period.
    • Server error rate: Average percentage of incoming requests that generate 5xx series HTTP error codes over the selected time period.
    • P95 latency: 95th percentile of latency for a service request aggregated over the selected time period, in milliseconds.
    • CPU utilization: The average percentage of CPU utilization for a workload, aggregated over the specified time period. Values are typically numbers between 0.0 and 100.0, but may exceed 100.0.
    • Memory utilization: The average percentage of memory utilization for a workload, aggregated over the specified time period.

Optional: Explore metrics using charts

To chart metrics for your App Hub projects, use the Metrics Explorer. You can restrict which data is charted by applying filters, which are based on labels. For more information, see Create charts with Metrics Explorer.

The following App Hub system metadata labels are available for you to filter (Preview):

  • apphub_application_host_project_id
  • apphub_application_id
  • apphub_application_location
  • apphub_workload_criticality_type
  • apphub_workload_environment_type
  • apphub_workload_id

To visualize the App Hub metadata labels on a chart, follow these instructions. You can follow the same procedure for the other system metadata labels and App Hub metrics.

  1. In the Google Cloud console, go to the  Metrics explorer page:

    Go to Metrics explorer

    If you use the search bar to find this page, then select the result whose subheading is Monitoring.

  2. In the Metric element, expand the Select a metric menu, enter VM Instance in the filter bar, and then use the submenus to select a specific resource type and metric:
    1. In the Active resources menu, select VM Instance.
    2. In the Active metric categories menu, select Popular metrics.
    3. In the Active metrics menu, select CPU utilization.
    4. Click Apply.
    The fully qualified name for this metric is compute.googleapis.com/instance/cpu/utilization.
  3. Configure how the data is viewed. To display only the metrics for a specific label, follow these steps:
    1. In the Filter element, click Add filter, and then select apphub_application_id. For the value, enter a specific App Hub name.
    2. In the Aggregation entry, set the first menu to Unaggregated.

    For more information about configuring a chart, see Select metrics when using Metrics Explorer.

Clean up

Clean up an existing application and remove a service project attachment from the host project to remove resources associated with the project. This stops the automatic discovery of resources in the service project.

To do so, you must first delete workloads and services registered to the application.

Console

  1. In the Google Cloud console, go to the App Hub Applications page.

    Go to Applications

  2. Click the name of an application. A list of services and workloads registered to the application appears.

  3. Unregister a service or a workload.

    1. On the Services and workloads tab, from the Registered services and workloads section, click the name of the service or workload you'd like to unregister.
    2. On the Details tab, click Unregister to update the service or workload as a Discovered resource.
      On the Services and workloads tab, an alert notifies that the workload is unregistered.
    3. Repeat these instructions for each service and workload.
  4. Go to the App Hub Applications page.

    Go to Applications

  5. Click the name of an application.

  6. On the page with the application details, click Delete.

  7. To remove the service projects from your host project, see the Add or remove service projects section of this document.

  8. To remove the service projects from the metrics scope of the host project:

    1. In the Google Cloud console, go to the  Settings page:

      Go to Settings

      If you use the search bar to find this page, then select the result whose subheading is Monitoring.

    2. Select Metric Scope.
    3. In the Google Cloud Projects pane, click Remove project, and then complete the confirmation dialog.

gcloud

  1. List the registered workloads in the application:

    gcloud apphub applications workloads list \
      --application=APPLICATION_NAME --project=HOST_PROJECT_ID \
      --location=REGION
    
  2. Unregister the workload from the application:

    gcloud apphub applications workloads delete WORKLOAD_NAME \
      --application=APPLICATION_NAME \
      --project=HOST_PROJECT_ID \
      --location=REGION
    

    The workload is now a discovered workload that can be registered to the application.

  3. Repeat the previous command to delete the remaining registered workloads from the application.

  4. List the registered services in the application:

    gcloud apphub applications services list \
      --application=APPLICATION_NAME \
      --project=HOST_PROJECT_ID \
      --location=REGION
    
  5. Unregister the service from the application:

    gcloud apphub applications services delete SERVICE_NAME \
      --application=APPLICATION_NAME \
      --project=HOST_PROJECT_ID \
      --location=REGION
    

    The service is now a discovered service that can be registered to the application.

  6. Repeat the previous command to unregister the remaining registered services from the application.

  7. Delete the application:

    gcloud apphub applications delete APPLICATION_NAME \
      --project=HOST_PROJECT_ID \
      --location=REGION
    
  8. Remove a service project from the host project:

    gcloud apphub service-projects remove SERVICE_PROJECT_ID \
      --project=HOST_PROJECT_ID
    
  9. Repeat the previous command to remove all service projects from the host project.

  10. Remove the service projects from the metrics scope of the host project (Preview):

    gcloud beta monitoring metrics-scopes delete projects/SERVICE_PROJECT_ID \
      --project=HOST_PROJECT_ID
    
  11. Repeat the previous command to remove all service projects from the metrics scope host project.

What's next