使用倉儲儲存空間建立臉部模糊處理應用程式


Vertex AI Vision 是一項 AI 輔助平台,可供您擷取、分析及儲存影片 資料。Vertex AI Vision 可讓您建構及部署 AI 應用程式。您可以運用 Vertex AI Vision 與其他產品元件的整合功能,建構端對端 Vertex AI Vision 解決方案。

如要開始使用 Vertex AI Vision 平台導入解決方案,請先瞭解下列 Vertex AI Vision 概念和元件:

  • 串流:代表解決方案中的影片串流層。串流來源可以是即時影片 (例如 IP 攝影機) 或影片檔案 (例如 MP4 檔案)。

  • 應用程式:啟用串流與 AI 處理器之間的連線,對影片執行機器學習作業。舉例來說,您可以將攝影機串流連結至 AI 模型,計算攝影機前方經過的人數。

  • 媒體倉儲:將串流擷取的影片儲存至Google Cloud 儲存空間。將資料儲存至這個目的地後,您就能查詢分析輸出內容,以及從擷取的串流資料中使用的 AI 處理器取得中繼資料。

目標

本教學課程將說明如何執行下列操作:

  • 建立資料輸入串流資源。
  • 開始將影片資料串流至這個串流資源。
  • 建立空白應用程式。
  • 在應用程式中新增節點,即可串流、修改及儲存資料。
  • 部署應用程式以供使用。
  • 在 Google Cloud 控制台中查看處理後的資料輸出內容。

開始本教學課程前,您必須擁有串流影片資源,才能將資料傳送至 Vertex AI Vision 應用程式。這項資源可以是本機影片或 RTSP 動態饋給。這項影片資料必須包含人臉,範例應用程式才能模糊處理。

費用

在本文件中,您會使用 Google Cloud的下列計費元件:

  • Vertex AI Vision (Streams - Data ingested, Streams - Data consumed, Models - Person / face blur, Warehouse - Video storage)

如要根據預測用量估算費用,請使用 Pricing Calculator

初次使用 Google Cloud 的使用者可能符合免費試用資格。

完成本文所述工作後,您可以刪除已建立的資源,避免繼續計費。詳情請參閱清除所用資源一節。

事前準備

  1. 取得串流影片來源的位置,可以是本機 (例如 ./sample_video.mp4),也可以是即時 RTSP 動態饋給的 IP 位址 (例如 rtsp://192.168.1.180:540)。建立串流資源後,您需要這項資訊才能開始將資料擷取至串流中。
  2. Sign in to your Google Cloud account. If you're new to Google Cloud, create an account to evaluate how our products perform in real-world scenarios. New customers also get $300 in free credits to run, test, and deploy workloads.
  3. In the Google Cloud console, on the project selector page, select or create a Google Cloud project.

    Go to project selector

  4. Make sure that billing is enabled for your Google Cloud project.

  5. Enable the Vision AI API.

    Enable the API

  6. Create a service account:

    1. In the Google Cloud console, go to the Create service account page.

      Go to Create service account
    2. Select your project.
    3. In the Service account name field, enter a name. The Google Cloud console fills in the Service account ID field based on this name.

      In the Service account description field, enter a description. For example, Service account for quickstart.

    4. Click Create and continue.
    5. Grant the Vision AI > Vision AI Editor role to the service account.

      To grant the role, find the Select a role list, then select Vision AI > Vision AI Editor.

    6. Click Continue.
    7. Click Done to finish creating the service account.

      Do not close your browser window. You will use it in the next step.

  7. Create a service account key:

    1. In the Google Cloud console, click the email address for the service account that you created.
    2. Click Keys.
    3. Click Add key, and then click Create new key.
    4. Click Create. A JSON key file is downloaded to your computer.
    5. Click Close.
  8. Set the environment variable GOOGLE_APPLICATION_CREDENTIALS to the path of the JSON file that contains your credentials. This variable applies only to your current shell session, so if you open a new session, set the variable again.

  9. Install the Google Cloud CLI.

  10. If you're using an external identity provider (IdP), you must first sign in to the gcloud CLI with your federated identity.

  11. To initialize the gcloud CLI, run the following command:

    gcloud init
  12. In the Google Cloud console, on the project selector page, select or create a Google Cloud project.

    Go to project selector

  13. Make sure that billing is enabled for your Google Cloud project.

  14. Enable the Vision AI API.

    Enable the API

  15. Create a service account:

    1. In the Google Cloud console, go to the Create service account page.

      Go to Create service account
    2. Select your project.
    3. In the Service account name field, enter a name. The Google Cloud console fills in the Service account ID field based on this name.

      In the Service account description field, enter a description. For example, Service account for quickstart.

    4. Click Create and continue.
    5. Grant the Vision AI > Vision AI Editor role to the service account.

      To grant the role, find the Select a role list, then select Vision AI > Vision AI Editor.

    6. Click Continue.
    7. Click Done to finish creating the service account.

      Do not close your browser window. You will use it in the next step.

  16. Create a service account key:

    1. In the Google Cloud console, click the email address for the service account that you created.
    2. Click Keys.
    3. Click Add key, and then click Create new key.
    4. Click Create. A JSON key file is downloaded to your computer.
    5. Click Close.
  17. Set the environment variable GOOGLE_APPLICATION_CREDENTIALS to the path of the JSON file that contains your credentials. This variable applies only to your current shell session, so if you open a new session, set the variable again.

  18. Install the Google Cloud CLI.

  19. If you're using an external identity provider (IdP), you must first sign in to the gcloud CLI with your federated identity.

  20. To initialize the gcloud CLI, run the following command:

    gcloud init
  21. 安裝 vaictl 工具,將資料擷取至串流 (作業系統:Debian GNU/Linux,CPU 架構:x86_64):
    1. 下載必要套件:
      wget https://github.com/google/visionai/releases/download/v0.0.5/visionai_0.0-5_amd64.deb
    2. 下載套件後,請在下載檔案的目錄中執行下列指令:
      sudo apt install ./visionai_0.0-5_amd64.deb
    3. 驗證安裝:
      vaictl --help

建立串流

如要建立串流影片分析應用程式,請先建立並註冊串流資源。串流是從使用者接收影片資料的資源,因此使用 Vertex AI Vision 建構任何情境時,都必須使用串流。

主控台

如要在 Google Cloud 控制台中建立新串流,請按照下列步驟操作。

  1. 開啟 Vertex AI Vision 資訊主頁的「Streams」(串流) 分頁。

    前往「串流」分頁

  2. 按一下「註冊」

  3. 輸入 input-stream 做為串流名稱,然後選取要建立串流的區域。

  4. 按一下「註冊」即可建立一或多個串流。

    在 UI 中註冊串流選項

將影片擷取至串流

建立串流資源後,您可以使用 vaictl 指令列工具將影片資料傳送至串流。

IP 攝影機

如果使用即時 IP 攝影機進行測試,請取得攝影機的 IP 位址。您必須在要求中提供這項資訊,以及其他變數替代項目:

  • PROJECT_ID:您的 Google Cloud 專案 ID。
  • LOCATION_ID:您的位置 ID。例如:us-central1。詳情請參閱「Cloud 服務據點」。
  • RTSP_ADDRESS:即時串流通訊協定 (RTSP) 動態消息的位址。例如:rtsp://192.168.1.180:540

這項指令會將 RTSP 動態饋給傳送至串流。您必須在可直接存取 RTSP 動態饋給的網路中執行這項指令。

vaictl -p PROJECT_ID \
       -l LOCATION_ID \
       -c application-cluster-0 \
       --service-endpoint visionai.googleapis.com \
send rtsp to streams input-stream --rtsp-uri RTSP_ADDRESS
      

如果指令執行成功,您會看到下列輸出內容:

[...]
Waiting for long running operation projects/your-project/locations/us-central1/operations/operation-1651364156981-5dde82db7e4a9-dfb17ca5-1051eb20 ⠙
I20220430 21:16:28.024988 211449 gstvaisink.cc:417] cluster-id=application-cluster-0
I20220430 21:16:28.025032 211449 gstvaisink.cc:418] cluster-endpoint=c8khq35ftg78mn61ef50.us-central1.visionai.goog
I20220430 21:16:28.025040 211449 gstvaisink.cc:419] event-id=ev-1651364114183255223
I20220430 21:16:28.025048 211449 gstvaisink.cc:420] stream-id=input-stream
I20220430 21:16:28.025053 211449 gstvaisink.cc:421] series-id=ev-1651364114183255223--input-stream
I20220430 21:16:28.025060 211449 gstvaisink.cc:422] Sending data

本機影片檔案

你也可以將影片檔案資料傳送至串流,而非即時影片動態消息。如果無法使用 IP 攝影機,這個選項就非常實用。

這個選項與前一個選項的唯一差別,在於 vaictl 指令參數。請改為傳遞本機影片檔案的路徑,而非 IP 攝影機資訊。進行下列變數替換:

  • PROJECT_ID:您的 Google Cloud 專案 ID。
  • LOCATION_ID:您的位置 ID。例如:us-central1更多資訊
  • LOCAL_FILE.EXT:本機影片檔案的檔案名稱。 例如:my-video.mp4
  • --loop 旗標:選用。迴圈檔案資料以模擬串流。

這項指令會將影片檔案串流至串流。如果使用 --loop 旗標,影片會循環播放到串流中,直到您停止指令為止:

vaictl -p PROJECT_ID \
       -l LOCATION_ID \
       -c application-cluster-0 \
       --service-endpoint visionai.googleapis.com \
send video-file to streams 'input-stream' --file-path LOCAL_FILE.EXT --loop

從開始擷取作業到影片顯示在資訊主頁,可能需要約 100 秒。vaictl

串流擷取功能上線後,選取 input-stream 串流,即可在 Vertex AI Vision 資訊主頁的「串流」分頁中查看影片動態饋給。

前往「串流」分頁

使用者介面中串流的即時影像
在控制台中,即時查看影片擷取到串流的狀況。 Google Cloud 影片出處: Tima Miroshnichenko on Pexels (pixelation added).

建立臉部模糊處理應用程式

建立串流並將資料擷取到串流後,即可建立 Vertex AI Vision 應用程式來處理資料。應用程式可視為自動化管道,連結下列項目:

  • 擷取資料:將影片動態饋給擷取至串流。
  • 資料分析:擷取資料後,即可加入 AI 模型。您可以對擷取的影片資訊執行任何電腦視覺作業。
  • 資料儲存:影片動態饋給的兩個版本 (原始串流和 AI 模型處理的串流) 可以儲存在媒體倉儲中。

在 Google Cloud 控制台中,應用程式會以圖表形式呈現。此外,在 Vertex AI Vision 中,應用程式圖表必須至少有兩個節點:影片來源節點 (串流),以及至少一個節點 (處理模型或輸出目的地)。

建立空白應用程式

您必須先建立空白應用程式,才能填入應用程式圖表。

控制台

在 Google Cloud 控制台中建立應用程式。

  1. 開啟 Vertex AI Vision 資訊主頁的「應用程式」分頁。

    前往「應用程式」分頁

  2. 按一下「建立」按鈕。

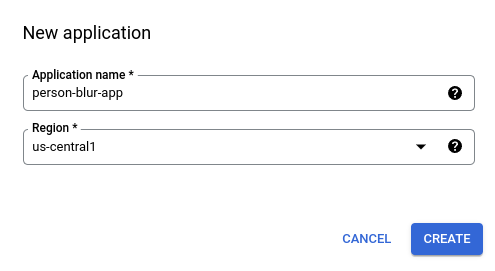
  3. 輸入 person-blur-app 做為應用程式名稱,然後選擇您所在的地區。

  4. 點選「建立」

    在 UI 中建立新應用程式對話方塊

新增應用程式元件節點

建立空白應用程式後,即可將三個節點新增至應用程式圖表:

  1. 擷取節點:已擷取資料的串流資源。
  2. 處理節點:對擷取資料採取動作的個人模糊處理模型。
  3. 儲存節點:儲存處理過的影片,並做為中繼資料儲存空間的媒體倉儲。資料倉儲可針對擷取的影片資料產生分析資訊,並儲存 AI 模型推斷的資料資訊。

控制台

在管理中心將元件節點新增至應用程式。

  1. 開啟 Vertex AI Vision 資訊主頁的「應用程式」分頁。

    前往「應用程式」分頁

  2. person-blur-app 行中,選取「查看圖表」。這會將您導向至處理管道的圖表視覺化畫面。

新增資料匯入節點

  1. 如要新增輸入串流節點,請在側邊選單的「Connectors」(連接器) 區段中選取「Streams」(串流) 選項。

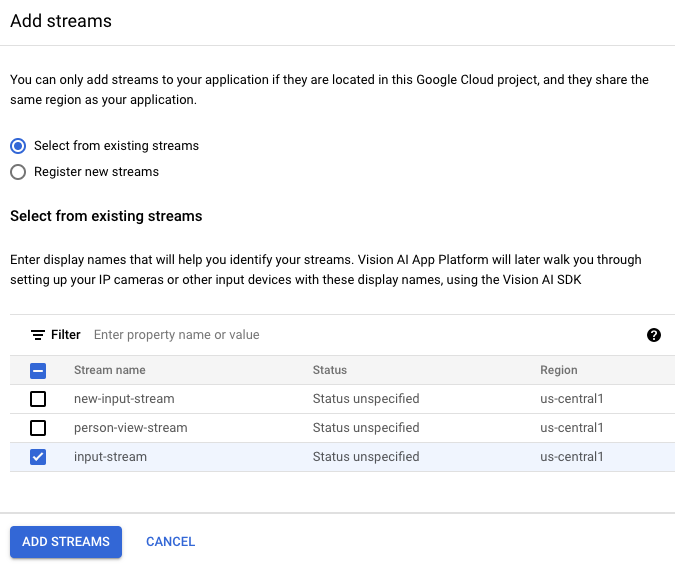
  2. 在隨即開啟的「Stream」(串流) 選單中,選取「Source」(來源) 區段的 「Add Stream」(新增串流)

  3. 在「新增串流」選單中,選擇「從現有串流選取」,然後從串流資源清單中選取 person-blur-app

    在 UI 中新增串流選單

  4. 如要將串流新增至應用程式圖表,請按一下「新增串流」

新增資料處理節點

  1. 如要新增人物模糊處理模型節點,請在側邊選單的「General processors」(一般處理器) 區段中,選取「Person blur」(人物模糊處理) 選項。

  2. 在隨即開啟的「人物模糊處理」選項選單中,保留選取的「完全遮蓋」,然後啟用「僅模糊處理臉部」選項。

    在 UI 中新增臉部模糊處理模型

新增資料儲存節點

  1. 如要新增輸出目的地 (儲存空間) 節點,請在側邊選單的「Connectors」(連接器) 區段中選取「Vertex AI Vision's Media Warehouse」(Vertex AI Vision 的媒體倉儲) 選項。

  2. 在「Vertex AI Vision's Media Warehouse」(Vertex AI Vision 媒體倉儲) 選單中,按一下「Connect warehouse」(連結倉儲)

  3. 在「Connect Warehouse」(連結倉儲) 選單中,選取 「Create new warehouse」(新建倉儲)。將倉儲命名為 person-blur-app,並將 TTL 持續時間保留 14 天。

  4. 如要新增倉儲,請按一下「建立」

    在使用者介面中新增倉庫節點

部署應用程式

使用所有必要元件建構端對端應用程式後,最後一個步驟就是部署應用程式。

控制台

  1. 開啟 Vertex AI Vision 資訊主頁的「應用程式」分頁。

    前往「應用程式」分頁

  2. 在清單中,選取 person-blur-app 應用程式旁邊的「查看圖表」

  3. 在應用程式圖表建構工具頁面中,按一下「部署」按鈕。

  4. 在隨即顯示的確認對話方塊中,選取「Deploy」

    部署作業可能需要幾分鐘才能完成。部署作業完成後,節點旁會顯示綠色勾號。

    使用者介面中已部署的應用程式

查看已處理的輸出資料

主控台

  1. 開啟 Vertex AI Vision 資訊主頁的「倉庫」分頁。

    前往「倉庫」分頁

  2. 在清單中找出 person-blur-output-storage 倉庫,然後按一下「查看資產」

    在 UI 中查看應用程式輸出內容

清除所用資源

如要避免系統向您的 Google Cloud 帳戶收取本教學課程中所用資源的相關費用,請刪除含有該項資源的專案,或者保留專案但刪除個別資源。

刪除專案

  1. In the Google Cloud console, go to the Manage resources page.

    Go to Manage resources

  2. In the project list, select the project that you want to delete, and then click Delete.
  3. In the dialog, type the project ID, and then click Shut down to delete the project.

刪除個別資源

刪除倉庫

  1. In the Google Cloud console, go to the Warehouses page.

    Go to the Warehouses tab

  2. Locate your person-blur-output-storage warehouse.
  3. To delete the warehouse, click Actions, click Delete warehouse, and then follow the instructions.

刪除串流

  1. In the Google Cloud console, go to the Streams page.

    Go to the Streams tab

  2. Locate your input-stream stream.
  3. To delete the stream, click Actions, click Delete stream, and then follow the instructions.

刪除應用程式

  1. In the Google Cloud console, go to the Applications page.

    Go to the Applications tab

  2. Locate your person-blur-app app.
  3. To delete the app, click Actions, click Delete application, and then follow the instructions.

後續步驟