本教學課程將逐步說明 Cloud Service Mesh 的常見應用情境,也就是推出初期測試版本部署作業。
什麼是初期測試部署?
初期測試部署會將一小部分的流量導向新版微服務,然後讓您逐步向全體使用者推出新版本,同時淘汰舊版本。如果這個程序發生錯誤,流量可以切換回舊版。 使用 Cloud Service Mesh 即可設定流量路徑,確保新服務安全上線。
部署 Online Boutique
將
kubectl的目前環境設為部署 Online Boutique 的叢集:gcloud container clusters get-credentials CLUSTER_NAME \ --project=PROJECT_ID \ --zone=CLUSTER_LOCATION為範例應用程式和輸入閘道建立命名空間:
kubectl create namespace onlineboutique標記
onlineboutique命名空間,自動插入 Envoy Proxy。 請按照這篇文章的步驟,啟用自動 Sidecar 插入功能。部署範例應用程式。在本教學課程中,您將部署 Online Boutique,這是一個微服務示範應用程式。
kubectl apply \
-n onlineboutique \
-f https://raw.githubusercontent.com/GoogleCloudPlatform/anthos-service-mesh-samples/main/docs/shared/online-boutique/kubernetes-manifests.yaml
執行下列指令,將
version=v1標籤新增至productcatalog部署作業:kubectl patch deployments/productcatalogservice -p '{"spec":{"template":{"metadata":{"labels":{"version":"v1"}}}}}' \ -n onlineboutique查看您部署的服務:
kubectl get pods -n onlineboutique預期輸出內容:
NAME                                     READY   STATUS    RESTARTS   AGE
adservice-85598d856b-m84m6               2/2     Running   0          2m7s
cartservice-c77f6b866-m67vd              2/2     Running   0          2m8s
checkoutservice-654c47f4b6-hqtqr         2/2     Running   0          2m10s
currencyservice-59bc889674-jhk8z         2/2     Running   0          2m8s
emailservice-5b9fff7cb8-8nqwz            2/2     Running   0          2m10s
frontend-77b88cc7cb-mr4rp                2/2     Running   0          2m9s
loadgenerator-6958f5bc8b-55q7w           2/2     Running   0          2m8s
paymentservice-68dd9755bb-2jmb7          2/2     Running   0          2m9s
productcatalogservice-84f95c95ff-c5kl6   2/2     Running   0          114s
recommendationservice-64dc9dfbc8-xfs2t   2/2     Running   0          2m9s
redis-cart-5b569cd47-cc2qd               2/2     Running   0          2m7s
shippingservice-5488d5b6cb-lfhtt         2/2     Running   0          2m7s
應用程式的所有 Pod 都應已啟動並執行,且
READY欄中會顯示2/2。這表示 Pod 已成功插入 Envoy 補充容器 Proxy。部署
productcatalog第 1 版的VirtualService和DestinationRule:kubectl apply -f destination-vs-v1.yaml -n onlineboutique請注意,資源中只會出現
v1。使用 Ingress 的外部 IP 位址,在瀏覽器中前往應用程式:
kubectl get services -n GATEWAY_NAMESPACE
下一節將帶您瀏覽 Cloud Service Mesh 使用者介面,並說明如何查看指標。
在 Google Cloud 控制台中部署及查看服務
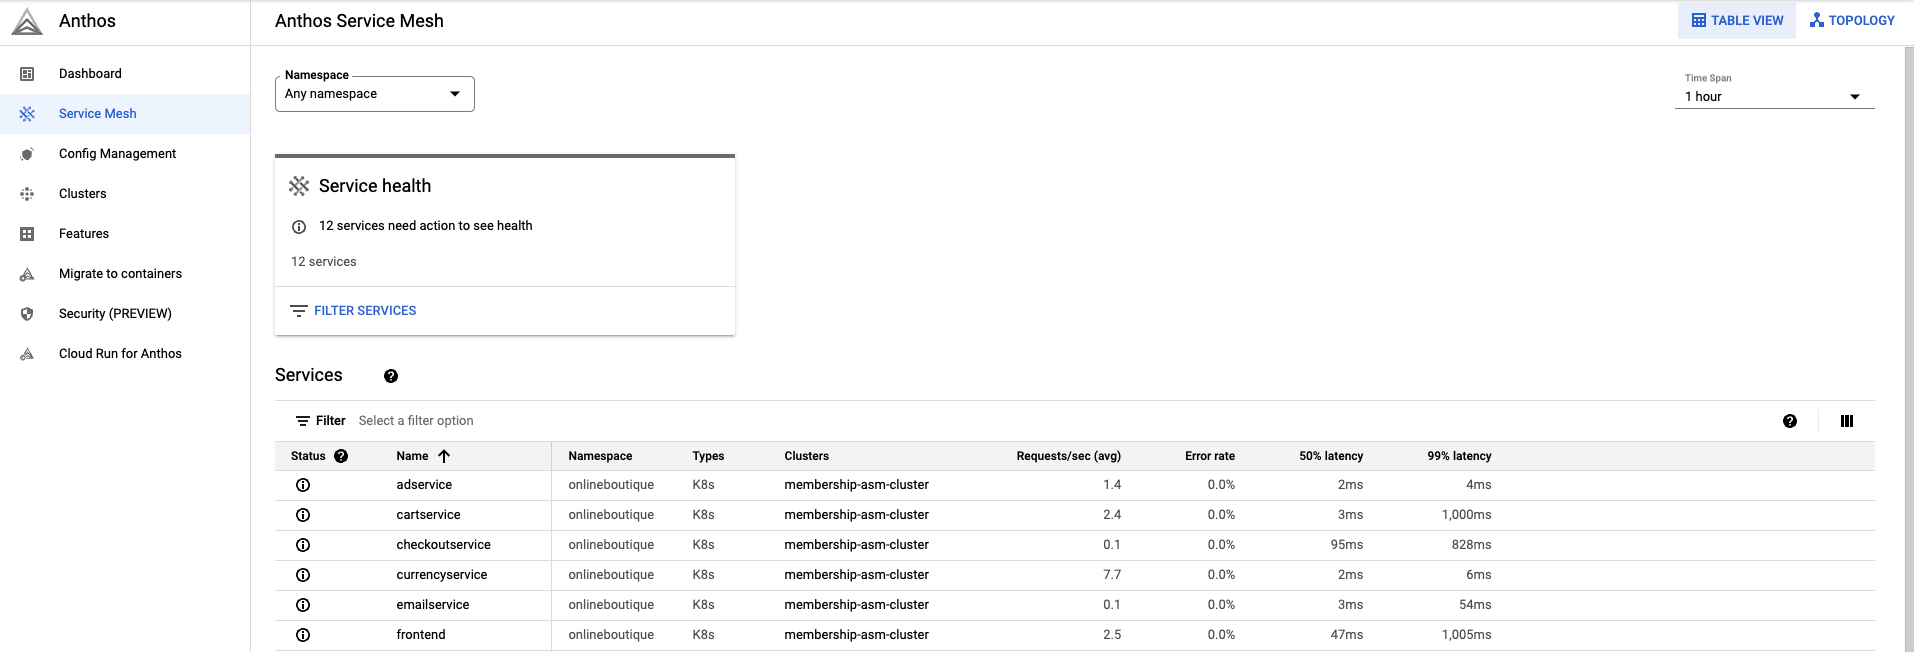
前往 Google Cloud 控制台的「GKE Enterprise Services」(GKE Enterprise 服務) 頁面。
根據預設,您會在「表格」檢視畫面中查看服務。
您可以在「表格總覽」中,一覽所有服務和重要指標。
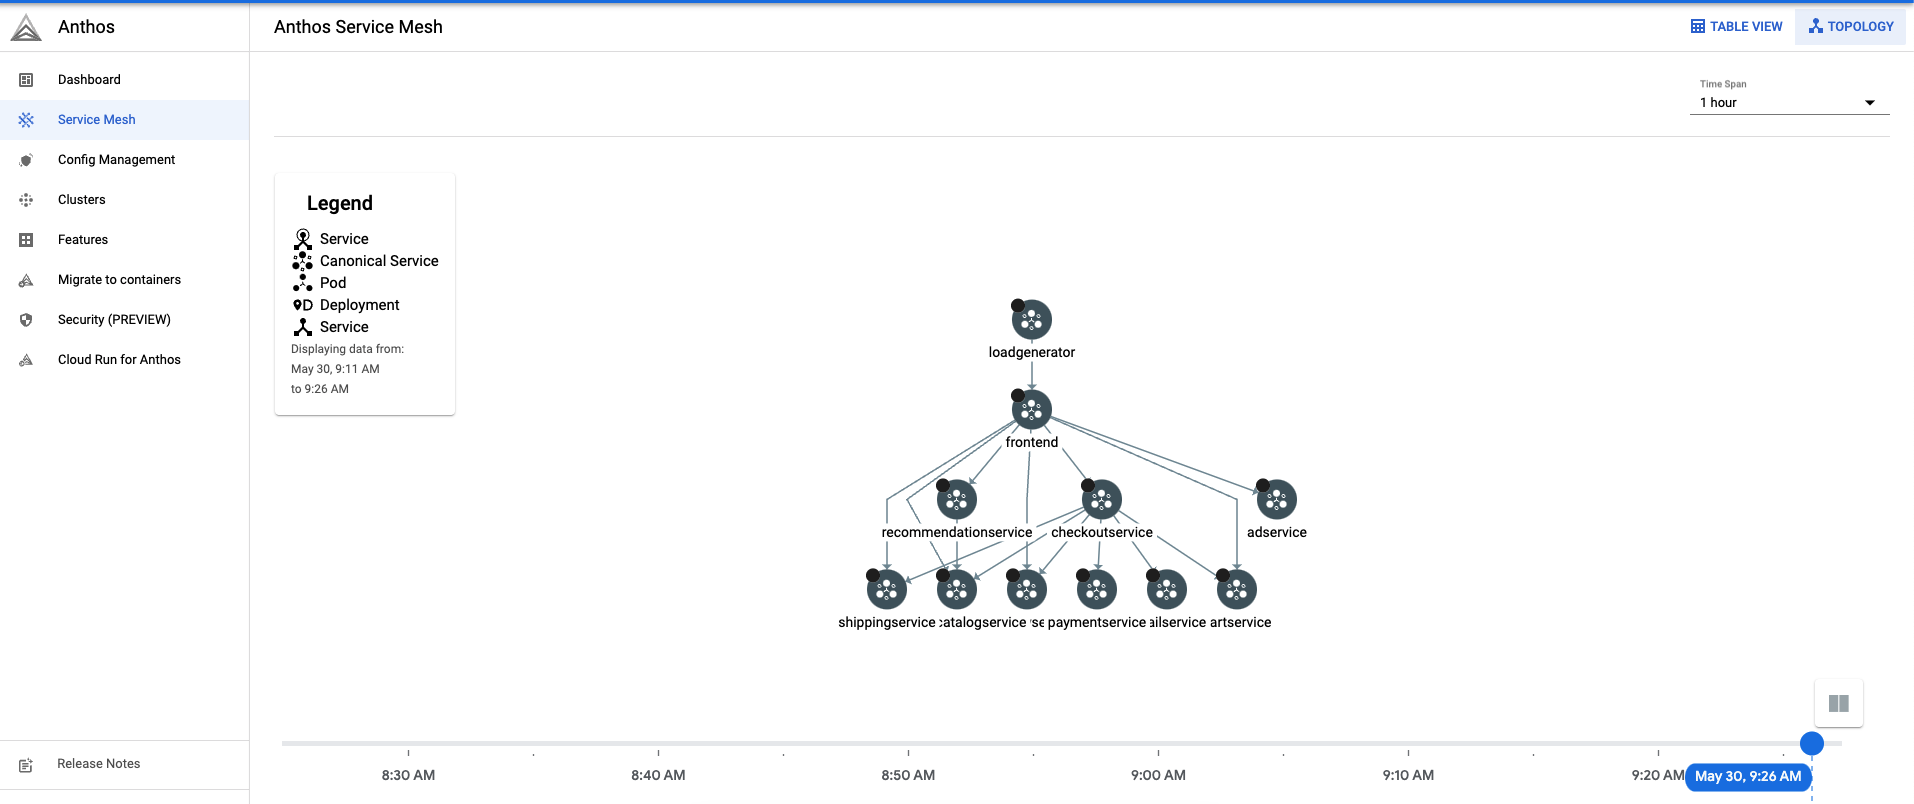
按一下右上方的「拓撲」。 您可以在這裡查看服務,以及服務之間的互動。
您可以展開服務,然後將游標懸停在服務上,查看每項服務每秒的要求數。
返回「表格檢視」。
在「服務表」中,選取
productcatalogservice。系統會將您導向服務總覽頁面。在畫面左側,按一下「流量」。
確保
productcatalogservice的所有傳入流量都會導向工作負載服務。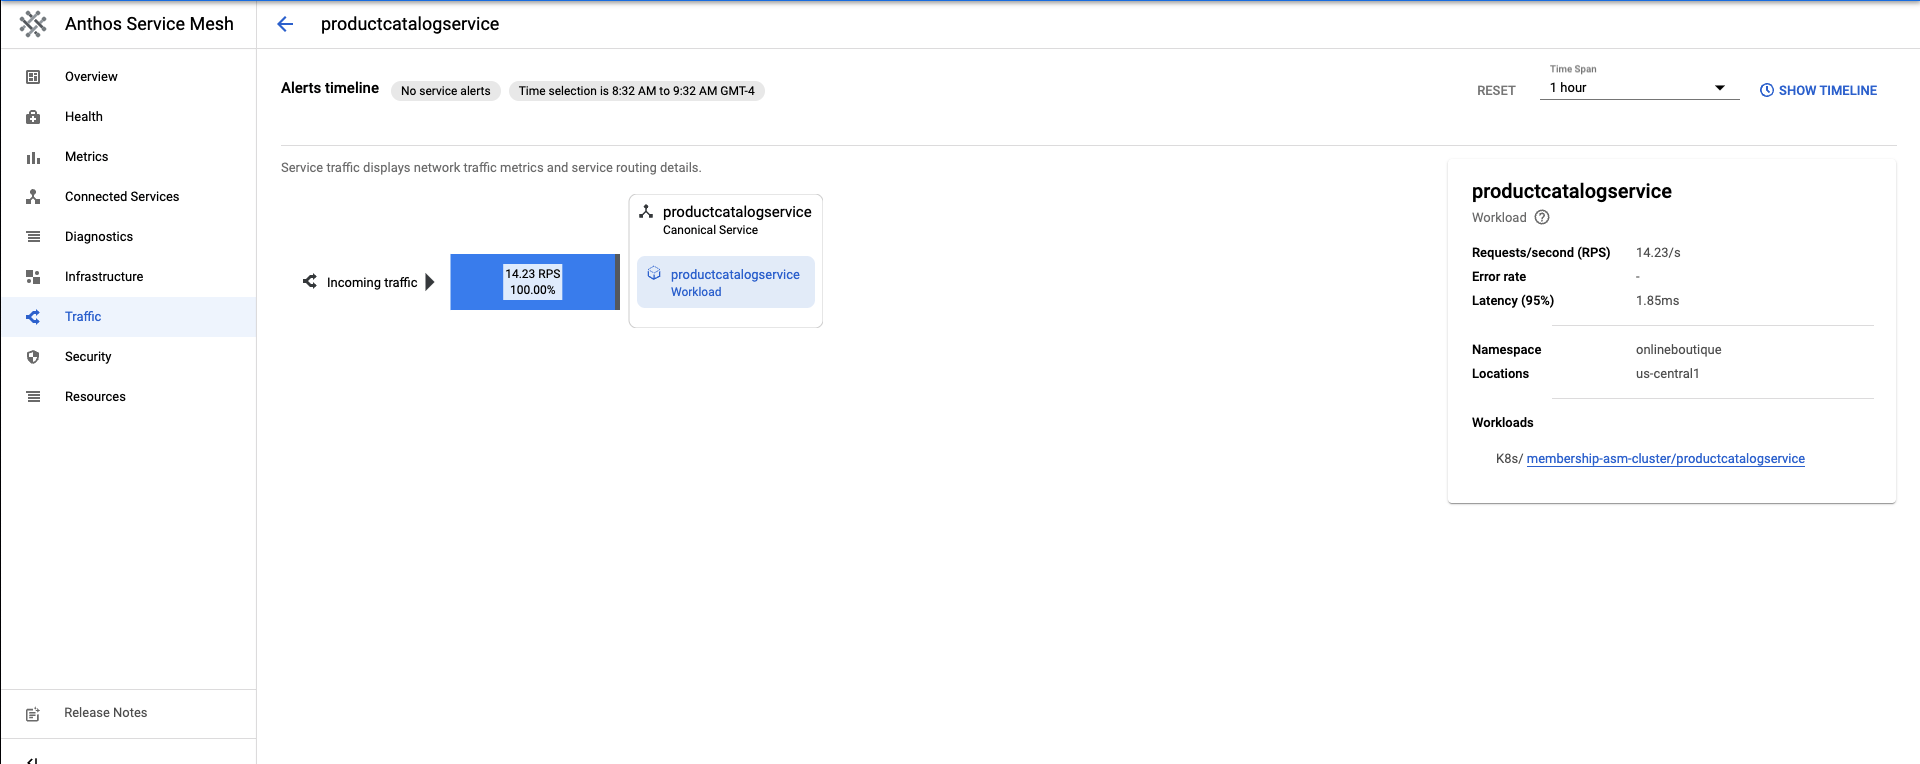
下一個部分將說明如何建立 productcatalog 服務的第 2 版。
部署服務的 v2 版本
在本教學課程中,
productcatalogservice-v2會在含有EXTRA_LATENCY欄位的要求中導入 3 秒延遲。將這項資源套用至
onlineboutique命名空間。kubectl apply -f productcatalog-v2.yaml -n onlineboutique檢查應用程式 Pod。
kubectl get pods -n onlineboutique預期輸出內容:
NAME                                     READY   STATUS    RESTARTS   AGE
adservice-85598d856b-8wqfd                  2/2     Running   0          25h
cartservice-c77f6b866-7jwcr                 2/2     Running   0          25h
checkoutservice-654c47f4b6-n8c6x            2/2     Running   0          25h
currencyservice-59bc889674-l5xw2            2/2     Running   0          25h
emailservice-5b9fff7cb8-jjr89               2/2     Running   0          25h
frontend-77b88cc7cb-bwtk4                   2/2     Running   0          25h
loadgenerator-6958f5bc8b-lqmnw              2/2     Running   0          25h
paymentservice-68dd9755bb-dckrj             2/2     Running   0          25h
productcatalogservice-84f95c95ff-ddhjv      2/2     Running   0          25h
productcatalogservice-v2-6df4cf5475-9lwjb   2/2     Running   0          8s
recommendationservice-64dc9dfbc8-7s7cx      2/2     Running   0          25h
redis-cart-5b569cd47-vw7lw                  2/2     Running   0          25h
shippingservice-5488d5b6cb-dj5gd            2/2     Running   0          25h
請注意,現在列出了兩個
productcatalogservices。DestinationRule用於指定服務的子集。在這個情境中,productcatalogservice的 v1 和 v2 各有一個子集。請注意
labels欄位。流量由VirtualService路由後,系統會區分productcatalogservice的版本。套用
DestinationRule:kubectl apply -f destination-v1-v2.yaml -n onlineboutique
在 v1 和 v2 之間拆分流量
VirtualService是將一小部分流量導向productcatalogservicev2 的方式。子集欄位會指出版本,權重欄位則會指出流量拆分的百分比。75% 的流量會導向 productcatalog 的 v1,25% 的流量則會導向 v2。
套用
VirtualService:kubectl apply -f vs-split-traffic.yaml -n onlineboutique
如果您造訪叢集 Ingress 的 EXTERNAL_IP,應該會發現前端載入速度會定期變慢。
下一節將說明 GKE Enterprise Google Cloud 控制台中的流量分割。
在 Google Cloud 控制台中觀察流量分配
返回 Google Cloud 控制台,然後前往 GKE Enterprise 服務頁面 前往 GKE Enterprise 服務
按一下右上方的「拓撲」。
擴展
productcatalogservice工作負載。您會看到productcatalogservice和productcatalogservice-v2部署作業。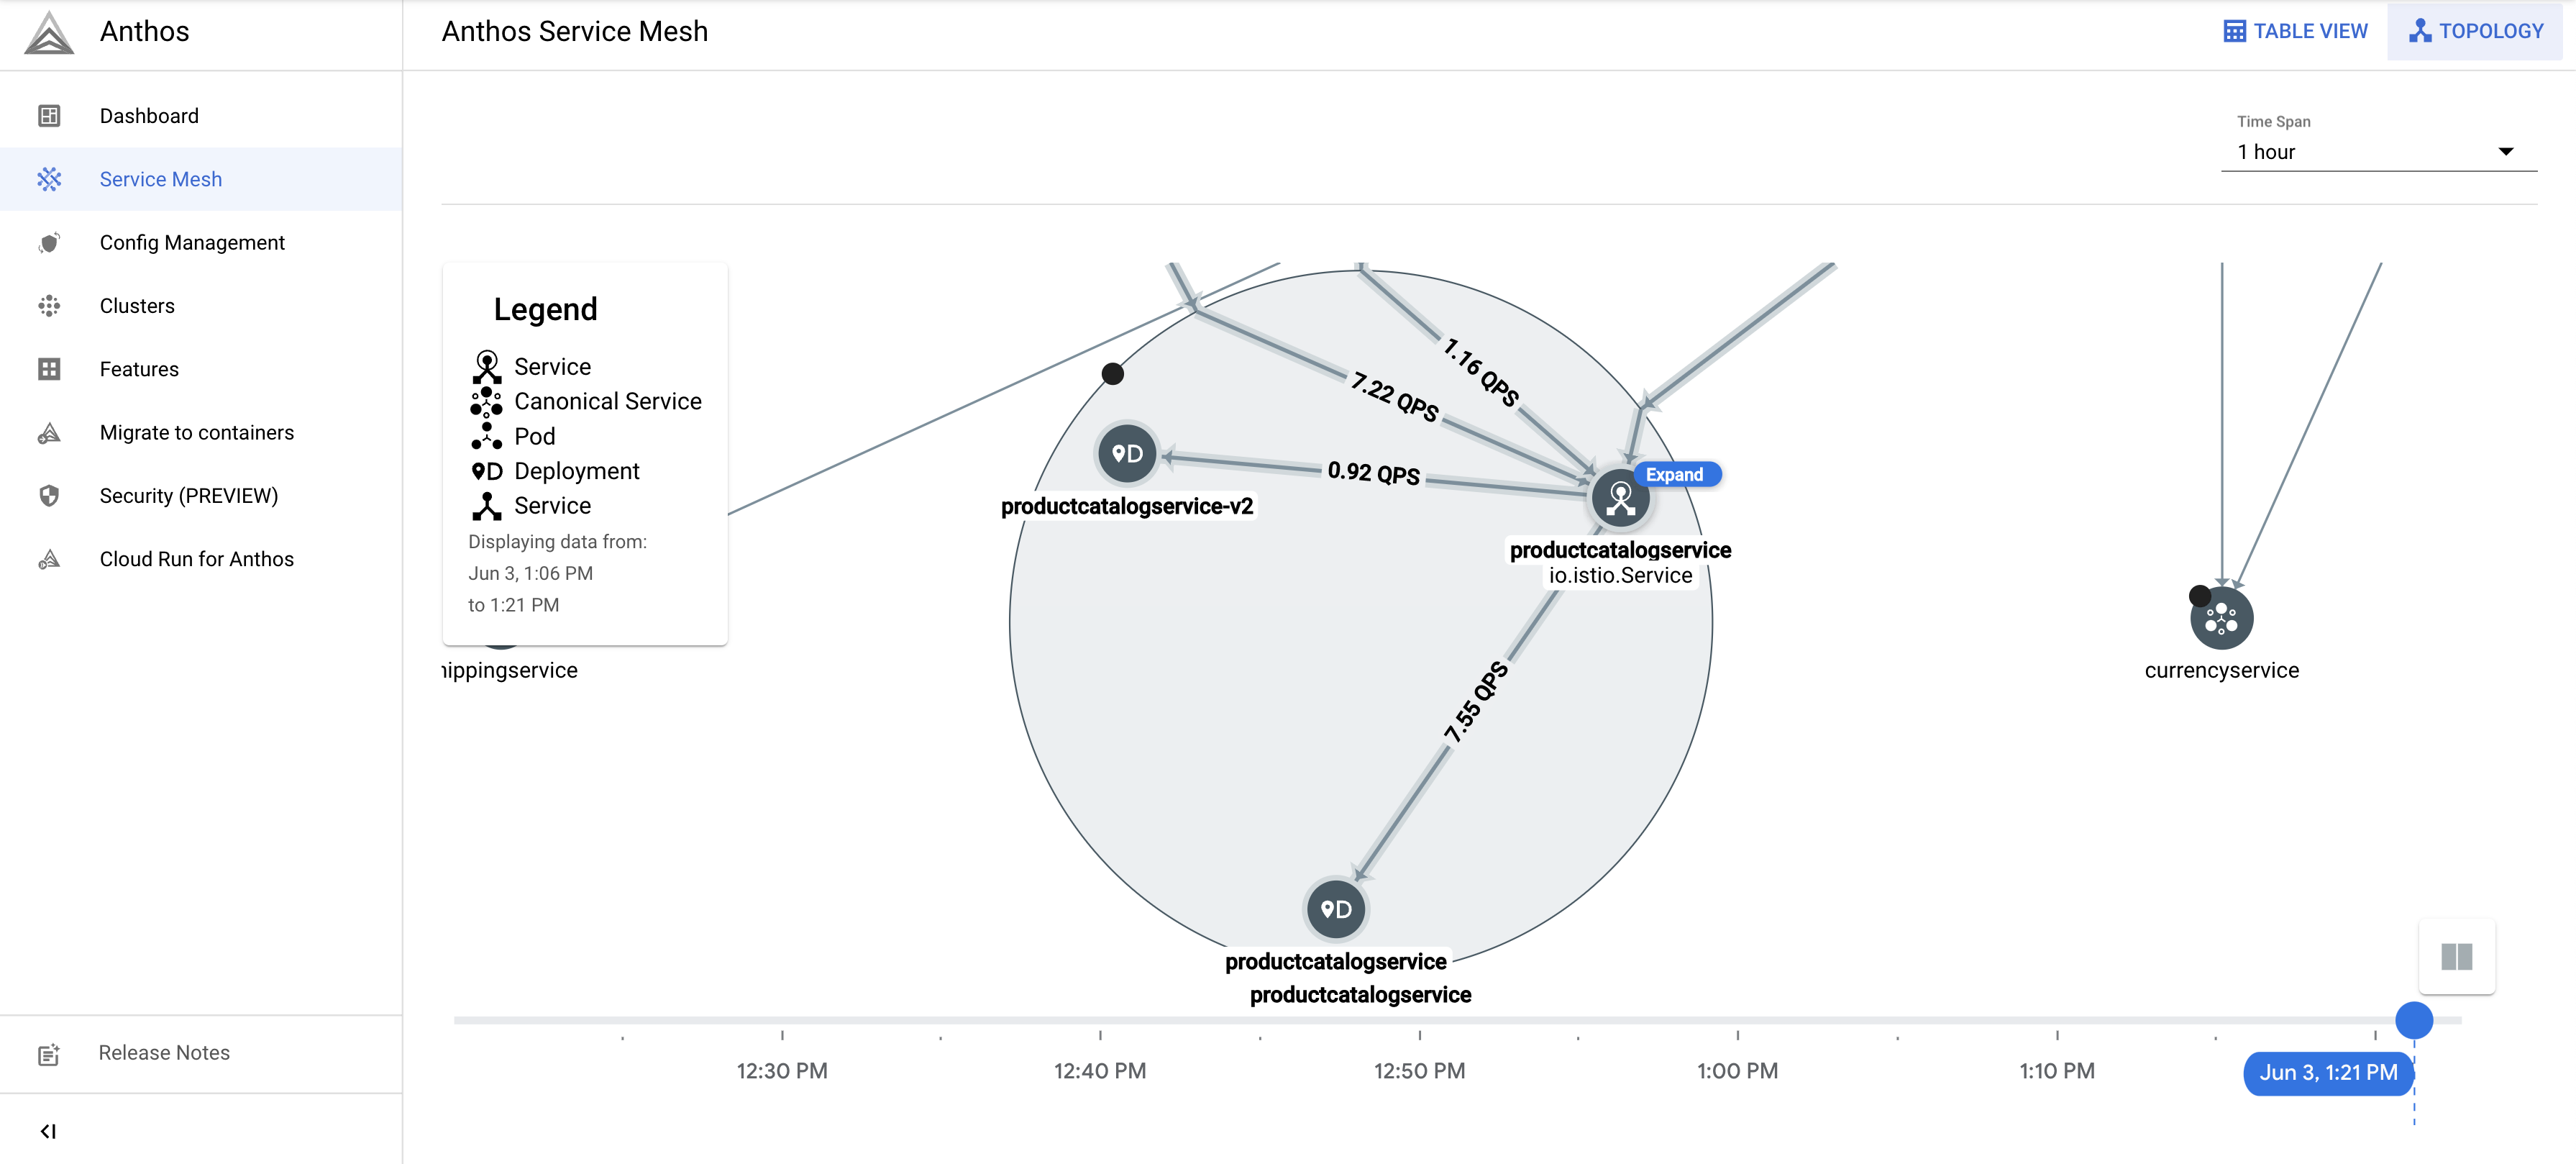
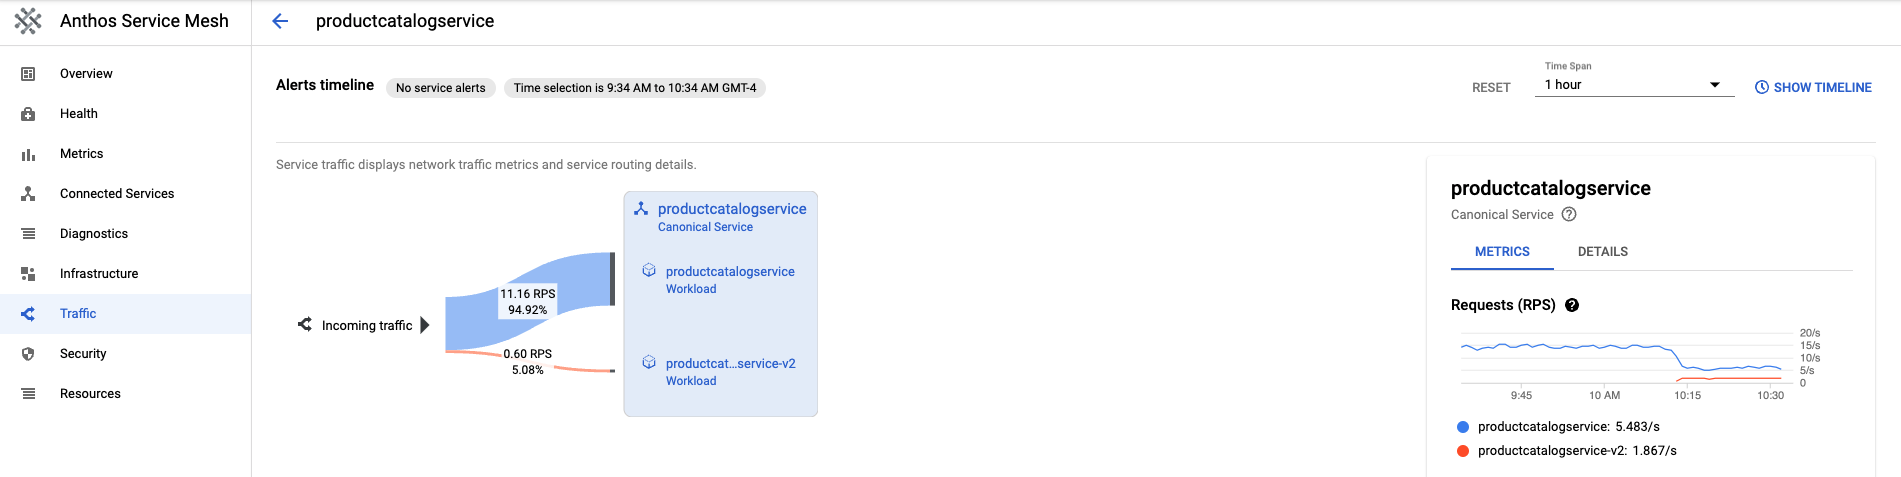
返回「表格檢視」。按一下「服務」表格中的
productcatalogservice。 返回左側導覽列中的「流量」。請注意,系統會根據
VirtualService檔案中指定的百分比,將傳入流量分配給 v1 和 v2,且 productcatalog 服務有 2 個工作負載。畫面右側會顯示「要求」、「錯誤率」和「延遲時間指標」。使用 Cloud Service Mesh 時,每項服務都會列出這些指標,方便您進行觀測。
推出或復原至某個版本
在 Canary 部署期間觀察指標後,您可以利用 VirtualService 資源推出新服務,或回復舊服務。
推出作業
確認第 2 版服務的行為符合預期後,請逐步增加第 2 版服務的流量行為。最終,所有流量都會導向新服務。
如要將所有流量導向 productcatalogservice 的 v2:
kubectl apply -f vs-v2.yaml -n onlineboutique
復原
如要還原為 v1 服務,只要套用先前的 destination-vs-v1.yaml 即可。這樣一來,流量只會導向 productcatalogservice 的 v1。
如要將所有流量導向 productcatalogservice 的 v1:
kubectl apply -f vs-v1.yaml -n onlineboutique