Terraform 構成の作成
組織向けにサービス カタログ ソリューションをキュレートする場合、Terraform 構成(構成)を作成できます。ユーザーは、これを Terraform を使用してデプロイします。構成を作成したら、カタログに割り当てることでユーザーと共有できます。
このガイドでは、Cloud Build を使用して Terraform Docker イメージの最新バージョンで Terraform コマンドを実行し、Cloud Storage を使用してモジュールや状態ファイルなどの Terraform リソースを保存して管理します。
Terraform の使用に関するリソースとガイドについては、 Google Cloudで Terraform を使用するをご覧ください。
始める前に
次の Identity and Access Management(IAM)ロールを付与されている必要があります。
- サービス カタログが有効になっている Google Cloud プロジェクトに関連付けられているGoogle Cloud 組織のカタログ管理者またはカタログ マネージャー。このロールを付与されていない場合は、組織管理者に連絡してアクセス権をリクエストしてください。
- ソリューションを作成する Google Cloud プロジェクトに対する Storage Admin。Terraform 構成が別のプロジェクトにある場合は、Terraform 構成を含むプロジェクトの Storage 管理者ロールも必要です。
- ソリューションを作成する Google Cloud プロジェクトの Cloud Build 編集者。
独自のサービス アカウントを使用する場合は、使用するサービス アカウントを含む Google Cloud プロジェクトに対するサービス アカウント ユーザーのロールも必要です。
これらのロールを付与されていない場合は、組織の管理者に連絡してアクセス権をリクエストしてください。
独自のサービス アカウントを使用する場合は、サービス アカウントに次の IAM ロールが必要です。
- ソリューションを作成する Google Cloud プロジェクトに対する Storage Admin。Terraform 構成が別のプロジェクトにある場合、サービス アカウントには、Terraform 構成を含むプロジェクトの ストレージ オブジェクト閲覧者ロールも必要です。
- ソリューションを作成するGoogle Cloud プロジェクトの ログ書き込みロール。
これらのロールを付与されていない場合は、組織の管理者に連絡してアクセス権をリクエストしてください。
構成を作成するプロジェクトで次の Cloud Build を設定します。
-
Enable the Cloud Build API.
Roles required to enable APIs
To enable APIs, you need the Service Usage Admin IAM role (
roles/serviceusage.serviceUsageAdmin), which contains theserviceusage.services.enablepermission. Learn how to grant roles. - [Cloud Build] ページに移動します。
- 左側のパネルで [設定] を選択します。
- [サービス アカウントのメールアドレス] セクションに表示されているサービス アカウントを使用します。
- 独自のサービス アカウントを使用していない場合は、サービス アカウントに次の IAM ロールを付与します。ロールを付与する手順については、Cloud Build サービス アカウントのアクセス権の構成をご覧ください。
- プロジェクト編集者(
roles/editor) - Storage 管理者(
roles/storage.admin)
- プロジェクト編集者(
-
Cloud Storage への構成ファイルのアップロード
サービス カタログの Terraform 構成ファイルは、Cloud Storage を使用して管理します。
Cloud Storage バケットを作成する
Cloud Storage を設定するには、組織に対してサービス カタログを有効にしたのと同じプロジェクト内でバケットを作成します。
- In the Google Cloud console, go to the Cloud Storage Buckets page.
- Click Create.
- On the Create a bucket page, enter your bucket information. To go to the next
step, click Continue.
-
In the Get started section, do the following:
- Enter a globally unique name that meets the bucket naming requirements.
- To add a
bucket label,
expand the Labels section (),
click add_box
Add label, and specify a
keyand avaluefor your label.
-
In the Choose where to store your data section, do the following:
- Select a Location type.
- Choose a location where your bucket's data is permanently stored from the Location type drop-down menu.
- If you select the dual-region location type, you can also choose to enable turbo replication by using the relevant checkbox.
- To set up cross-bucket replication, select
Add cross-bucket replication via Storage Transfer Service and
follow these steps:
Set up cross-bucket replication
- In the Bucket menu, select a bucket.
In the Replication settings section, click Configure to configure settings for the replication job.
The Configure cross-bucket replication pane appears.
- To filter objects to replicate by object name prefix, enter a prefix that you want to include or exclude objects from, then click Add a prefix.
- To set a storage class for the replicated objects, select a storage class from the Storage class menu. If you skip this step, the replicated objects will use the destination bucket's storage class by default.
- Click Done.
-
In the Choose how to store your data section, do the following:
- Select a default storage class for the bucket or Autoclass for automatic storage class management of your bucket's data.
- To enable hierarchical namespace, in the Optimize storage for data-intensive workloads section, select Enable hierarchical namespace on this bucket.
- In the Choose how to control access to objects section, select whether or not your bucket enforces public access prevention, and select an access control method for your bucket's objects.
-
In the Choose how to protect object data section, do the
following:
- Select any of the options under Data protection that you
want to set for your bucket.
- To enable soft delete, click the Soft delete policy (For data recovery) checkbox, and specify the number of days you want to retain objects after deletion.
- To set Object Versioning, click the Object versioning (For version control) checkbox, and specify the maximum number of versions per object and the number of days after which the noncurrent versions expire.
- To enable the retention policy on objects and buckets, click the Retention (For compliance) checkbox, and then do the following:
- To enable Object Retention Lock, click the Enable object retention checkbox.
- To enable Bucket Lock, click the Set bucket retention policy checkbox, and choose a unit of time and a length of time for your retention period.
- To choose how your object data will be encrypted, expand the Data encryption section (), and select a Data encryption method.
- Select any of the options under Data protection that you
want to set for your bucket.
-
In the Get started section, do the following:
- Click Create.
オブジェクトのバージョニングの有効化
Terraform の構成の削除や上書きを防ぐには、バケットのオブジェクトのバージョニングを使用する必要があります。オブジェクトのバージョニングを有効にするには、オブジェクトのバージョニングの使用に関する Cloud Storage のドキュメントをご覧ください。
バケットへのアクセスを許可する
組織内のユーザーが構成をデプロイする場合、Cloud Build サービス アカウントにバケットの読み取りアクセス権が必要です。ユーザーが構成をデプロイするのと同じ Google Cloud プロジェクトにバケットが保存されている場合、サービス アカウントにはすでにこのアクセス権があります。
ユーザーが別のGoogle Cloud プロジェクトで構成をデプロイする場合は、次のいずれかの方法を使用してバケットへのアクセスを許可します。
ストレージ オブジェクト閲覧者(
roles/storage.objectViewer)ロールをユーザーの Cloud Build サービス アカウントまたは Terraform 構成をデプロイする Google Cloud リソース(プロジェクト、フォルダ、組織など)に付与します。アクセス制御リスト(ACL)を使用して、バケットへのアクセスを管理します。
バケットへのアクセスの管理についての詳細は、Cloud Storage のアクセス制御の概要をご覧ください。
Terraform モジュールの作成とアップロード
Cloud Storage バケットを設定したら、すべての構成ファイルのコンテナである Terraform モジュールを作成してアップロードする必要があります。サービス カタログはモジュールを使用して JSON スキーマ ファイルを自動的に生成し、構成の変数を定義します。
現在のディレクトリの外部にあるモジュールを呼び出す場合は、相対パスの代わりにリモートパスを使用します。たとえば、source = "../../" ではなく source = "GoogleCloudPlatform/cloud-run/google" を使用します。
Google Cloud の一般的なユースケースのモジュールについては、 Google Cloud用の Terraform ブループリントとモジュールをご覧ください。
次のコードサンプルは、Terraform 構成ファイル main.tf を示しています。
variable "machine_type" {
  type    = string
  default = "n1-standard-1"
}

variable "zone" {
  type    = string
  default = "us-central1-a"
}

variable "deployment_identifier" {
  description = "The unique name for your instance"
  type        = string
}

resource "google_compute_instance" "default" {
  name         = "vm-${var.deployment_identifier}"
  machine_type = var.machine_type
  zone         = var.zone

  boot_disk {
    device_name = "boot"
    auto_delete = true
    initialize_params {
      image = "debian-cloud/debian-11"
    }
  }

  network_interface {
    network = "default"
    access_config {
      // Ephemeral IP
    }
  }
}
モジュールを作成したら、ファイルを ZIP ファイルに圧縮します。モジュールが ZIP ファイルのルートに保存されていることを確認します。
Terraform ファイルを圧縮するときにモジュールが正しく保存されるようにするには、次のコマンドを実行します。
none
zip solution.zip file1.tf file2.tf file3.tf
続いて、zip ファイルをバケットにアップロードします。zip ファイルをアップロードする手順については、Cloud Storage のドキュメントにある オブジェクトのアップロードをご覧ください。
サービス カタログでの構成の作成
Terraform モジュールを使用して Cloud Storage バケットを設定したら、バケットを含むサービス カタログソリューションを作成します。
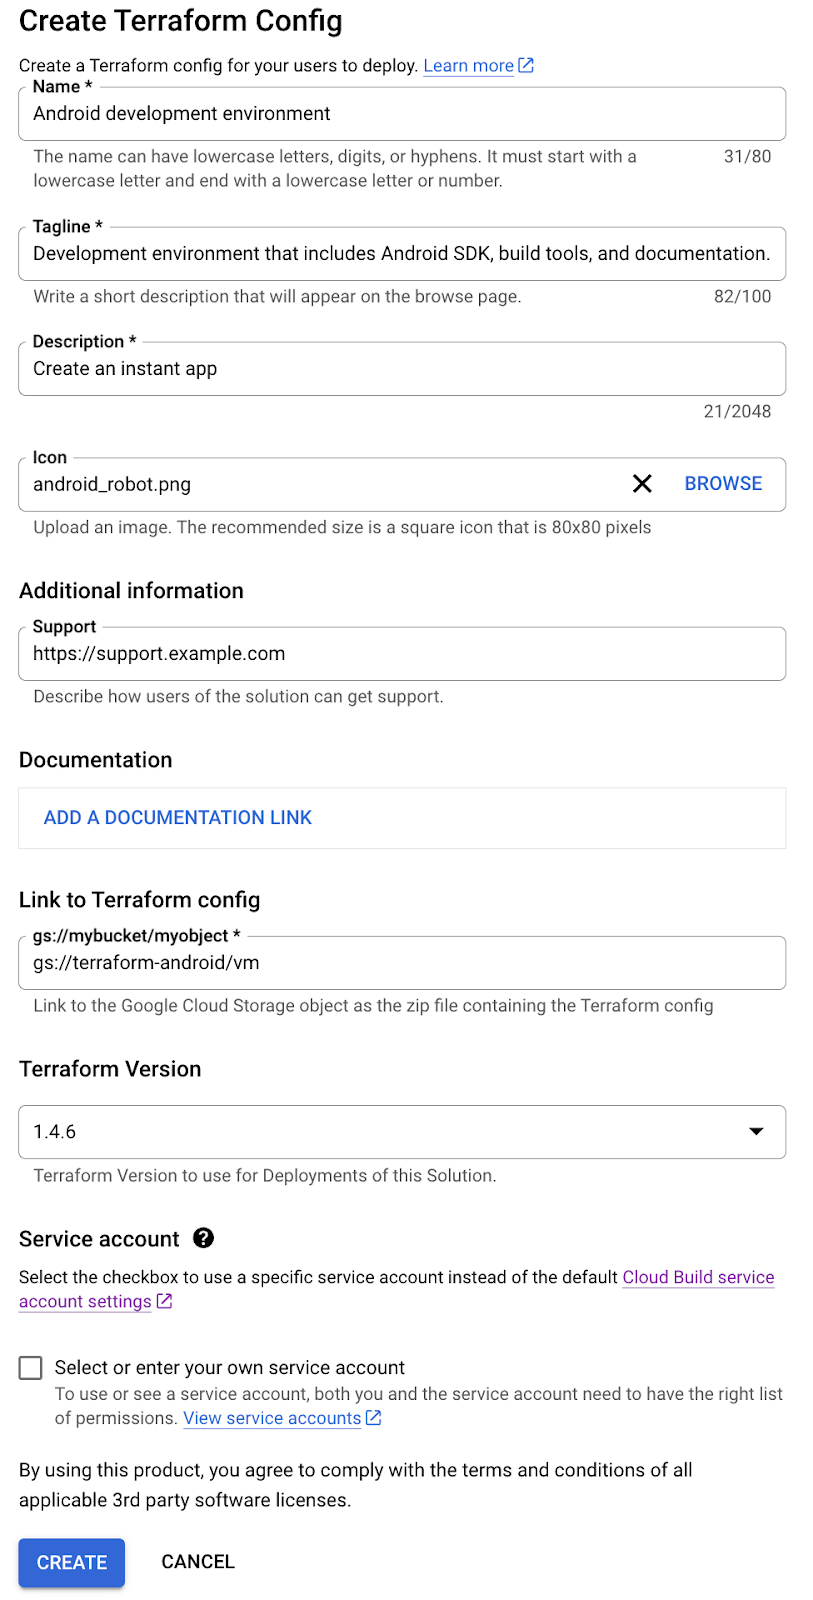
Terraform 構成をサービス カタログソリューションとして作成するには:
Google Cloud コンソールで、サービス カタログ管理者の [ソリューション] ページに移動します。
[ソリューション] ページに移動Google Cloud プロジェクトを選択するには、[選択] をクリックします。
[ソリューションを作成] をクリックします。プルダウン リストで、[Terraform 構成の作成] を選択します。
Terraform 構成の名前、説明、タグラインを入力します。タグラインとは、ユーザーがサービス カタログをブラウジングするときに表示されるソリューションの簡単な説明です。
[Terraform 構成へのリンク] に、Terraform モジュールの zip ファイルを含む Cloud Storage バケットへのリンクを指定します(
gs://my-terraform-bucket/my-zip-file.zipなど)。必要に応じて、ソリューションのアイコンをアップロードします。アイコンの推奨サイズは 80×80 ピクセルです。
必要に応じて、サポートリンクとクリエイターの連絡先情報を入力します。
必要に応じて、ソリューションのドキュメントへのリンクを追加します。
ソリューションのデプロイに使用する Terraform のバージョンを選択します。
必要に応じて、[独自のサービス アカウントを選択または入力する] の横にあるチェックボックスをオンにして、独自のサービス アカウントを指定できます。サービス アカウントがソリューションを作成する Google Cloud プロジェクトと同じ場所にある場合は、[現在のプロジェクトからサービス アカウントを選択] を選択し、プルダウン メニューからサービス アカウントを選択します。サービス アカウントがソリューションとは異なる Google Cloud プロジェクトにある場合は、[プロジェクトのサービス アカウントのメールアドレスを入力する] を選択し、サービス アカウントのメールアドレスを入力します。
[作成] をクリックします。
ソリューションが作成され、サービス カタログ管理者の [ソリューション] ページに表示されます。
次のスクリーンショットは、Terraform 設定の作成方法を示しています。
次のステップ
- Terraform 構成をカタログに割り当てて、組織内のユーザーがソリューションにアクセスしてデプロイできるようにする。
- 最新の Terraform 構成の詳細でソリューションを更新する。