zip 文件的名称必须与架构以及 Jinja 或 Python 文件的名称一致。例如,如果 zip 文件名为 android-dev-environment.zip,则 zip 内的 Jinja 架构文件必须命名为 android-dev-environment.jinja.schema,并且 Jinja 模板必须命名为 android-dev-environment.jinja。
以下代码示例演示了创建部署表单的架构文件:
info:title:Single Google Compute Engine Machineauthor:Google Inc.description:Creates a virtual machine based on zone and machine type selection.required:-machinetype-zoneproperties:machinetype:title:Machine typetype:stringenum:-n2-standard-2-n2-standard-4-n2-standard-8-n2-highmem-2-n2-highmem-4-n2-highmem-8-n2-highcpu-2-n2-highcpu-4-n2-highcpu-8zone:title:Zonetype:stringenum:-us-central1-a-us-central1-c-us-east1-b-us-east1-c-us-west1-a-us-west1-b-us-west1-c
以下代码示例说明了用于创建永久性虚拟机的 Jinja 文件:
# Creates a Persistent VMresources:-type:compute.v1.instancename:vm-{{ env["deployment"] }}properties:zone:{{properties["zone"]}}# Note the machineType definition at the end. n2-custom-4-5120 specifies n2 machine family with 4 CPUs and 5GB (5120 MB) of RAM. For custom machine types, refer to https://cloud.google.com/compute/docs/instances/creating-instance-with-custom-machine-typemachineType:https://www.googleapis.com/compute/v1/projects/{{ env["project"] }}/zones/{{ properties["zone"] }}/machineTypes/{{ properties["machinetype"] }}disks:-deviceName:boottype:PERSISTENTboot:trueautoDelete:trueinitializeParams:diskName:disk-{{ env["deployment"] }}sourceImage:https://www.googleapis.com/compute/v1/projects/debian-cloud/global/images/family/debian-9networkInterfaces:-network:https://www.googleapis.com/compute/v1/projects/{{ env["project"] }}/global/networks/default# Access Config required to give the instance a public IP addressaccessConfigs:-name:External NATtype:ONE_TO_ONE_NAT
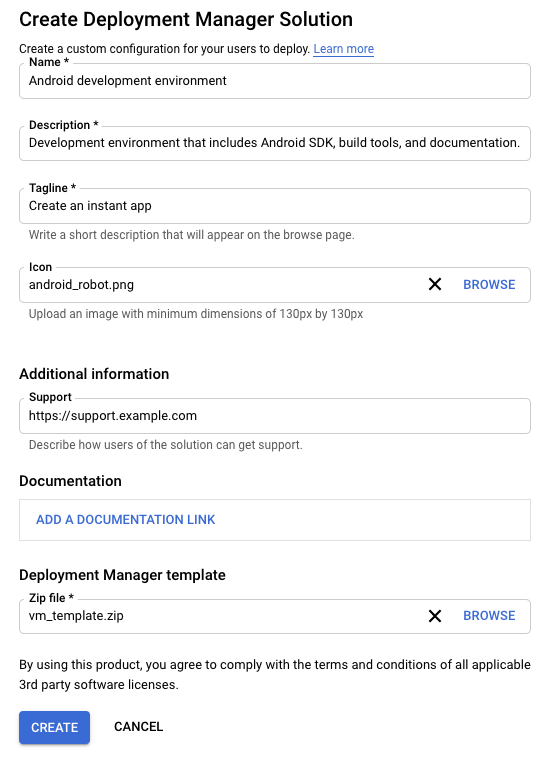
[[["易于理解","easyToUnderstand","thumb-up"],["解决了我的问题","solvedMyProblem","thumb-up"],["其他","otherUp","thumb-up"]],[["很难理解","hardToUnderstand","thumb-down"],["信息或示例代码不正确","incorrectInformationOrSampleCode","thumb-down"],["没有我需要的信息/示例","missingTheInformationSamplesINeed","thumb-down"],["翻译问题","translationIssue","thumb-down"],["其他","otherDown","thumb-down"]],["最后更新时间 (UTC):2025-08-17。"],[],[],null,["# Creating a Deployment Manager-based solution\n============================================\n\nWhen creating Service Catalog solutions for users in your organization, you can\ncreate a Deployment Manager (DM) solution, which users launch\nusing a Deployment Manager template. After you create a solution,\nyou can share it with your users by adding it to [catalogs](/service-catalog/docs/create-catalog).\n| **Note:** We recommend [creating a Terraform configuration](/service-catalog/docs/terraform-configuration) to take advantage of the open-source infrastructure as code software tool.\n\nBefore you begin\n----------------\n\n- You must have the [Catalog Admin](/service-catalog/docs/access-control#instance_admin_role)\n (`roles/cloudprivatecatalogproducer.admin`) *OR*\n [Catalog Manager](/service-catalog/docs/access-control#catalog_manager_role)\n (`roles/cloudprivatecatalogproducer.manager`) role for the Google Cloud\n organization associated with the Google Cloud project which has\n Service Catalog enabled. If you don't have this role, contact your\n Organization Administrator to request access.\n\n\n-\n\n\n Enable the Cloud Deployment Manager and Compute Engine APIs.\n\n\n [Enable the APIs](https://console.cloud.google.com/flows/enableapi?apiid=deploymentmanager,compute_component)\n\nPreparing your deployment template\n----------------------------------\n\nTo create a Deployment Manager solution in Service Catalog,\nyou first prepare a [Deployment Manager template](https://cloud.google.com/deployment-manager/docs/configuration/templates/create-basic-template)\nzip file to upload, which must contain the following files:\n\n- A Jinja template file ending in the `.jinja` extension or a Python template file ending in the `.py` extension.\n- A [schema file](/deployment-manager/docs/configuration/templates/using-schemas) ending in the `.jinja.schema` extension for a Jinja template or the `py.schema` extension for a Python template.\n\nThe name of the zip file must match the names of both the schema and Jinja or\nPython files. For example, if the zip file is named\n`android-dev-environment.zip`, the Jinja schema file inside the zip must be\nnamed `android-dev-environment.jinja.schema` and the Jinja template must be\nnamed `android-dev-environment.jinja`.\n\nThe following code sample illustrates a schema file to create a deployment form: \n\n\n\n info:\n title: Single Google Compute Engine Machine\n author: Google Inc.\n description: Creates a virtual machine based on zone and machine type selection.\n\n required:\n - machinetype\n - zone\n\n properties:\n machinetype:\n title: Machine type\n type: string\n enum:\n - n2-standard-2\n - n2-standard-4\n - n2-standard-8\n - n2-highmem-2\n - n2-highmem-4\n - n2-highmem-8\n - n2-highcpu-2\n - n2-highcpu-4\n - n2-highcpu-8\n zone:\n title: Zone\n type: string\n enum:\n - us-central1-a\n - us-central1-c\n - us-east1-b\n - us-east1-c\n - us-west1-a\n - us-west1-b\n - us-west1-c\n\nThe following code sample illustrates a Jinja file to create a persistent VM: \n\n\n\n # Creates a Persistent VM\n resources:\n - type: compute.v1.instance\n name: vm-{{ env[\"deployment\"] }}\n properties:\n zone: {{ properties[\"zone\"] }}\n # Note the machineType definition at the end. n2-custom-4-5120 specifies n2 machine family with 4 CPUs and 5GB (5120 MB) of RAM. For custom machine types, refer to https://cloud.google.com/compute/docs/instances/creating-instance-with-custom-machine-type\n machineType: https://www.googleapis.com/compute/v1/projects/{{ env[\"project\"] }}/zones/{{ properties[\"zone\"] }}/machineTypes/{{ properties[\"machinetype\"] }}\n disks:\n - deviceName: boot\n type: PERSISTENT\n boot: true\n autoDelete: true\n initializeParams:\n diskName: disk-{{ env[\"deployment\"] }}\n sourceImage: https://www.googleapis.com/compute/v1/projects/debian-cloud/global/images/family/debian-9\n networkInterfaces:\n - network: https://www.googleapis.com/compute/v1/projects/{{ env[\"project\"] }}/global/networks/default\n # Access Config required to give the instance a public IP address\n accessConfigs:\n - name: External NAT\n type: ONE_TO_ONE_NAT\n\nCreating the solution in Service Catalog\n----------------------------------------\n\nTo create a Deployment Manager template-based solution:\n\n1. Go to the Service Catalog Admin [**Solutions** page](https://console.cloud.google.com/catalog/admin/solutions) in the Google Cloud console.\n\n [Go to the Solutions page](https://console.cloud.google.com/catalog/admin/solutions)\n\n2. Click **Select** to choose the Google Cloud project.\n\n3. Click **CREATE SOLUTION** . In the drop-down list, select **Create a DM\n solution**.\n\n4. Enter a name, description, and tagline for your solution. The tagline\n is a short description of a solution that users see as they browse\n Service Catalog.\n\n5. Upload a zip file, containing the files for a deployment\n [configuration](/deployment-manager/docs/configuration).\n\n6. Optionally, upload an icon for the solution. The recommended dimensions for\n an icon are 80 by 80 pixels.\n\n7. Optionally, enter a support link and contact information for the creator.\n\n8. Optionally, add a link to the documentation for the solution.\n\n9. Click **CREATE**.\n\nThe following screenshot illustrates creating a DM-based solution:\n\nNext steps\n----------\n\n- [Assign the solution](/service-catalog/docs/assign-solutions) to a catalog, so that users in your organization can access and deploy the solution."]]