You can use Cloud Build to automate builds and deployments to Knative serving by using Cloud Build trigger to automatically build and deploy your code whenever new commits are pushed to a given branch of a Git repository.
When you use a Cloud Build trigger to build containers, the source repository information is displayed in the Google Cloud console for your service after you deploy to Knative serving.
Before you begin
- You either have a git repository with a
Dockerfileor your codebase is written in one of the languages supported by Google Cloud's buildpacks: Go, Node.js, Python, Java or .NET Core. -
Enable the Cloud Build and Cloud Source Repositories APIs.
Roles required to enable APIs
To enable APIs, you need the Service Usage Admin IAM role (
roles/serviceusage.serviceUsageAdmin), which contains theserviceusage.services.enablepermission. Learn how to grant roles.
Setting up continuous deployment from the Knative serving user interface
The procedure varies slightly depending on whether you are setting up continuous deployment on a new service or on an existing service. Click the appropriate tab to learn more.
New service
Go to Knative serving in the Google Cloud console:
Click Create service.
Fill the Service Settings with your preferences.
Click Next.
Select Continuously deploy new revisions from a source repository.
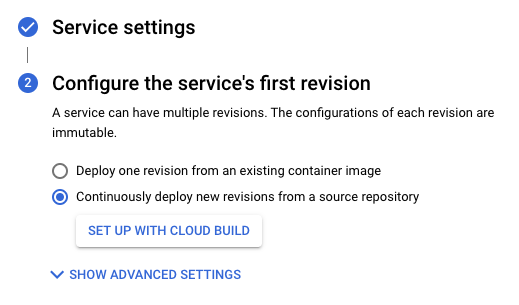
Click Set up with Cloud Build.
Select the provider and the repository.
- GitHub - if you are not yet authenticated, click Authenticate and follow the instructions. By default, connecting a repository is done via the Cloud Build GitHub app. Alternatively, you can mirror your GitHub repository in Cloud Source Repositories. To do so, click Advanced option and check Mirror GitHub repository using Cloud Source Repositories Learn more
- Bitbucket - if you are not yet authenticated, click Authenticate and follow the instructions.
- Cloud Source Repositories
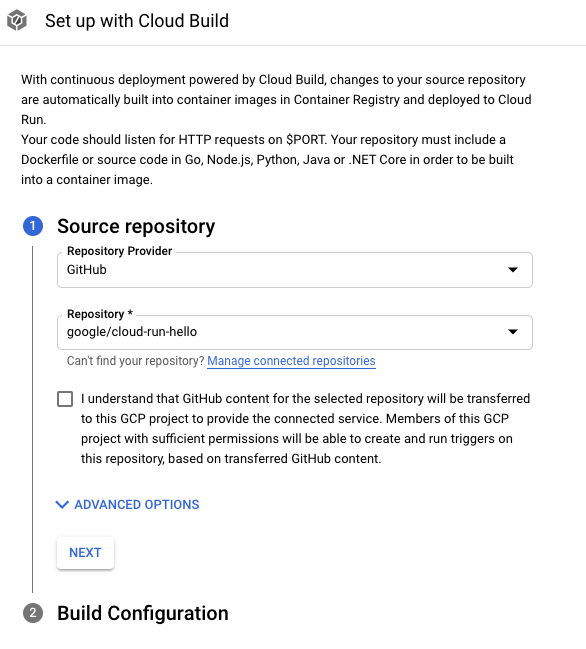
Click Next.
Fill the options in Build Configuration step:
- Branch - indicates what source should be used when running the trigger. You can put the regex here. Matched branches are automatically verified: you can see them below the input. Note that if exactly one branch is matched, the trigger will be automatically executed after the creation.
Build Type
If your repository should be built using Docker and it contains a Dockerfile, select Dockerfile. Source location indicates the location and name of the Dockerfile. This directory will be used as the Docker build context. All paths should be relative to the current directory.
Otherwise, select Google Cloud Buildpacks. Use Buildpack context to specify the directory and Entrypoint (optional) to provide the command to start the server. Example:
gunicorn -p :8080 main:appfor Python,java -jar target/myjar.jarfor Java. Leave it blank to use default behavior.
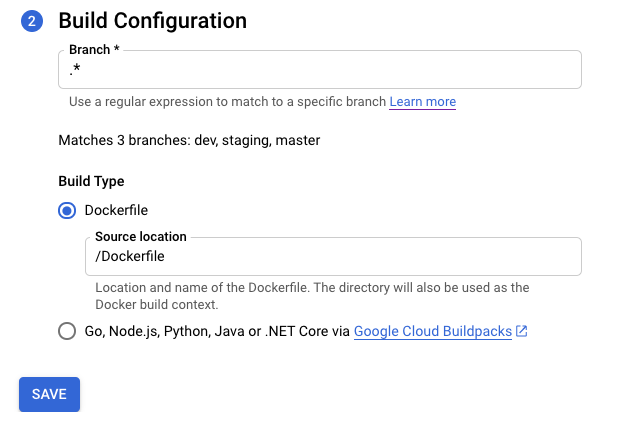
Click Save.
Verify the selected settings.
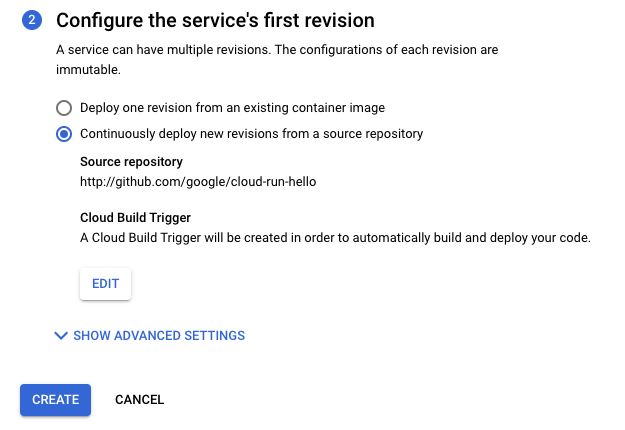
Click Create.
Note that you are redirected to the Service Details page, where you can track the progress of your Continuous Deployment set up.
Once all steps are completed, note additional options:
- Edit Continuous Deployment button.
- Build History.
- Source details in the Revision Details section.
Existing service
Go to Knative serving in the Google Cloud console:
Locate the service in the services list, and click on it.
Click Set up Continuous Deployment.
Select the provider and the repository.
- GitHub - if you are not yet authenticated, click Authenticate and follow the instructions. By default, connecting a repository is done via the Cloud Build GitHub app. Alternatively, you can mirror your GitHub repository in Cloud Source Repositories. To do so, click Advanced option and check Mirror GitHub repository using Cloud Source Repositories Learn more
- Bitbucket - if you are not yet authenticated, click Authenticate and follow the instructions.
- Cloud Source Repositories
Click Next.
Fill the options in Build Configuration step:
- Branch - indicates what source should be used when running the trigger. You can put the regex here. Matched branches are automatically verified: you can see them below the input. Note that if exactly one branch is matched, the trigger will be automatically executed after the creation.
Build Type
If your repository should be built using Docker and it contains a Dockerfile, select Dockerfile. Source location indicates the location and name of the Dockerfile. This directory will be used as the Docker build context. All paths should be relative to the current directory.
Otherwise, select Google Cloud Buildpacks. Use Buildpack context to specify the directory and Entrypoint (optional) to provide the command to start the server. Example:
gunicorn -p :8080 main:appfor Python,java -jar target/myjar.jarfor Java. Leave it blank to use default behavior.
Click Save.
The page reloads and displays the progress of the Continuous Deployment setup.
Once all steps are completed, note additional options:
- Edit Continuous Deployment button.
- Build History.
- Source details in the Revision Details section.
Setting up continuous deployment manually
Refer to Setting up continuous deployment manually if you need to use a manual procedure and not the UI.
Attach existing Cloud Build trigger to Knative serving service.
If you already have an existing Cloud Build trigger, you can attach it to the service and take advantage of Google Cloud console features in the Service Details page: Edit Continuous Deployment button and Build History chart.
To do so, you have to add a label with gcb-trigger-id as a key and the unique identifier of the Cloud Build trigger as value (not the trigger name). See instructions for setting up the label.