本教學課程說明如何在 Compute Engine 的 Docker 容器中,使用可擴充服務 Proxy V2 (ESPv2) 部署簡單的 gRPC 服務範例。
本教學課程使用 Python 版本的 bookstore-grpc 範例。如需其他語言的 gRPC 範例,請參閱「後續步驟」一節。
如需 Cloud Endpoints 的總覽,請參閱關於 Endpoints 和 Endpoints 架構。
目標
請根據以下的主要工作清單,逐步進行本教學課程的各個步驟。您必須完成所有工作才能成功傳送要求至 API。
- 設定 Google Cloud 專案,並下載必要軟體。請參閱「事前準備」。
- 建立 Compute Engine VM 執行個體。請參閱建立 Compute Engine 執行個體一節。
- 從
bookstore-grpc範例複製並設定檔案。請參閱「設定 Endpoints」。 - 部署 Endpoints 設定以建立 Endpoints 服務。請參閱部署 Endpoints 設定一節。
- 在 Compute Engine VM 上部署 API 和 ESPv2。請參閱部署 API 後端一節。
- 傳送要求至 API,請參閱傳送要求至 API 一節。
- 避免系統向您的 Google Cloud 帳戶收取相關費用。請參閱清除所用資源一節。
費用
在本文件中,您會使用下列 Google Cloud的計費元件:
如要根據預測用量估算費用,請使用 Pricing Calculator。
完成本文所述工作後,您可以刪除已建立的資源,避免繼續計費。詳情請參閱清除所用資源一節。
事前準備
- Sign in to your Google Cloud account. If you're new to Google Cloud, create an account to evaluate how our products perform in real-world scenarios. New customers also get $300 in free credits to run, test, and deploy workloads.
-
In the Google Cloud console, on the project selector page, select or create a Google Cloud project.
Roles required to select or create a project
- Select a project: Selecting a project doesn't require a specific IAM role—you can select any project that you've been granted a role on.
-
Create a project: To create a project, you need the Project Creator
(
roles/resourcemanager.projectCreator), which contains theresourcemanager.projects.createpermission. Learn how to grant roles.
-
Verify that billing is enabled for your Google Cloud project.
-
In the Google Cloud console, on the project selector page, select or create a Google Cloud project.
Roles required to select or create a project
- Select a project: Selecting a project doesn't require a specific IAM role—you can select any project that you've been granted a role on.
-
Create a project: To create a project, you need the Project Creator
(
roles/resourcemanager.projectCreator), which contains theresourcemanager.projects.createpermission. Learn how to grant roles.
-
Verify that billing is enabled for your Google Cloud project.
- 記下專案 ID,後續步驟將會用到。
- 安裝並初始化 Google Cloud CLI。
- 更新 gcloud CLI 並安裝 Endpoints 元件:
gcloud components update
-
確認 Google Cloud CLI (
gcloud) 已取得授權,可存取您在 Google Cloud上的資料與服務:gcloud auth login
-
將預設專案設為您的專案 ID。
gcloud config set project YOUR_PROJECT_ID
將 YOUR_PROJECT_ID 替換為專案 ID。如果您有其他 Google Cloud 專案,並想使用
gcloud加以管理,請參閱「管理 gcloud CLI 設定」。 - 按照 gRPC Python 快速入門導覽課程中的步驟安裝 gRPC 和 gRPC 工具。
完成本文所述工作後,您可以刪除已建立的資源,避免繼續計費。詳情請參閱清除所用資源一節。
建立 Compute Engine 執行個體
如要建立 Compute Engine 執行個體,請按照下列指示操作:
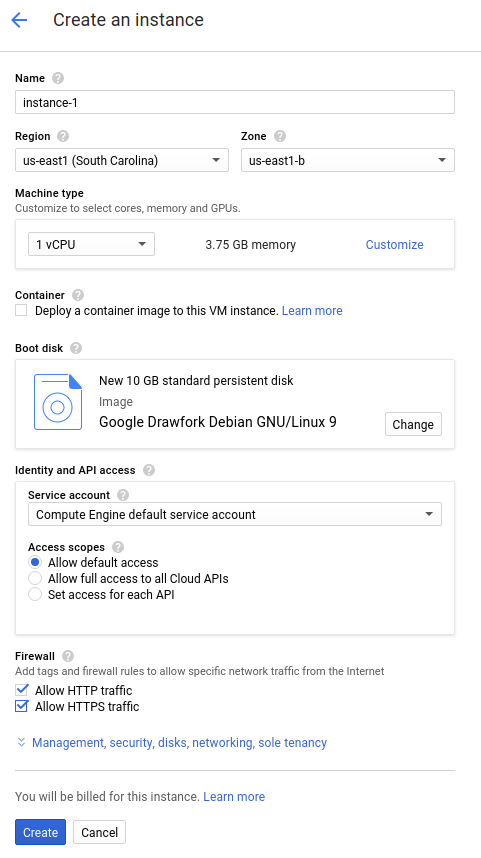
- In the Google Cloud console, go to the Create an instance page.
- 在「Firewall」(防火牆) 區段中,選取 「允許 HTTP 流量」和「允許 HTTPS 流量」。
- 如要建立 VM,請按一下「建立」。
- 確定您可以連線至自己的 VM 執行個體。
- In the list of virtual machine instances, click SSH in the row of the instance that you want to connect to.
- 您現在可以使用終端機在 Debian 執行個體上執行 Linux 指令。
- 輸入
exit來中斷與執行個體之間的連線。
- 記下執行個體的名稱、區域和外部 IP 位址,以便用於後續步驟。
啟動執行個體會花費一些時間。如果執行個體準備就緒,就會列在「VM Instances」(VM 執行個體) 頁面中,並顯示綠色的狀態圖示。
設定 Endpoints
從 GitHub 複製 bookstore-grpc 範例存放區。
如要設定 Endpoints:
- 從您的服務
.proto檔案中建立獨立的 protobuf 描述元檔案:- 儲存範例存放區中的
bookstore.proto副本,這個檔案定義了 Bookstore 服務的 API。 - 建立以下目錄:
mkdir generated_pb2 - 使用
protoc通訊協定緩衝區編譯器建立描述元檔案api_descriptor.pb。在儲存bookstore.proto的目錄中執行下列指令:python -m grpc_tools.protoc \ --include_imports \ --include_source_info \ --proto_path=. \ --descriptor_set_out=api_descriptor.pb \ --python_out=generated_pb2 \ --grpc_python_out=generated_pb2 \ bookstore.proto
在上述指令中,
--proto_path會設為目前的工作目錄。在您的 gRPC 建構環境中,如果您為.proto輸入檔案使用不同的目錄,請變更--proto_path以讓編譯器能夠搜尋您儲存bookstore.proto的目錄。
- 儲存範例存放區中的
- 建立 gRPC API 設定 YAML 檔案:
- 請儲存
api_config.yaml檔案的副本。這個檔案定義了 Bookstore 服務的 gRPC API 設定。 - 將
api_config.yaml檔案中的 MY_PROJECT_ID 替換為您的 Google Cloud 專案 ID。例如:# # Name of the service configuration. # name: bookstore.endpoints.example-project-12345.cloud.goog
請注意,這個檔案中的
apis.name欄位值必須與.proto檔案中的完整 API 名稱完全相同,否則無法部署。Bookstore 服務會在套件endpoints.examples.bookstore內的bookstore.proto中定義。其完整的 API 名稱為endpoints.examples.bookstore.Bookstore,就像api_config.yaml檔案中的名稱一樣。apis: - name: endpoints.examples.bookstore.Bookstore
- 請儲存
詳情請參閱設定 Endpoints。
部署 Endpoints 設定
如要部署 Endpoints 設定,請使用 gcloud endpoints services deploy 指令。這個指令使用 Service Management 建立代管服務。
- 確認您所在的目錄有
api_descriptor.pb和api_config.yaml檔案。 - 確認
gcloud指令列工具目前使用的預設專案,就是您要部署 Endpoints 設定的 Google Cloud 專案。請利用下列指令傳回的專案 ID 進行驗證,以確保系統沒有將服務建立在錯誤的專案中。gcloud config list project
如要變更預設的專案,請執行下列指令:
gcloud config set project YOUR_PROJECT_ID
- 使用 Google Cloud CLI 部署
proto descriptor檔案和設定檔:gcloud endpoints services deploy api_descriptor.pb api_config.yaml
Service Management 在建立並設定服務時,會把資訊輸出到終端機。部署完成後,您將看到類似以下的訊息:
Service Configuration [CONFIG_ID] uploaded for service [bookstore.endpoints.example-project.cloud.goog]
CONFIG_ID 是部署作業建立的 Endpoints 服務設定 ID。例如:
Service Configuration [2017-02-13r0] uploaded for service [bookstore.endpoints.example-project.cloud.goog]
在上方範例中,
2017-02-13r0是服務設定 ID,bookstore.endpoints.example-project.cloud.goog則是服務名稱。服務設定 ID 是由一個日期戳記和一個修訂版本編號所組成。如果您在同一天再次部署 Endpoints 設定,服務設定 ID 中的修訂編號將會增加。
檢查必要服務
Endpoints 和 ESP 至少需要啟用下列 Google 服務:| 名稱 | 標題 |
|---|---|
servicemanagement.googleapis.com |
Service Management API |
servicecontrol.googleapis.com |
Service Control API |
在大多數情況下,gcloud endpoints services deploy 指令會啟用這些必要服務。不過在以下情況中,即便您成功執行 gcloud 指令,還是無法啟用必要服務:
您使用 Terraform 之類的第三方應用程式,而其中未包含這些服務。
您已將 Endpoints 設定部署至現有Google Cloud 專案,但在專案中已明確停用這些服務。
請使用下列指令確認必要服務已啟用:
gcloud services list
如果必要的服務並未列出,請執行下列指令加以啟用:
gcloud services enable servicemanagement.googleapis.com
gcloud services enable servicecontrol.googleapis.com
同時啟用 Endpoints 服務:
gcloud services enable ENDPOINTS_SERVICE_NAME
如要判斷 ENDPOINTS_SERVICE_NAME,您可以採取下列任一做法:
部署 Endpoints 設定後,請前往 Cloud 控制台的「Endpoints」頁面。「服務名稱」欄下方會顯示可能的 ENDPOINTS_SERVICE_NAME 清單。
如果是 OpenAPI,ENDPOINTS_SERVICE_NAME 是您在 OpenAPI 規格的
host欄位中指定的內容。如果是 gRPC,ENDPOINTS_SERVICE_NAME 是您在 gRPC Endpoints 設定的name欄位中指定的內容。
如要進一步瞭解 gcloud 指令,請參閱 gcloud 服務。
如果收到錯誤訊息,請參閱「排解 Endpoints 設定部署問題」。詳情請參閱部署 Endpoints 設定一文。
部署 API 後端
到目前為止,您已經將 API 設定部署到 Service Management,但還沒有部署會提供 API 後端的程式碼。本節將逐步引導您在 VM 執行個體上設定 Docker,並在 Docker 容器中執行 API 後端程式碼和 ESPv2。
在 VM 執行個體中安裝 Docker
如要在 VM 執行個體上安裝 Docker,請執行下列操作:
- 執行以下指令來設定專案區域:
gcloud config set compute/zone YOUR_INSTANCE_ZONE
將 YOUR_INSTANCE_ZONE 替換成您執行個體的執行區域。
- 使用下列指令連線至您的執行個體:
gcloud compute ssh INSTANCE_NAME
將 INSTANCE_NAME 替換成您的 VM 執行個體名稱。
- 如要設定 Docker 存放區,請參閱 Docker 說明文件。請務必按照符合所用 VM 執行個體版本和架構的步驟操作:
- Jessie 以上版本
- x86_64/amd64
在 Docker 容器中執行範例 API 和 ESPv2
如何在 Docker 容器中執行範例 gRPC 服務和 ESPv2,以便讓用戶端使用:
- 在 VM 執行個體上,建立名為
esp_net的容器網路。sudo docker network create --driver bridge esp_net
- 執行會提供範例 API 的範例 Bookstore 伺服器:
sudo docker run \ --detach \ --name=bookstore \ --net=esp_net \ gcr.io/endpointsv2/python-grpc-bookstore-server:1 - 執行預先封裝的 ESPv2 Docker 容器。在 ESPv2 啟動選項中,將 SERVICE_NAME 替換為您的服務名稱。這就是您在
api_config.yaml檔案的name欄位中設定的名稱,例如:bookstore.endpoints.example-project-12345.cloud.googsudo docker run \ --detach \ --name=esp \ --publish=80:9000 \ --net=esp_net \ gcr.io/endpoints-release/endpoints-runtime:2 \ --service=SERVICE_NAME \ --rollout_strategy=managed \ --listener_port=9000 \ --backend=grpc://bookstore:8000--rollout_strategy=managed選項會將 ESPv2 設定為使用最新部署的服務設定。指定此選項時,在您部署新服務設定後一分鐘內,ESPv2 會偵測到變更並自動開始使用新設定。建議您指定此選項,而非提供 ESPv2 使用的特定設定 ID。 如要進一步瞭解 ESPv2 引數,請參閱 ESPv2 啟動選項。
如果您收到錯誤訊息,請參閱在 Compute Engine 上排解 Cloud Endpoints 的問題一文。
傳送要求至 API
如果您要從執行 Docker 容器的相同執行個體傳送要求,可以使用 localhost 取代 SERVER_IP,否則請使用執行個體的外部 IP 取代 SERVER_IP。
您可以執行以下指令來取得外部 IP 位址:
gcloud compute instances list
如要傳送要求至範例 API,您可以使用以 Python 編寫的範例 gRPC 用戶端。
複製託管 gRPC 用戶端程式碼的 git 存放區:
git clone https://github.com/GoogleCloudPlatform/python-docs-samples.git
變更您的工作目錄:
cd python-docs-samples/endpoints/bookstore-grpc/
安裝依附元件:
pip install virtualenvvirtualenv envsource env/bin/activatepython -m pip install -r requirements.txt傳送要求至範例 API:
python bookstore_client.py --host SERVER_IP --port 80
在「Endpoints」>「Services」(服務) 頁面中查看 API 的活動圖表。
要求可能需要一些時間才能反映在圖表中。
在「Logs Explorer」(記錄檔探索工具) 頁面中查看您的 API 要求記錄。
如果您沒有收到成功的回應,請參閱排解回應錯誤一文。
您已在 Endpoints 中部署並測試了 API!
清除所用資源
如要避免系統向您的 Google Cloud 帳戶收取本教學課程中所用資源的相關費用,請刪除含有該項資源的專案,或者保留專案但刪除個別資源。
- 刪除 API:
gcloud endpoints services delete SERVICE_NAME
將
SERVICE_NAME改為您的服務名稱。 - In the Google Cloud console, go to the VM instances page.
- Select the checkbox for the instance that you want to delete.
- To delete the instance, click More actions, click Delete, and then follow the instructions.