Extract entities with Document AI processors: This
triggers runPipeline API with
GcsIngestWithDocAiProcessorsPipeline.
The pipeline will call the given Document AI processor first,
and then ingest the documents with the processed results.
Classify document types and extract entities for each type: This also
triggers runPipeline API with
GcsIngestWithDocAiProcessorsPipeline,
which first calls a classifier. Then, for each document
type, you can specify a
corresponding schema and processor to process those particular document
types. They're ingested with the results and set to this schema.
Each of the preprocessing types correspond to the following options in the UI:
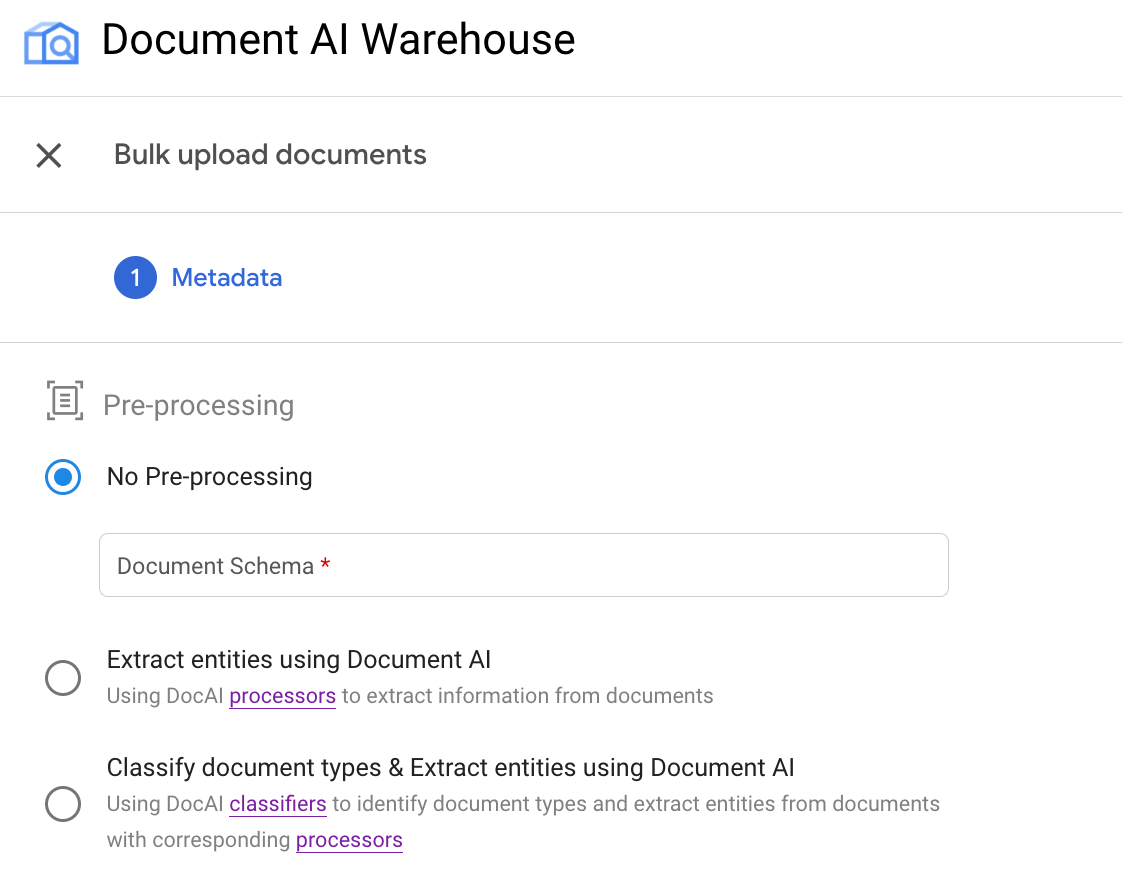
Example: Trigger bulk upload with an OCR processor
This example illustrates the second use of the pipeline.
Create an OCR processor and get processor ID
If you have created an OCR processor before, just find it in the processor
list, and go into the details page of
the processor and get the processor ID.
If you have not created one, follow these steps:
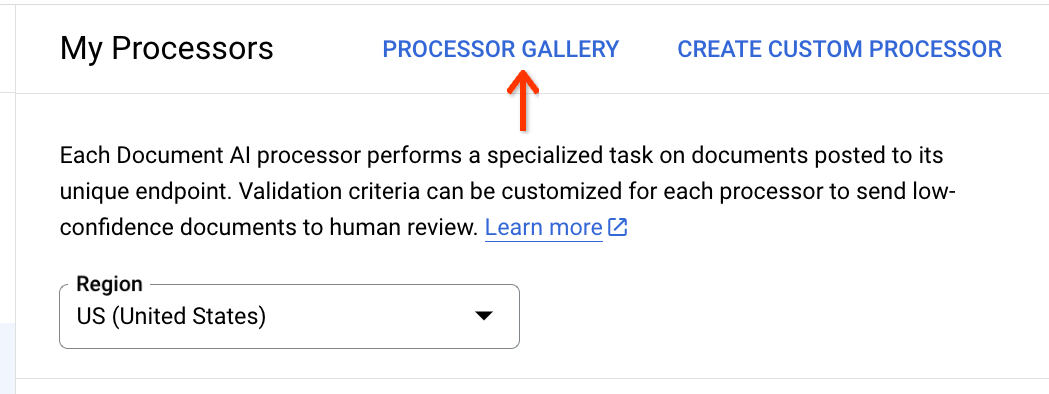
At the top of the processor
list, click the Processor
Gallery:
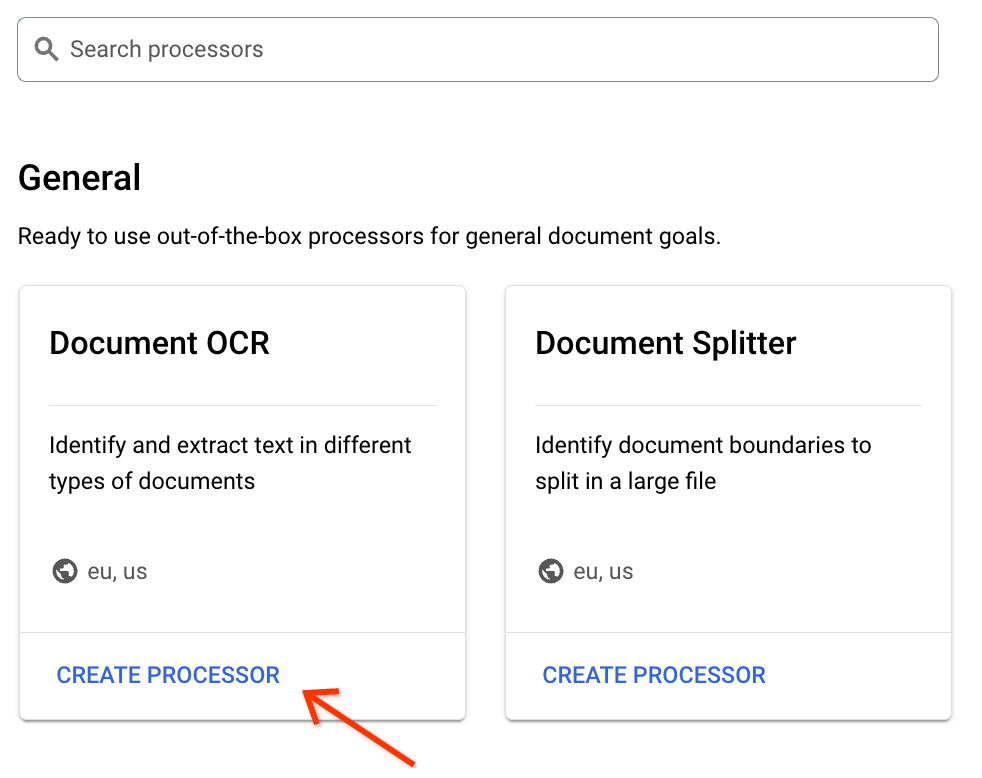
Find the Document OCR processor in the gallery, and at the bottom of the
card, click Create Processor:
Enter a processor display name:
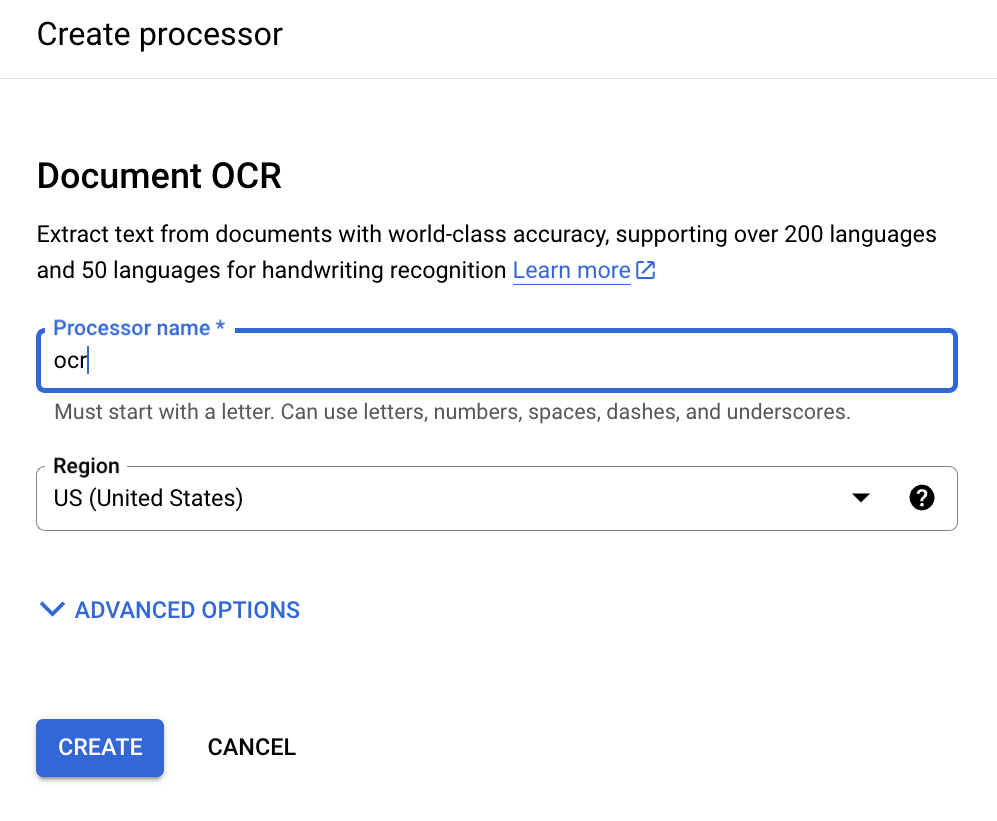
Click Create and when you're redirected to the Processor Details
page, find the ID:
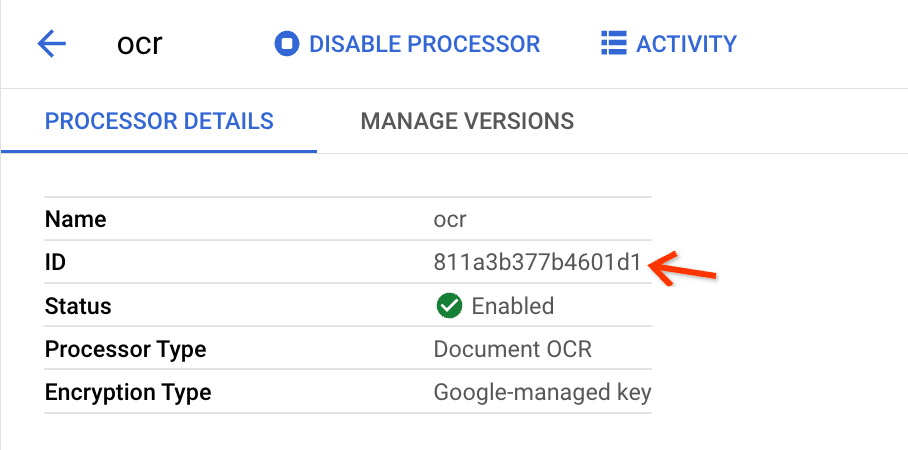
This is what you need to copy to the input fields in the bulk upload view.
Trigger bulk upload
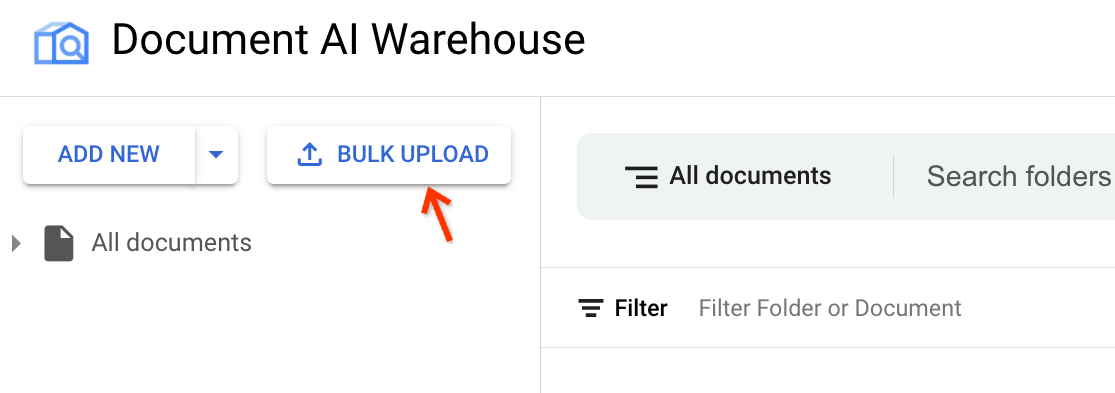
Open the bulk upload view.
Next to Add New, click Bulk Upload:
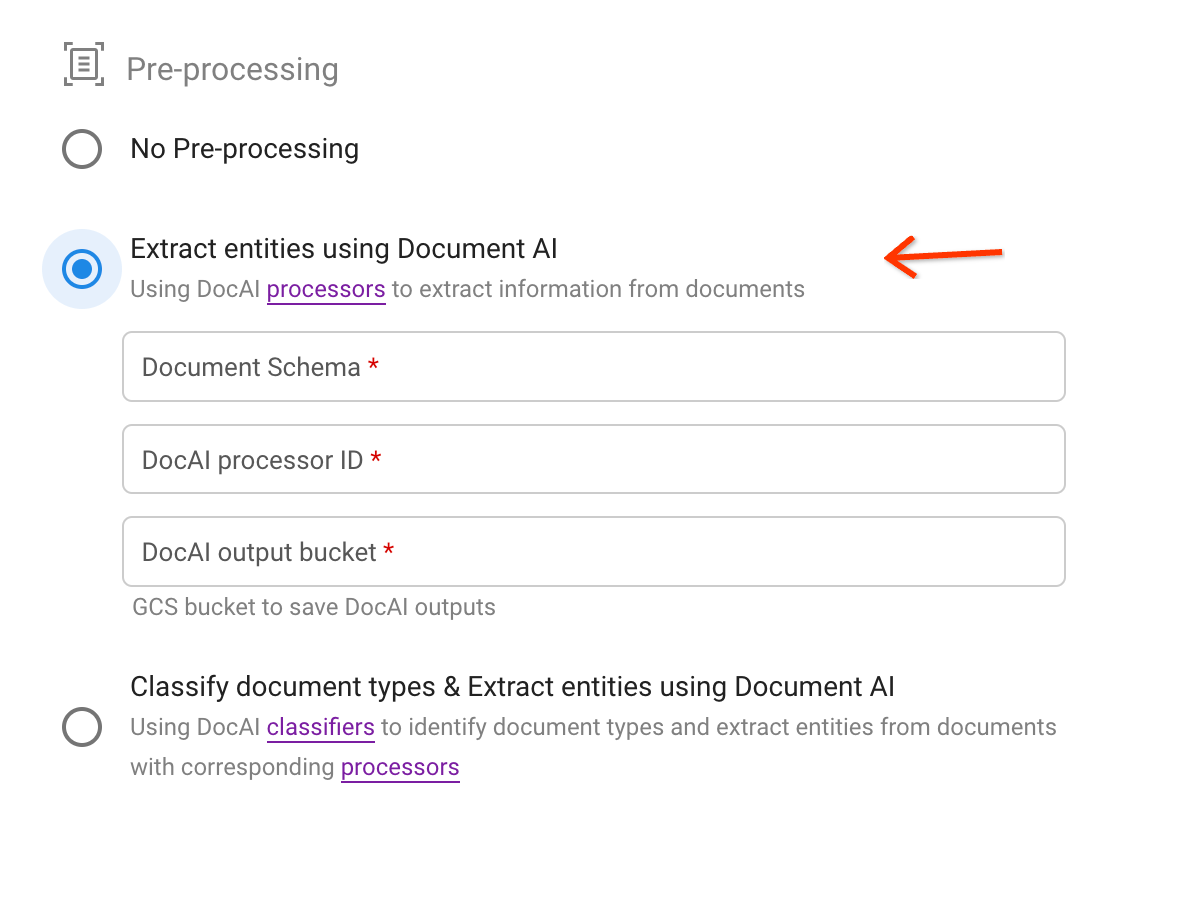
Find the correct processor.
Select the second preprocessing option.
Choose a schema and specify a processor and Cloud Storage bucket path
for saving the extraction results in JSON format.
Find the processor ID through the link in the description text:
Trigger upload:
With the processor ID copied from the last step, specify the input
fields. The source file bucket path can be a bucket or a folder or
subfolder in the bucket.
When the input fields are valid, to trigger bulk upload, at the top
right, click Upload.
Check progress in the status page
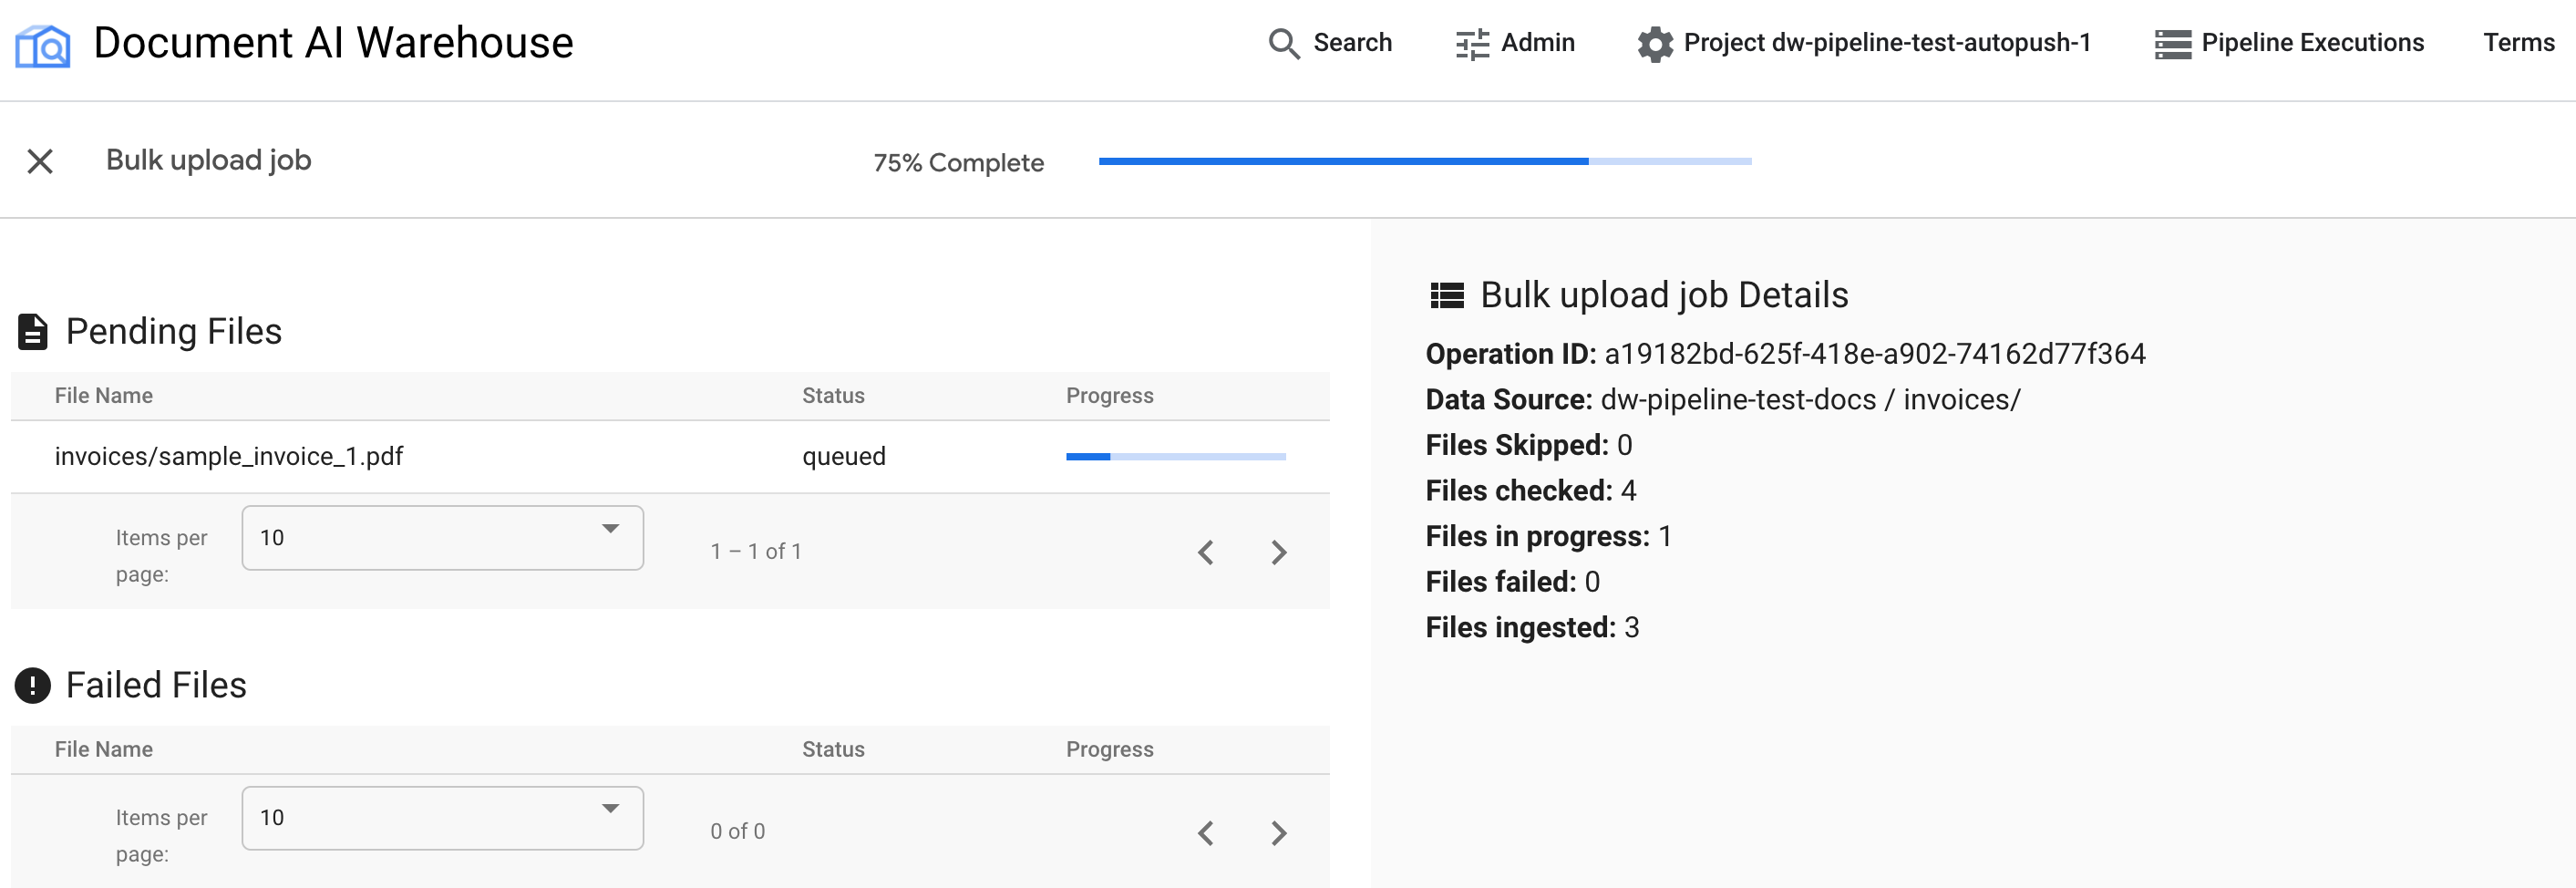
After the bulk upload is triggered, you are redirected to the status tracking
page:
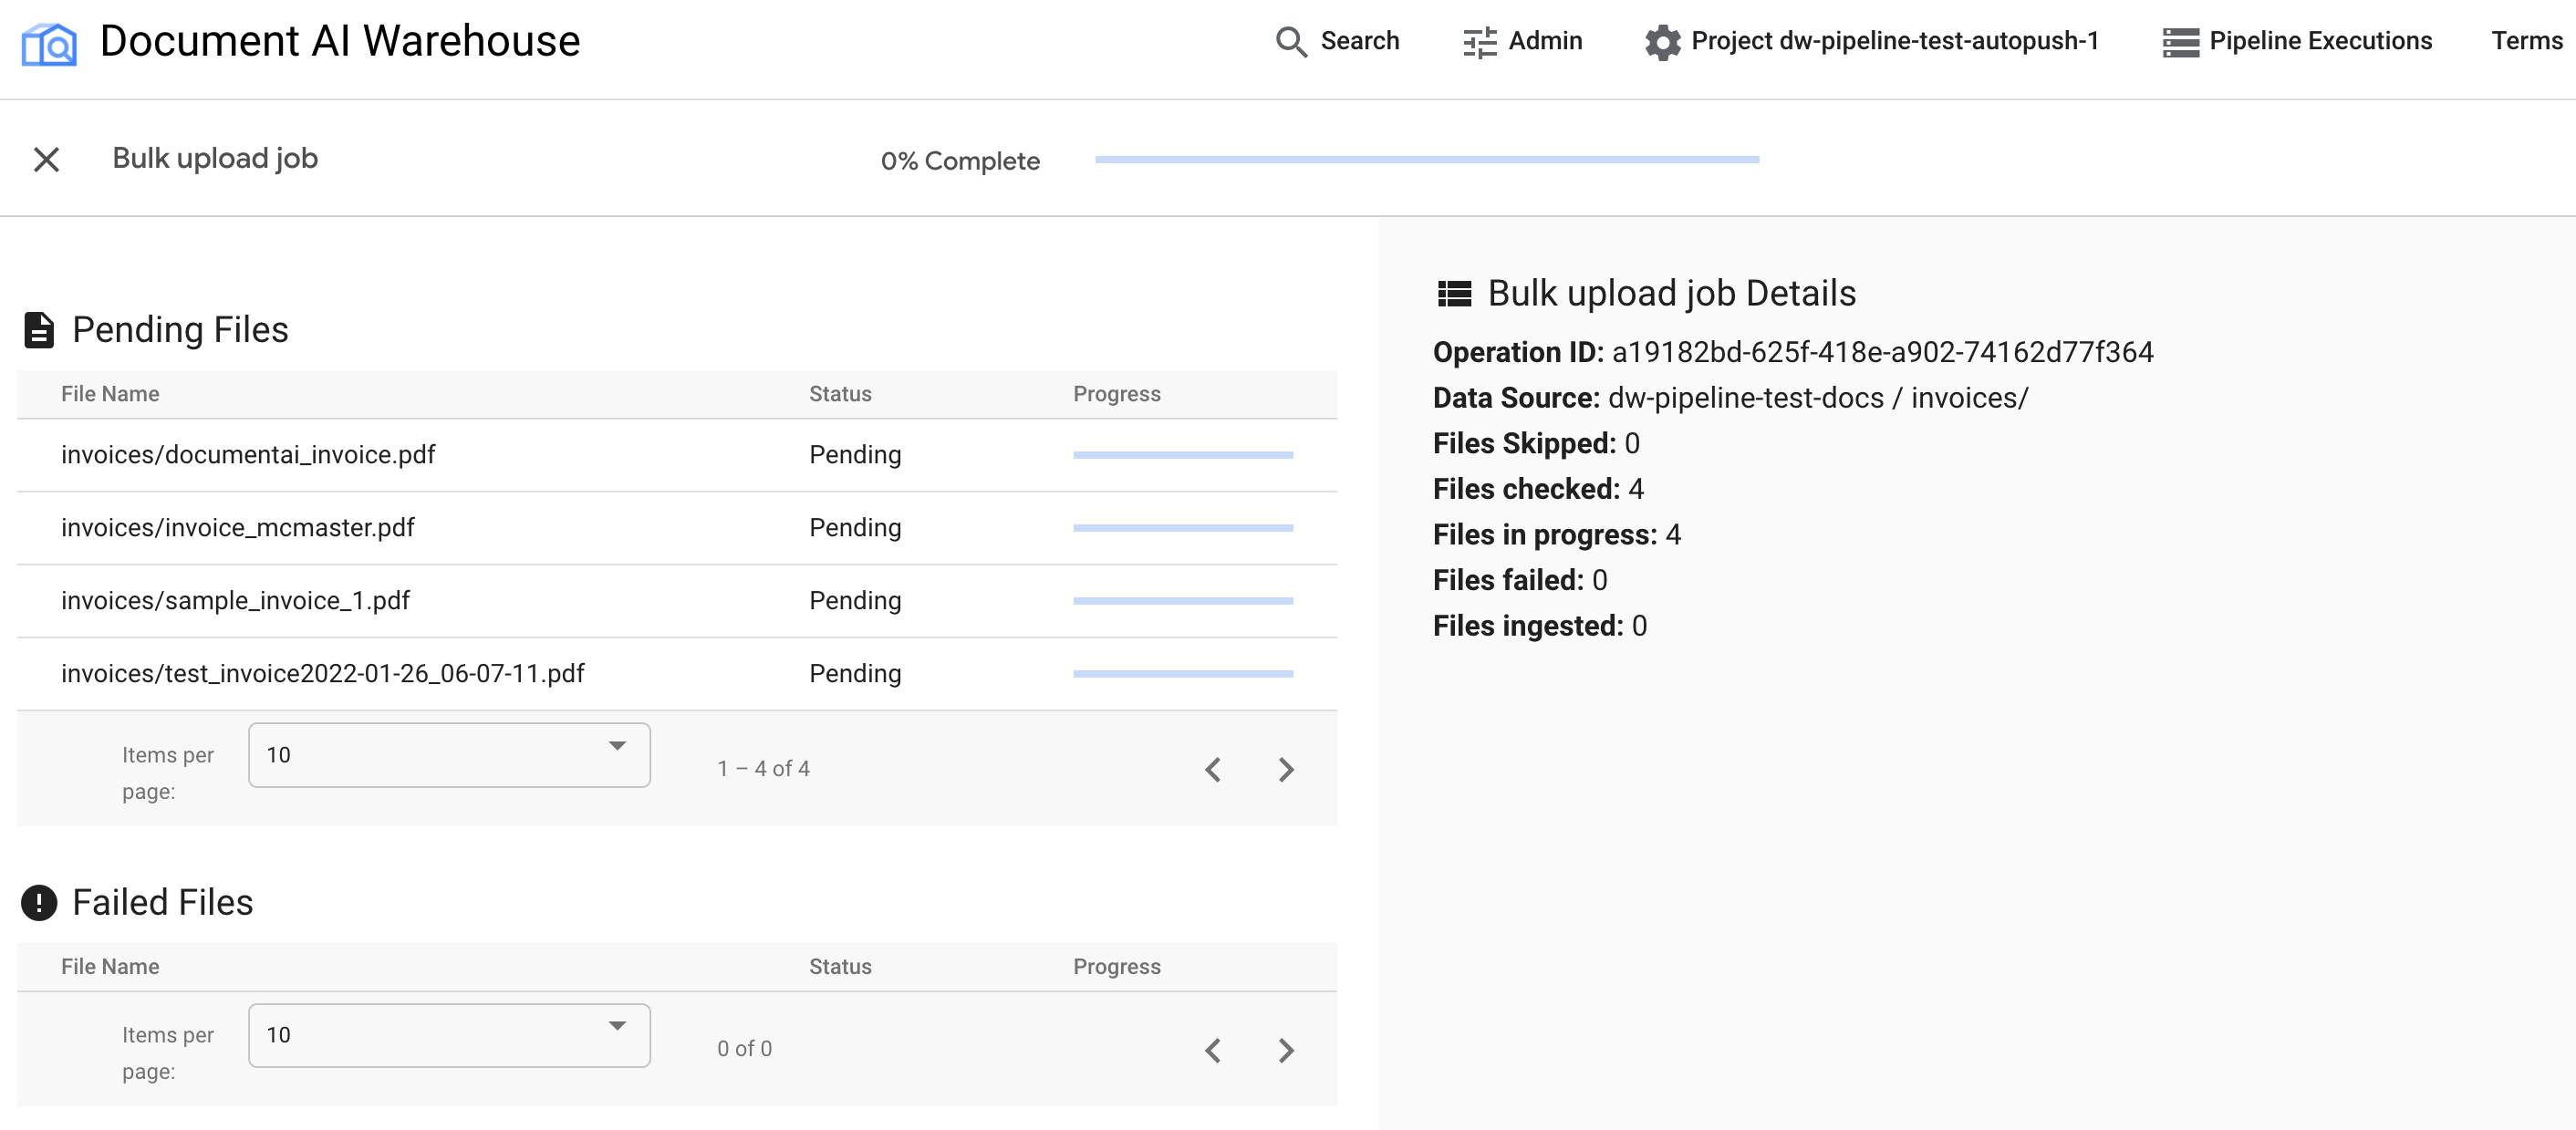
The first table shows any pending or processed documents. After they're
ingested, the document is not listed in the first table anymore. Documents that
failed to upload appear in the second table. On the right, the statistics shows
the number of ingested, failed, and pending documents.
After the job is complete, the status page shows 100% complete without any
pending documents:
Examine the uploaded documents
Find the newly ingested documents by going back to the search view. Click
the Document AI Warehouse logo or Search on the top navigation bar:
Open any of the newly ingested documents by clicking the document name. In
the document viewer, you can open the AI View.
Go to the Text block tab. The OCR results are stored in the document:
[[["Easy to understand","easyToUnderstand","thumb-up"],["Solved my problem","solvedMyProblem","thumb-up"],["Other","otherUp","thumb-up"]],[["Hard to understand","hardToUnderstand","thumb-down"],["Incorrect information or sample code","incorrectInformationOrSampleCode","thumb-down"],["Missing the information/samples I need","missingTheInformationSamplesINeed","thumb-down"],["Other","otherDown","thumb-down"]],["Last updated 2025-08-25 UTC."],[[["\u003cp\u003eDocument AI Warehouse is being deprecated and will be unavailable after January 16, 2025, requiring users to migrate their data to an alternative storage solution like Cloud Storage.\u003c/p\u003e\n"],["\u003cp\u003eThe bulk upload feature uses Cloud Storage ingest pipelines and offers three preprocessing options: no preprocessing, entity extraction with Document AI processors, and classifying documents and extracting entities by type.\u003c/p\u003e\n"],["\u003cp\u003eTo perform bulk uploads with entity extraction, users must create or locate an existing Document AI processor and use its ID to configure the upload settings.\u003c/p\u003e\n"],["\u003cp\u003eAfter initiating a bulk upload, the progress can be tracked on a status page, showing pending, processed, and failed documents, as well as overall statistics.\u003c/p\u003e\n"],["\u003cp\u003eOnce documents are ingested via bulk upload, they can be viewed and managed in the search view, and the OCR results are stored within each document's text block tab.\u003c/p\u003e\n"]]],[],null,["# Bulk upload with the Cloud Storage ingest pipeline\n\n| **Caution** : Document AI Warehouse is deprecated and will no longer be available on Google Cloud after January 16, 2025. To safeguard your data, migrate any documents currently saved in Document AI Warehouse to an alternative like Cloud Storage. Verify that your data migration is completed before the discontinuation date to prevent any data loss. See [Deprecations](/document-warehouse/docs/deprecations) for details.\n\n\u003cbr /\u003e\n\n|\n| **Preview**\n|\n|\n| This feature is subject to the \"Pre-GA Offerings Terms\" in the General Service Terms section\n| of the [Service Specific Terms](/terms/service-terms#1).\n|\n| Pre-GA features are available \"as is\" and might have limited support.\n|\n| For more information, see the\n| [launch stage descriptions](/products#product-launch-stages).\n\nThis document describes how to perform bulk upload, which triggers the\nCloud Storage ingest pipeline behind the scene.\n\nPreprocessing options\n---------------------\n\nCurrently, the bulk upload provides three preprocessing options:\n\n1. **Bulk upload without preprocessing** : This triggers [runPipeline API with\n GcsIngestPipeline](/document-warehouse/docs/reference/rest/v1/projects.locations/runPipeline#gcsingestpipeline)\n without processing the documents with Document AI processors.\n\n2. **Extract entities with Document AI processors** : This\n triggers [runPipeline API with\n GcsIngestWithDocAiProcessorsPipeline](/document-warehouse/docs/reference/rest/v1/projects.locations/runPipeline#gcsingestwithdocaiprocessorspipeline).\n The pipeline will call the given Document AI processor first,\n and then ingest the documents with the processed results.\n\n3. **Classify document types and extract entities for each type** : This also\n triggers [runPipeline API with\n GcsIngestWithDocAiProcessorsPipeline](/document-warehouse/docs/reference/rest/v1/projects.locations/runPipeline#gcsingestwithdocaiprocessorspipeline),\n which first calls a classifier. Then, for each [document\n type](/document-ai/docs/splitters#types-identified), you can specify a\n corresponding schema and processor to process those particular document\n types. They're ingested with the results and set to this schema.\n\nEach of the preprocessing types correspond to the following options in the UI:\n\nExample: Trigger bulk upload with an OCR processor\n--------------------------------------------------\n\nThis example illustrates the second use of the pipeline.\n\n### Create an OCR processor and get processor ID\n\nIf you have created an OCR processor before, just find it in the [processor\nlist](https://console.cloud.google.com/ai/document-ai/processors), and go into the details page of\nthe processor and get the processor ID.\n\nIf you have not created one, follow these steps:\n\n1. At the top of the [processor\n list](https://console.cloud.google.com/ai/document-ai/processors), click the **Processor\n Gallery**:\n\n2. Find the Document OCR processor in the gallery, and at the bottom of the\n card, click **Create Processor**:\n\n3. Enter a processor display name:\n\n4. Click **Create** and when you're redirected to the **Processor Details**\n page, find the ID:\n\n This is what you need to copy to the input fields in the bulk upload view.\n\n### Trigger bulk upload\n\n1. Open the bulk upload view.\n\n Next to **Add New** , click **Bulk Upload**:\n\n2. Find the correct processor.\n\n 1. Select the second preprocessing option.\n\n 2. Choose a schema and specify a processor and Cloud Storage bucket path\n for saving the extraction results in JSON format.\n\n3. Find the processor ID through the link in the description text:\n\n | **Note:** If you haven't used Document AI before, the processors link redirects to an API-enabling page, as shown below:\n4. Trigger upload:\n\n 1. With the processor ID copied from the last step, specify the input\n fields. The source file bucket path can be a bucket or a folder or\n subfolder in the bucket.\n\n 2. When the input fields are valid, to trigger bulk upload, at the top\n right, click **Upload**.\n\n### Check progress in the status page\n\nAfter the bulk upload is triggered, you are redirected to the status tracking\npage:\n\nThe first table shows any pending or processed documents. After they're\ningested, the document is not listed in the first table anymore. Documents that\nfailed to upload appear in the second table. On the right, the statistics shows\nthe number of ingested, failed, and pending documents.\n\nAfter the job is complete, the status page shows 100% complete without any\npending documents:\n\n### Examine the uploaded documents\n\n1. Find the newly ingested documents by going back to the search view. Click\n the Document AI Warehouse logo or **Search** on the top navigation bar:\n\n2. Open any of the newly ingested documents by clicking the document name. In\n the document viewer, you can open the **AI View**.\n\n3. Go to the **Text block** tab. The OCR results are stored in the document:\n\nNext step\n---------\n\nUpdate existing documents with the [extract with Document AI\npipeline](/document-warehouse/docs/pipeline-ui-extract-with-docai)."]]