自动扫描 Go 软件包
了解如何启用自动扫描、将容器映像推送到 Artifact Registry,以及查看映像中发现的所有漏洞的列表。
每次将映像推送到 Artifact Registry 时,Artifact Analysis 都会扫描漏洞。平台管理员和应用开发者可以使用此自动扫描功能来帮助识别软件交付流水线中的风险。
本快速入门使用一个简单的公开软件包来演示一种软件包扫描。默认情况下,启用扫描 API 后,Artifact Analysis 会扫描多种软件包类型中的漏洞。支持的软件包类型包括:OS、Go、Java (Maven)、Python 和 Node.js (npm)。
准备工作
- Sign in to your Google Cloud account. If you're new to Google Cloud, create an account to evaluate how our products perform in real-world scenarios. New customers also get $300 in free credits to run, test, and deploy workloads.
-
Install the Google Cloud CLI.
-
如果您使用的是外部身份提供方 (IdP),则必须先使用联合身份登录 gcloud CLI。
-
如需初始化 gcloud CLI,请运行以下命令:
gcloud init -
Create or select a Google Cloud project.
-
Create a Google Cloud project:
gcloud projects create PROJECT_ID
Replace
PROJECT_IDwith a name for the Google Cloud project you are creating. -
Select the Google Cloud project that you created:
gcloud config set project PROJECT_ID
Replace
PROJECT_IDwith your Google Cloud project name.
-
-
Verify that billing is enabled for your Google Cloud project.
-
Enable the Artifact Registry and Container Scanning APIs:
gcloud services enable containerscanning.googleapis.com
artifactregistry.googleapis.com -
Install the Google Cloud CLI.
-
如果您使用的是外部身份提供方 (IdP),则必须先使用联合身份登录 gcloud CLI。
-
如需初始化 gcloud CLI,请运行以下命令:
gcloud init -
Create or select a Google Cloud project.
-
Create a Google Cloud project:
gcloud projects create PROJECT_ID
Replace
PROJECT_IDwith a name for the Google Cloud project you are creating. -
Select the Google Cloud project that you created:
gcloud config set project PROJECT_ID
Replace
PROJECT_IDwith your Google Cloud project name.
-
-
Verify that billing is enabled for your Google Cloud project.
-
Enable the Artifact Registry and Container Scanning APIs:
gcloud services enable containerscanning.googleapis.com
artifactregistry.googleapis.com 在 Google Cloud 控制台中打开代码库页面。
点击创建代码库。
在创建代码库页面上,输入以下设置:
- 名称:
quickstart-docker-repo - 格式:Docker
- 模式:标准
- 位置类型:区域
- 区域:
us-central1
- 名称:
点击创建。
切换到您要保存容器映像的目录。
将图片复制到本地目录中。例如,您可以使用 Docker 从 Docker Hub 拉取最新的 Go 映像。
docker pull golang:1.17.6-alpine- PROJECT 是您的 Google Cloud
项目 ID。
如果您的项目 ID 包含英文冒号 (
:),请参阅网域级项目。 us-central1是 Artifact Registry 制品库区域。docker.pkg.dev是 Docker 代码库的主机名。quickstart-image是您要在代码库中使用的映像名称。该映像名称可能与本地映像名称不同。tag1是要添加到 Docker 映像的标记。如果您没有指定标记,Docker 将应用默认标记latest。获取代码库列表。
在代码库列表中,点击一个代码库。
在映像列表中,点击映像名称。
每个映像摘要的漏洞总数将显示在漏洞列中。

如需查看映像的漏洞列表,请点击漏洞列中的链接。
扫描结果部分会显示扫描的软件包类型、漏洞总数、有修复的漏洞、无修复的漏洞和有效严重程度的摘要。
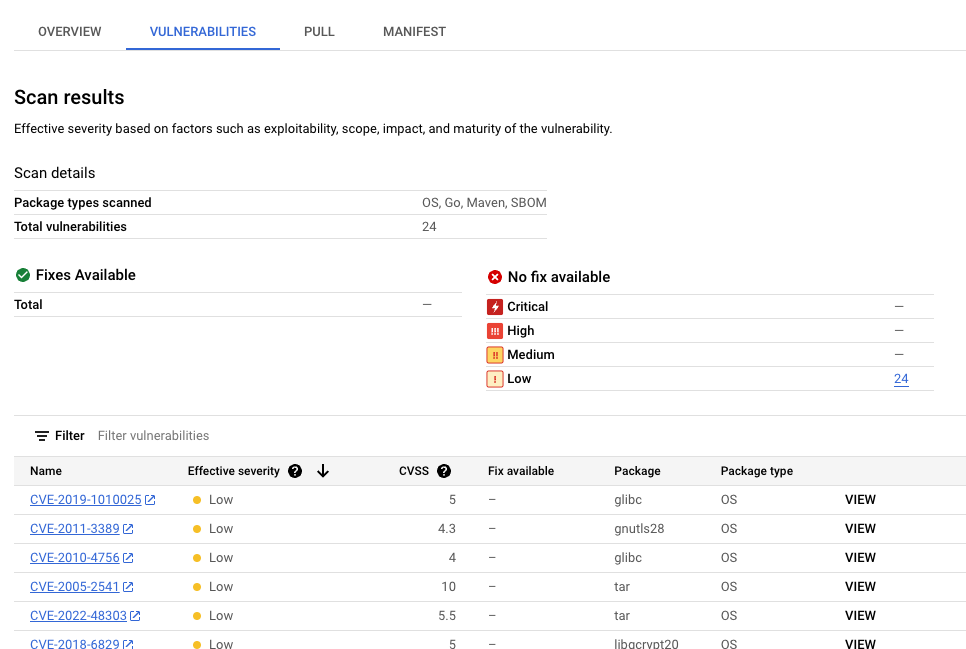
漏洞表格会列出发现的每个漏洞的常见漏洞和披露 (CVE) 名称、有效严重程度、通用漏洞评分系统 (CVSS) 评分、修复(如有)、包含漏洞的软件包的名称以及软件包类型。
您可以过滤和排序这些文件,以按文件扩展名检查特定文件、目录或文件类型。
Google Cloud 控制台会在该表格中显示最多 1,200 个漏洞。如果您的映像包含的漏洞超过 1200 个,您必须使用 gcloud 或 API 查看完整列表。
如需详细了解特定 CVE,请点击 CVE 名称。
如需查看漏洞出现详细信息(例如版本号和受影响的位置),请点击包含漏洞名称的行中的查看或查看已修复。对于没有修复的漏洞,链接文字为查看;对于已应用修复的漏洞,链接文字为查看已修复。
在 Artifact Registry 中创建 Docker 代码库
创建 Docker 代码库以存储此快速入门的示例映像。
您会看到代码库页面。您的 quickstart-docker-repo 代码库已添加到代码库列表中。
配置身份验证
如需使用 Artifact Registry 推送或拉取映像,您必须将 Docker 配置为使用 Google Cloud CLI 对向 Artifact Registry 发出的请求进行身份验证。
在 Cloud Shell 或本地 shell 中,为 us-central1 区域中的 Docker 代码库设置身份验证:
gcloud auth configure-docker us-central1-docker.pkg.dev
获取软件包
使用代码库名称标记软件包
当您想要将软件包推送到 Artifact Registry 时,需要配置 docker push 命令以将映像推送到特定位置。
运行以下命令以将映像标记为 quickstart-image:tag1:
docker tag golang:1.17.6-alpine \
us-central1-docker.pkg.dev/PROJECT/quickstart-docker-repo/quickstart-image:tag1
其中:
将映像推送到 Artifact Registry
Artifact Analysis 会在新 Go 软件包上传到 Artifact Registry 时自动扫描这些软件包。
如需将映像推送到 Artifact Registry 中的 Docker 代码库,请运行以下命令:
docker push us-central1-docker.pkg.dev/PROJECT/quickstart-docker-repo/quickstart-image:tag1
请将 PROJECT 替换为您的 Google Cloud
项目 ID。如果您的项目 ID 包含英文冒号 (:),请参阅网域级项目。
查看漏洞扫描结果
如需查看映像中的漏洞,请执行以下操作:
清理
为避免因本页面中使用的资源导致您的 Google Cloud 账号产生费用,请删除包含这些资源的 Google Cloud 项目。
如果您为此指南创建了一个新项目,现在可以删除该项目。Delete a Google Cloud project:
gcloud projects delete PROJECT_ID