A distributed denial-of-service (DDoS) attack is a deliberate attempt by a hostile actor to disrupt operations of publicly exposed sites, systems, and APIs, with the goal of degrading the experience of legitimate users. For workloads using external passthrough Network Load Balancers, protocol forwarding, or VMs with public IP addresses, Google Cloud Armor offers the following options to help protect systems against DDoS attacks:
- Standard network DDoS protection: basic always-on protection for external passthrough Network Load Balancer, protocol forwarding, or VMs with public IP addresses. This is covered under Google Cloud Armor Standard and does not require any additional subscriptions.
- Advanced network DDoS protection: additional protections for Cloud Armor Enterprise subscribers who use external passthrough Network Load Balancer, protocol forwarding, or VMs with public IP addresses. For more information about Cloud Armor Enterprise, see the Cloud Armor Enterprise overview.
This document explains the difference between standard and advanced network DDoS protection, how advanced network DDoS protection works, and how to enable advanced network DDoS protection.
Compare standard and advanced network DDoS protection
Use the following table to compare standard and advanced network DDoS protection features.
| Feature | Standard network DDoS protection | Advanced network DDoS protection |
|---|---|---|
| Protected endpoint type |
|
|
| Forwarding rule enforcement | ||
| Always-on attack monitoring and alerting | ||
| Targeted attack mitigations | ||
| Mitigation telemetry |
How network DDoS protection works
Standard network DDoS protection is always enabled. You don't need to take any action to enable it.
You configure advanced network DDoS protection on a per-region basis. Instead of associating the network edge security policy with one or more target pools, target instances, backend services, or instances with external IP addresses, you associate it with a network edge security service in a particular region. When you enable it for that region, Cloud Armor provides always-on targeted volumetric attack detection and mitigation for external passthrough Network Load Balancer, protocol forwarding, and VMs with public IP addresses in that region. You can only apply advanced network DDoS protection to projects that are enrolled in Cloud Armor Enterprise.
When you configure advanced network DDoS protection, you first create a security
policy of the type CLOUD_ARMOR_NETWORK in a region that you choose. Next, you
update the security policy to enable advanced network DDoS protection. Finally,
you create a network edge security service, a resource to which you can attach
security policies of type CLOUD_ARMOR_NETWORK. Attaching the security policy
to the network edge security service enables advanced network DDoS protection for all
applicable endpoints in the region that you chose.
Advanced network DDoS protection measures your baseline traffic to improve its mitigation performance. When you enable advanced network DDoS protection, there is a training period of 24 hours before advanced network DDoS protection develops a reliable baseline and can use its training to enhance its mitigations. When the training period is over, advanced network DDoS protection applies additional mitigation techniques based on historical traffic.
Activate advanced network DDoS protection
Use the following steps to activate advanced network DDoS protection.
Enroll in Cloud Armor Enterprise
Your project must be enrolled in Cloud Armor Enterprise to enable advanced network DDoS protection on a per-region basis. After they are activated, all regional endpoints in the activated region receive always-on advanced network DDoS protection.
Ensure that there is an active Cloud Armor Enterprise subscription in your billing account, and that the current project is enrolled in Cloud Armor Enterprise. For more information about enrolling in Cloud Armor Enterprise, see Subscribing to Cloud Armor Enterprise and enrolling projects.
Configure Identity and Access Management (IAM) permissions
To configure, update, or delete a Cloud Armor edge security service, you need the following IAM permissions:
compute.networkEdgeSecurityServices.createcompute.networkEdgeSecurityServices.updatecompute.networkEdgeSecurityServices.getcompute.networkEdgeSecurityServices.delete
The following table lists the IAM roles' base permissions and their associated API methods.
| IAM permission | API methods |
|---|---|
compute.networkEdgeSecurityServices.create |
networkEdgeSecurityServices insert |
compute.networkEdgeSecurityServices.update |
networkEdgeSecurityServices patch |
compute.networkEdgeSecurityServices.get |
networkEdgeSecurityServices get |
compute.networkEdgeSecurityServices.delete |
networkEdgeSecurityServices delete |
compute.networkEdgeSecurityServices.list |
networkEdgeSecurityServices aggregatedList |
For more information about the IAM permissions that you need when you use Cloud Armor, see Set up IAM permissions for Google Cloud Armor security policies.
Configure advanced network DDoS protection
Use the following steps to enable advanced network DDoS protection.
Create a security policy of type
CLOUD_ARMOR_NETWORK, or use an existing security policy with typeCLOUD_ARMOR_NETWORK.gcloud compute security-policies create SECURITY_POLICY_NAME \ --type CLOUD_ARMOR_NETWORK \ --region REGIONReplace the following:
SECURITY_POLICY_NAME: the name that you want your security policy to haveREGION: the region in which you want your security policy to be provisioned
Update the newly created or existing security policy by setting the
--network-ddos-protectionflag toADVANCED.gcloud compute security-policies update SECURITY_POLICY_NAME \ --network-ddos-protection ADVANCED \ --region REGIONAlternatively, you can set the
--network-ddos-protectionflag toADVANCED_PREVIEWto enable the security policy in preview mode.gcloud beta compute security-policies update SECURITY_POLICY_NAME \ --network-ddos-protection ADVANCED_PREVIEW \ --region REGIONCreate a network edge security service that references your security policy.
 gcloud compute network-edge-security-services create SERVICE_NAME \
     --security-policy SECURITY_POLICY_NAME \
     --region REGION
Disable advanced network DDoS protection
To disable advanced network DDoS protection, you can either update or delete the security policy.
Update the security policy
Use the following command to update your security policy to set the
--network-ddos-protection flag to STANDARD. Replace variables
with information that is relevant to your deployment.
gcloud compute security-policies update SECURITY_POLICY_NAME \
    --network-ddos-protection STANDARD \
    --region REGION
Delete the security policy
Before you can delete a network edge security policy, you must first remove it from the network edge security service because you cannot delete in-use security policies. Use the following steps to delete your security policy:
Remove your policy from the network edge security service or delete the network edge security service.
To remove your policy from the network edge security service, use the following command:
 gcloud compute network-edge-security-services update SERVICE_NAME \
     --security-policy="" \
     --region=REGION_NAME
To delete the network edge security service, use the following command:
 gcloud compute network-edge-security-services delete SERVICE_NAME \
     --region=REGION_NAME
Delete the security policy using the following command:
gcloud compute security-policies delete SECURITY_POLICY_NAME
Use preview mode
Preview mode lets you monitor the effects of advanced network DDoS protection without enforcing the mitigation.
Cloud Armor Enterprise subscribers can also enable preview mode for advanced network DDoS protection policies. In preview mode, you receive all of the logging and telemetry about the detected attack and the proposed mitigation. However, the proposed mitigation is not enforced. This lets you test the effectiveness of the mitigation before enabling it. Because each policy is configured per region, you can enable or disable preview mode per region.
To enable preview mode, you set the --ddos-protection flag to ADVANCED_PREVIEW.
You can use the following example to update an existing policy.
gcloud beta compute security-policies update POLICY_NAME \
    --network-ddos-protection ADVANCED_PREVIEW \
    --region=REGION
Replace the following:
POLICY_NAME: the name of your policyREGION: the region in which your policy is located.
If your security policy is in preview mode during an active attack and you want
to enforce the mitigations, you can update your security policy to set the
--network-ddos-protection flag to ADVANCED. The policy is enforced
almost immediately, and the next MITIGATION_ONGOING logging event reflects the
change. MITIGATION_ONGOING logging events occur every five minutes.
Network DDoS mitigation telemetry
Cloud Armor generates three types of event logs when mitigating DDoS
attacks: MITIGATION_STARTED, MITIGATION_ONGOING, and MITIGATION_ENDED. You
can use the following log filters to view your logs by mitigation type:
| Mitigation type | Log filter |
|---|---|
| Mitigation start | resource.type="network_security_policy" jsonPayload.mitigationType="MITIGATION_STARTED" |
| Mitigation ongoing | resource.type="network_security_policy" jsonPayload.mitigationType="MITIGATION_ONGOING" |
| Mitigation end | resource.type="network_security_policy" jsonPayload.mitigationType="MITIGATION_ENDED" |
Cloud Logging attack mitigation event logs
The following sections provide examples of the log format for each type of event log:
Mitigation started
  @type: "type.googleapis.com/google.cloud.networksecurity.cloudarmor.logging.v1.CloudArmorMitigationAlert"
  alertId: "11275630857957031521"
  mitigation_type: "MITIGATION_STARTED"
  target_vip: "XXX.XXX.XXX.XXX"
  total_volume: {
   pps: 1400000
   bps: 140000000
  }
  started: {
   total_attack_volume: {
    pps: 1100000
    bps: 110000000
   }
   classified_attack: {
    attack_type: "NTP-udp"
    attack_volume: {
       pps: 500000
       bps: 50000000
    }
   }
   classified_attack: {
    attack_type: "CHARGEN-udp"
    attack_volume: {
       pps: 600000
       bps: 60000000
    }
   }
   attack_sources: {
    top_source_asns: {
      asn: "ABCDEF"
      volume: {
        pps: 20000
        bps: 2000000
      }
    }
    top_source_asns: {
      asn: "UVWXYZ"
      volume: {
        pps: 20000
        bps: 2000000
      }
    }
    top_source_geos: {
      region_code: "XX"
      volume: {
        pps: 20000
        bps: 2000000
      }
    }
    top_source_geos: {
      region_code: "XY"
      volume: {
        pps: 20000
        bps: 2000000
      }
    }
    top_source_ips: {
      region_code: "xx.xx.xx.xx"
      volume: {
        pps: 20000
        bps: 2000000
      }
    }
    top_source_ips: {
      region_code: "yy.yy.yy.yy"
      volume: {
        pps: 20000
        bps: 2000000
      }
    }
   }
  }
Mitigation ongoing
  @type: "type.googleapis.com/google.cloud.networksecurity.cloudarmor.logging.v1.CloudArmorMitigationAlert"
  alertId: "11275630857957031521"
  mitigation_type: "MITIGATION_ONGOING"
  target_vip: "XXX.XXX.XXX.XXX"
  total_volume: {
   pps: 1500000
   bps: 150000000
  }
  ongoing: {
   total_attack_volume: {
    pps: 1100000
    bps: 110000000
   }
   classified_attack: {
    attack_type: "NTP-udp"
    attack_volume: {
       pps: 500000
       bps: 50000000
    }
   }
   classified_attack: {
    attack_type: "CHARGEN-udp"
    attack_volume: {
       pps: 600000
       bps: 60000000
    }
   }
   attack_sources: {
    top_source_asns: {
      asn: "ABCDEF"
      volume: {
        pps: 20000
        bps: 2000000
      }
    }
    top_source_asns: {
      asn: "UVWXYZ"
      volume: {
        pps: 20000
        bps: 2000000
      }
    }
    top_source_geos: {
      region_code: "XX"
      volume: {
        pps: 20000
        bps: 2000000
      }
    }
    top_source_geos: {
      region_code: "XY"
      volume: {
        pps: 20000
        bps: 2000000
      }
    }
    top_source_ips: {
      region_code: "xx.xx.xx.xx"
      volume: {
        pps: 20000
        bps: 2000000
      }
    }
    top_source_ips: {
      region_code: "yy.yy.yy.yy"
      volume: {
        pps: 20000
        bps: 2000000
      }
    }
   }
  }
Mitigation completed
  @type: "type.googleapis.com/google.cloud.networksecurity.cloudarmor.logging.v1.CloudArmorMitigationAlert"
  alertId: "11275630857957031521"
  mitigation_type: "MITIGATION_ENDED"
  target_vip: "XXX.XXX.XXX.XXX"
  ended: {
      attack_duration_seconds: 600
      attack_type: "NTP-udp"
  }
In preview mode, each of the preceding mitigation_types are preceded
by PREVIEWED_. For example, in preview mode, MITIGATION_STARTED is instead
PREVIEWED_MITIGATION_STARTED.
To view these logs, go to the Logs Explorer and view the
network_security_policy resource.
For more information about viewing logs, see Viewing logs.
Security Command Center findings
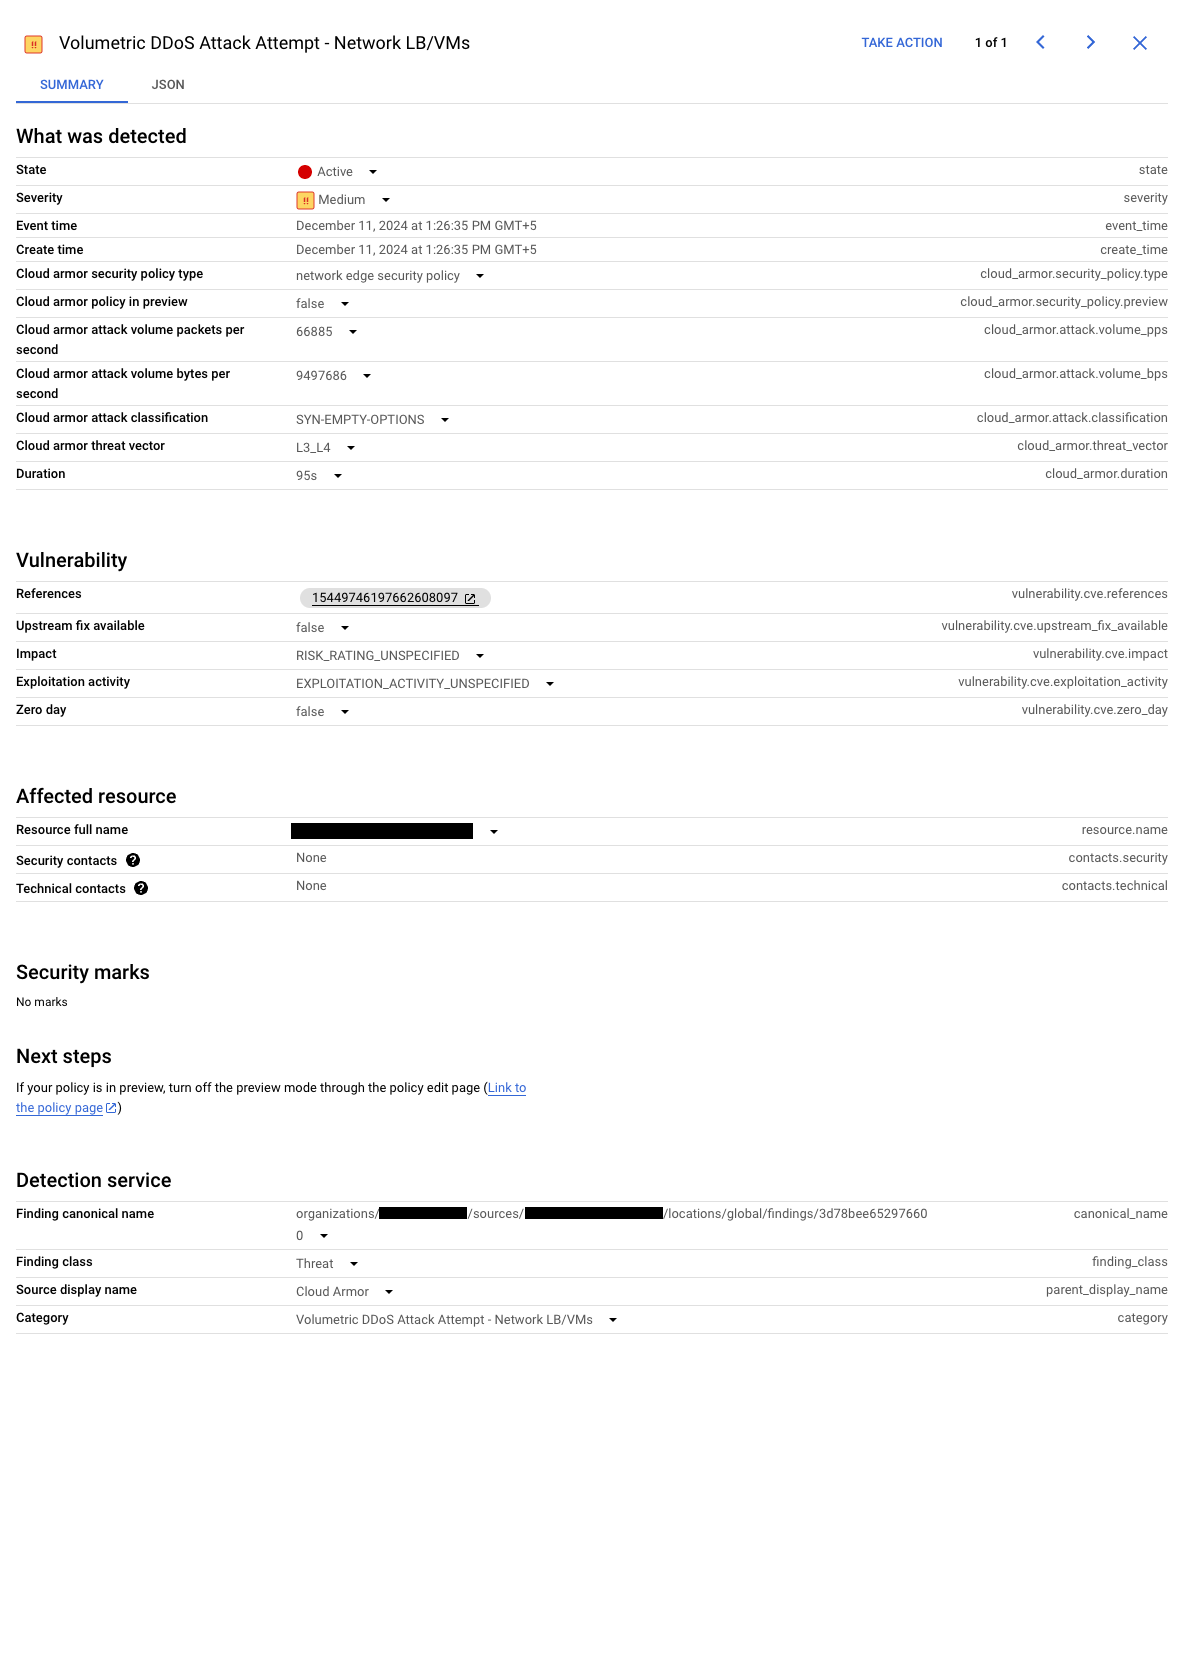
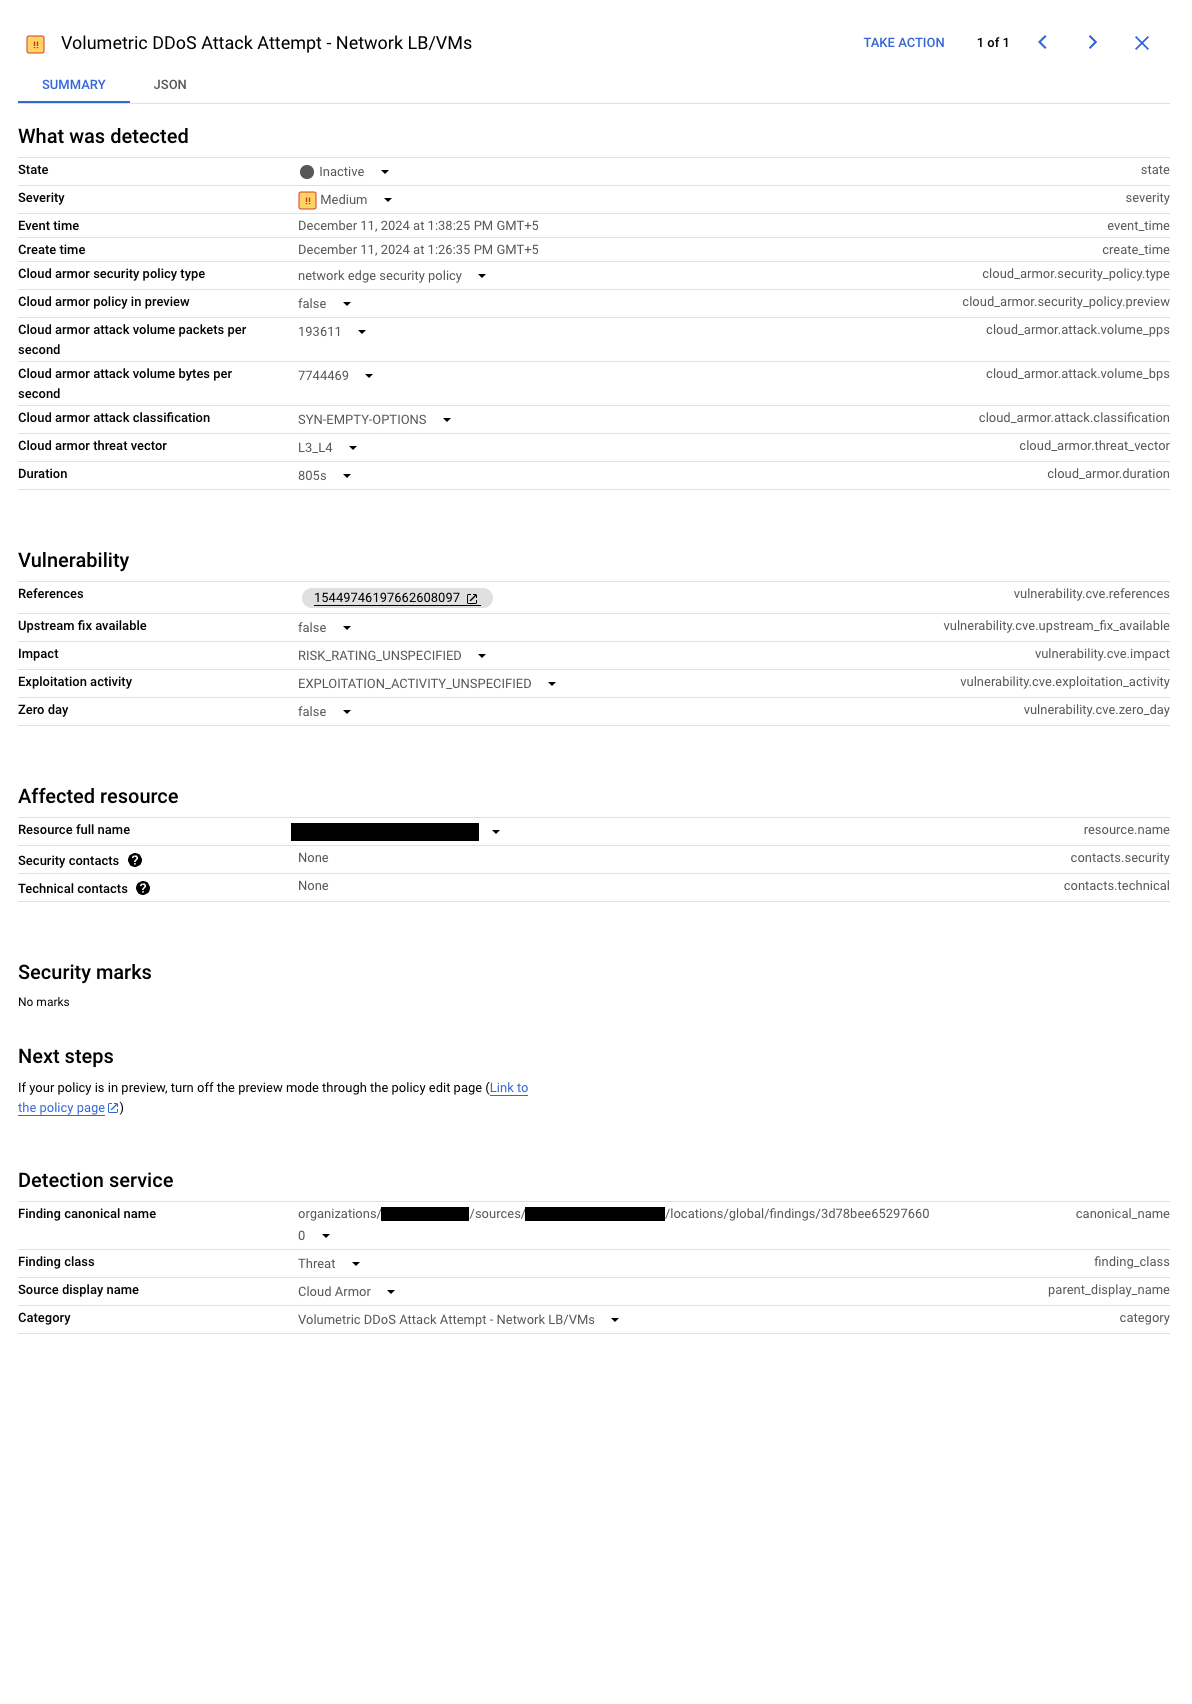
The Security Command Center dashboard helps you monitor and respond to volumetric DDoS attacks targeting your passthrough Network Load Balancer and virtual machines. When Cloud Armor detects an attack, a dedicated finding labeled "Volumetric DDoS Attack Attempt - Network LB/VMs" appears on the dashboard and the Cloud Armor card.
The finding includes direct links to relevant logs, and provides the following information to help you understand the attack:
- The specific resource under attack
- The volume of traffic affecting the resource
- The classification of the attack (like UDP, TCP, or SYN flood)
The finding dynamically reflects the attack status. Attack status is based on the following log events:
- Mitigation started: the finding appears when mitigation measures begin
Mitigation ongoing: as the mitigation progresses, the finding updates automatically, keeping you informed of the ongoing situation. The following screenshot shows an example active finding:

An active Security Command Center finding (click to enlarge). Mitigation ended: when the attack subsides and mitigation ends, the finding becomes inactive, providing a record of the event. The following screenshot shows an example inactive finding:

An inactive Security Command Center finding (click to enlarge).
What's next
- Learn to Configure network edge security policies
- Learn about Cloud Armor Enterprise
