Use o Cloud Build para automatizar builds e implantações no Knative serving usando o gatilho do Cloud Build para criar e implantar automaticamente seu código sempre que novos commits forem enviados para uma determinada ramificação de um repositório Git.
Quando você usa um gatilho do Cloud Build para criar contêineres, as informações do repositório de origem são exibidas no console do Google Cloud para o serviço após a implantação no Knative serving.
Antes de começar
- Você tem um repositório git com um
Dockerfileou a base do código é escrita em uma das linguagens compatíveis com o Google Cloud Buildpacks: Go, Node.js, Python, Java ou .NET Core. -
Enable the Cloud Build and Cloud Source Repositories APIs.
Roles required to enable APIs
To enable APIs, you need the Service Usage Admin IAM role (
roles/serviceusage.serviceUsageAdmin), which contains theserviceusage.services.enablepermission. Learn how to grant roles.
Como configurar a implantação contínua a partir da interface do usuário do Knative serving
O procedimento varia um pouco dependendo se você está configurando a implantação contínua em um novo serviço ou em um serviço existente. Clique na guia apropriada para saber mais.
Novo serviço
Acesse o Knative serving no Google Cloud console:
Clique em Criar serviço.
Preencha as Configurações do serviço com suas preferências.
Clique em Próxima.
Selecione Implantar continuamente novas revisões de um repositório de código-fonte.
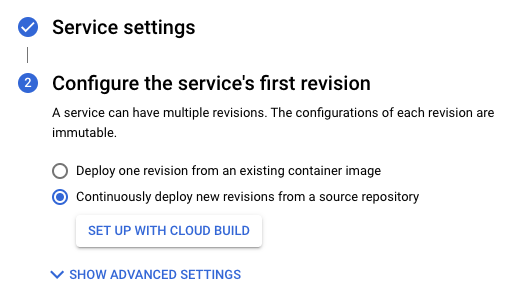
Clique em Configurar com o Cloud Build.
Selecione o provedor e o repositório.
- GitHub: se você ainda não estiver autenticado, clique em Autenticar e siga as instruções. Por padrão, a conexão de um repositório é feita usando o app do GitHub para o Cloud Build. Como alternativa, é possível espelhar o repositório do GitHub no Cloud Source Repositories. Para fazer isso, clique em Opções avançadas e marque Espelhar repositório do GitHub usando o Cloud Source Repositories. Saiba mais.
- Bitbucket: se você ainda não estiver autenticado, clique em Autenticar e siga as instruções.
- Cloud Source Repositories
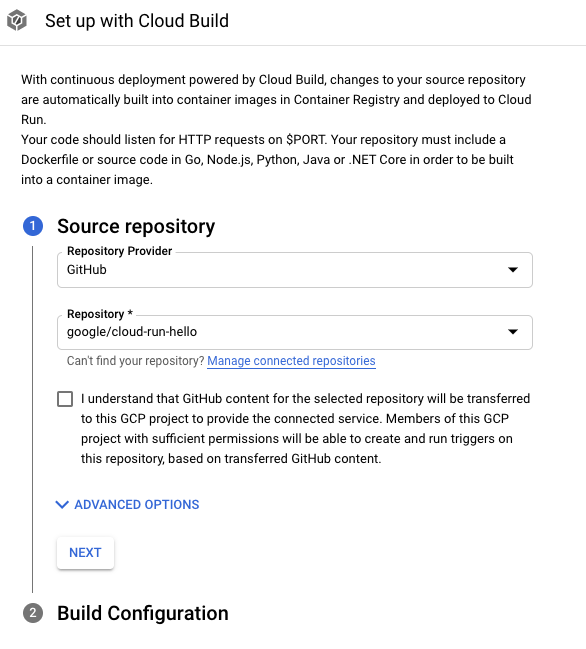
Clique em Próxima.
Preencha as opções na etapa "Configuração do build":
- Ramificação: indica qual código-fonte precisa ser usado ao executar o gatilho. É possível colocar o regex aqui. As ramificações correspondidas são verificadas automaticamente e podem ser vistas abaixo da entrada. Se houver correspondência exata de uma ramificação, o gatilho será executado automaticamente após a criação.
Tipo de build
Se o repositório precisar ser criado com o Docker e ele contiver um Dockerfile, selecione Dockerfile. Local de origem: indica o local e o nome do Dockerfile. O diretório será usado como o contexto de build do Docker. Todos os caminhos precisam estar relacionados ao diretório atual.
Caso contrário, selecione Google Cloud Buildpacks. Use o contexto de Buildpack para especificar o diretório e o Ponto de entrada (opcional) para fornecer o comando que inicia o servidor. Por exemplo:
gunicorn -p :8080 main:apppara Python,java -jar target/myjar.jarpara Java. Deixe em branco para usar o comportamento padrão.
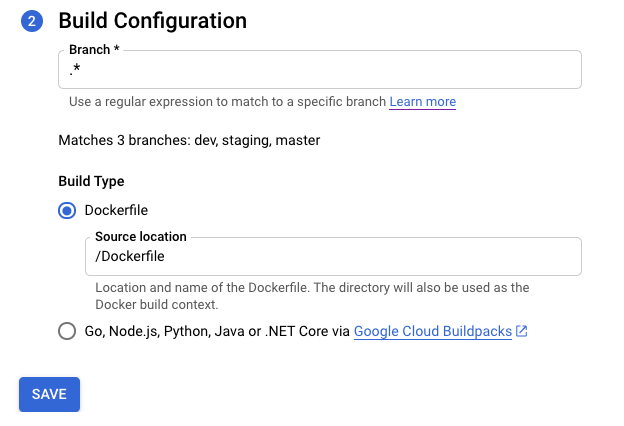
Clique em Salvar.
Verifique as configurações selecionadas.
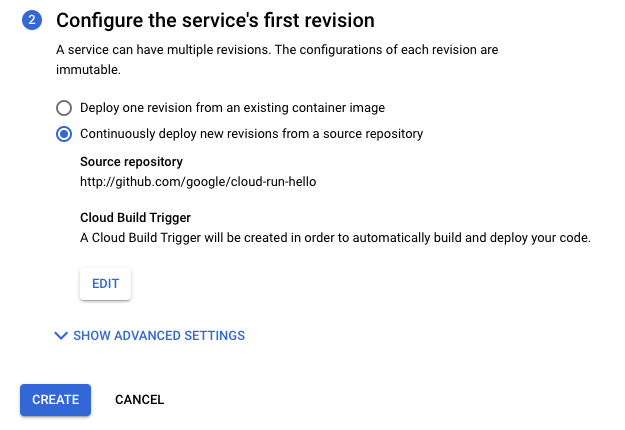
Clique em Criar.
Você será redirecionado para a página Detalhes do serviço, em que poderá acompanhar o progresso da configuração da implantação contínua.
Quando todas as etapas forem concluídas, observe as opções adicionais:
- Botão "Editar implantação contínua".
- Histórico de builds.
- Detalhes do código-fonte na seção Detalhes da revisão.
Serviço atual
Acesse o Knative serving no Google Cloud console:
Na lista, localize e clique no serviço.
Clique em Configurar implantação contínua.
Selecione o provedor e o repositório.
- GitHub: se você ainda não estiver autenticado, clique em Autenticar e siga as instruções. Por padrão, a conexão de um repositório é feita usando o app do GitHub para o Cloud Build. Como alternativa, é possível espelhar o repositório do GitHub no Cloud Source Repositories. Para fazer isso, clique em Opções avançadas e marque Espelhar repositório do GitHub usando o Cloud Source Repositories. Saiba mais.
- Bitbucket: se você ainda não estiver autenticado, clique em Autenticar e siga as instruções.
- Cloud Source Repositories
Clique em Próxima.
Preencha as opções na etapa "Configuração do build":
- Ramificação: indica qual código-fonte precisa ser usado ao executar o gatilho. É possível colocar o regex aqui. As ramificações correspondidas são verificadas automaticamente e podem ser vistas abaixo da entrada. Se houver correspondência exata de uma ramificação, o gatilho será executado automaticamente após a criação.
Tipo de build
Se o repositório precisar ser criado com o Docker e ele contiver um Dockerfile, selecione Dockerfile. Local de origem: indica o local e o nome do Dockerfile. O diretório será usado como o contexto de build do Docker. Todos os caminhos precisam estar relacionados ao diretório atual.
Caso contrário, selecione Google Cloud Buildpacks. Use o contexto de Buildpack para especificar o diretório e o Ponto de entrada (opcional) para fornecer o comando que inicia o servidor. Por exemplo:
gunicorn -p :8080 main:apppara Python,java -jar target/myjar.jarpara Java. Deixe em branco para usar o comportamento padrão.
Clique em Salvar.
A página é recarregada e exibe o progresso da configuração da implantação contínua.
Quando todas as etapas forem concluídas, observe as opções adicionais:
- Botão "Editar implantação contínua".
- Histórico de builds.
- Detalhes do código-fonte na seção Detalhes da revisão.
Como configurar manualmente a implantação contínua
Veja Como configurar manualmente a implantação contínua se precisar usar um procedimento manual em vez da IU.
Anexar o gatilho do Cloud Build ao serviço do Knative serving.
Se você já tiver um gatilho do Cloud Build, poderá anexá-lo ao serviço e aproveitar os recursos do console Google Cloud na página "Detalhes do serviço": botão Editar implantação contínua e gráfico Histórico de builds.
Para isso, você precisa adicionar um rótulo com gcb-trigger-id como chave e o identificador exclusivo do gatilho do Cloud Build como valor, e não o nome dele. Veja as instruções para configurar o rótulo.