Authorization and roles
Users must be authorized to access the Database Service. Authorization is required to access Database Service with both the GDC console and the Distributed Cloud CLI.
The following roles grant permissions to users:
project-viewer- Users with this role can access the GDC console.
project-db-viewer- Users with this role can view database clusters.
project-db-editor- Users with this role have the capabilities conferred by
project-db-viewerand can also edit database clusters. project-db-admin- Users with this role have the capability conferred by
project-db-editorand can also create and delete database clusters. project-bucket-object-viewer- Users with this role can use the storage browser in the Database Service interface in the GDC console. This interface is used to specify files for database imports and to specify destinations for files generated by database exports.
project-monitoring-viewer- Users with this role can access the monitoring instance. See Observe metrics for more information about observing Database Service metrics. You should only grant this role to users who need to access the monitoring instance.
project_mp_admin- Users with this role have the capabilities conferred by both
project_mp_editorandproject_mpb_editorroles, so they can create, edit, and delete both maintenance policies and maintenance policy bindings. project_mp_viewer- Users with this role can view maintenance policies.
project_mp_editor- Users with this role have the capabilities conferred by the
project_mp_viewerrole, and can also create, edit, and delete maintenance policies. project_mpb_viewer- Users with this role can view maintenance policy bindings.
project_mpb_editor- Users with this role have the capabilities conferred by the
project_mpb_viewerrole, and can also create, edit, and delete maintenance policy bindings.
Available database engines
The following database engines are available to use in a GDC environment:
| Database | Versions |
|---|---|
| AlloyDB Omni (preview only) | 0 |
| Oracle | 19 |
| PostgreSQL | 13, 14, 15 |
Choose a database engine type and create a database cluster
If you want to enable backups for the database cluster, first create a Distributed Cloud storage bucket or any bucket that is accessible with a S3-compatible endpoint, then create a backup repository named "dbs-backup-repository". If using storage bucket outside of Distributed Cloud, it's your responsibility to ensure the bucket is properly encrypted.
A user with the Project DB Admin role must perform the following steps. Use either the GDC console or the Distributed Cloud CLI to create database clusters:
Console
- From the main menu, choose Database Service.
- Click Create Database Cluster.
In the Choose a database engine dialog, choose a database engine.
In the Configure your cluster dialog, specify the cluster ID, password, and database version. You can enable backups and configure the backup retention period.
If you chose the PostgreSQL database engine, you can enable high availability for your database cluster. If enabled, the Database Service provisions a standby instance in the same zone as your primary instance to protect against failure. See High availability for more information.
In the Configure your primary instance dialog, specify the CPU, memory, and storage capacity of the primary instance of the database cluster. We recommend you choose enough memory to hold your largest table.
Click Create. Creating the database cluster can take a few minutes. Check the status of the cluster from the Cluster overview page. The status changes from Creating to Ready when the cluster is ready.
gdcloud
Before using Distributed Cloud CLI, install and initialize it. Then, authenticate with your organization.
Run the following command to create a database cluster:
gdcloud database clusters create CLUSTER_NAME \
    --database-version DB_VERSION \
    --admin-password ADMIN_PASSWORD
Replace the following variables:
CLUSTER_NAMEwith the name for the new cluster.DB_VERSIONwith the version string for the new cluster. For example,POSTGRESQL_13,ORACLE_19_ENTERPRISEorALLOYDBOMNI_0.2(AlloyDB is preview-only).ADMIN_PASSWORDwith the admin password for the new cluster.
For more information on configuring the CPU, memory, and storage resources for the database cluster, configuring backup, enabling high availability, and for other available options, run:
gdcloud database clusters create --help
List database clusters
Work through the following steps to list database clusters with the GDC console or the Distributed Cloud CLI:
Console
From the main menu, choose Database Service. The console takes you to a filterable list of your database clusters.
gdcloud CLI
Before using Distributed Cloud CLI, install and initialize it. Then, authenticate with your organization.
Run the following command to list database clusters:
gdcloud database clusters listThe output lists the namespace, name, database version, primary DNS endpoint, and status of each database cluster.
Start and stop database clusters
Stopping a database cluster pauses the cluster to save resources. You can stop and start database clusters with the GDC console or with the gdcloud CLI tool.
Console
- From the main menu of the GDC console, choose Database Service.
- Select the database cluster to start or stop.
- Click STOP or START.
gdcloud CLI
Use the following command to stop a database cluster:
gdcloud database clusters stop CLUSTER_NAME
Use the following command to start a database cluster:
gdcloud database clusters start CLUSTER_NAME
Replace the following:
- CLUSTER_NAME with the name of the database cluster to start or stop.
Update database cluster attributes
You can change the following database cluster attributes with the GDC console or the gdcloud CLI:
- Database password for the admin user
- External connections (enabled/disabled)
- Availability level (PostgreSQL only)
- Backup enabled and backup retention days
- Database flags
- CPU, memory, or storage allocated to the database cluster
For information on how to modify an attribute, see the workflow corresponding to the attribute type you want to update:
Console
High Availability
For PostgreSQL database clusters, enable or disable same zone high availability. See the Configure high availability section for more information.
Data Protection
For PostgreSQL and Oracle database clusters, you can enable or disable Data protection:
- Click edit Edit to the right of the Data protection header to access the form to control the data protection settings. If automated backups are enabled, you can also configure how long the backups are to be retained.
- After making changes, click Save to have the updates applied to your database cluster.
Connectivity
For all database cluster types, you can choose whether the database cluster can be accessed only from inside the GDC project, or if it is accessible from outside the project as well:
- Click edit Edit to the right of the Connectivity header to access the form where this setting can be modified.
- After making the change, click Save.
- After the change has been applied, note that the Endpoint and other connection string fields will be updated. If you have been using the old connection string, you will have to update to use the new one.
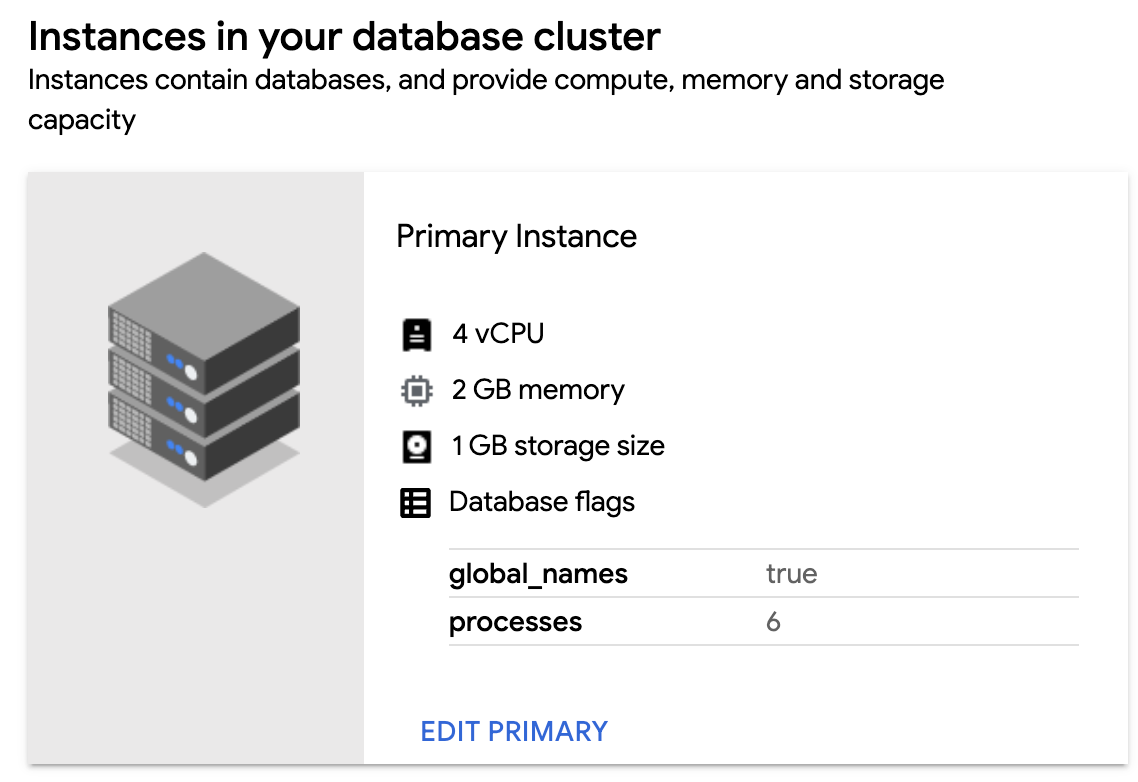
Instances
For all database cluster types, you can edit the primary instance properties:
- Click edit Edit at the bottom of the Primary Instance card.
- On the resulting form, select from the High Performance, Standard, Minimum, or Custom configurations. Note that if any configuration change results in a smaller storage size, that option will be disabled. If you select the Custom option, you have complete control over the number of CPUs, the amount of memory, and the amount of storage for your primary instance. Similarly, you cannot decrease the amount of storage, but you can increase or decrease the CPUs or memory.
- Changing the CPU, memory or storage requires the database to be restarted. After making a change, the Save button changes to Save and Restart, and you will see a message just above that button indicating that the database cluster will have to be restarted for this change to take effect.
For PostgreSQL and Oracle database clusters, this form also allows you to add, modify, or remove database flags. The set of flags available is predetermined by GDC. See the Configure database flags section for more information.
gdcloud CLI
Use the following command to update a database cluster:
sh
gdcloud database clusters update CLUSTER_NAME [options]
Replace the following:
- CLUSTER_NAME with the name of the database cluster to update.
For the full list of options, see the command reference or run
sh
gdcloud database clusters update --help
Configure database flags
Database images that ship with GDC come with default settings. However, you can customize the default database engine to satisfy requirements for your applications. Database clusters provide predefined flags that you can set using the GDC console or gdcloud CLI:
Console
In the navigation menu, select Database Service.
From the database cluster list, click the database cluster you want to configure database flags for.
In the Instances in your database cluster section, click Edit Primary.
In the Flags section, click Add a Database Flag.
Choose your flag and enter the value. If the value you input is not valid, the GDC console gives you instructions on how to satisfy the required range or value type.
Click Done.
To set the configuration, click Save. For some flags to take effect, you must restart the database cluster. For this case, click Save and Restart.
To confirm your new flag is set, return to the Instances in your database cluster section of your database cluster and verify the new flag and value are visible.
To edit your database flags, return to the Flags section and modify the existing flags. Hover over a flag component and click the Delete icon to remove a database flag.
gdcloud
You can configure new database flags for your cluster or reset all existing flags back to their default values:
To configure a database flag for your database cluster, run:
gdcloud database clusters update CLUSTER_NAME \
    --database-flags DB_FLAGS
Replace the following:
CLUSTER_NAME: the name of the database cluster.DB_FLAGS: the comma-separated list of database flags to set on the database running in the database cluster. Each database flag and value are set as a key-value pair. Flags without a value can be defined without a string following the=character.
For example, the following command sets several database flags for the
test-db-cluster:gdcloud database clusters update test-db-cluster \ --database-flags max_allowed_packet=55555,skip_grant_tables=,log_output=1For a list of available database flags, see Available database flags.
To reset all your database flags to their default settings, run:
gdcloud database clusters update CLUSTER_NAME --clear-database-flagsReplace
CLUSTER_NAMEwith the name of the database cluster.
Available database flags
The available database flags to configure for your database cluster are provided next based on the database engine you configured.
PostgreSQL database flags
| Flag | Range | Type | Need restart |
|---|---|---|---|
| max_connections | [1, 262143] | Integer | TRUE |
| temp_file_limit | [1048576, 2147483647] | Integer | FALSE |
| log_min_duration_statement | [-1, 2147483647] | Integer | FALSE |
| log_connections | on, off | Boolean | FALSE |
| log_lock_waits | on, off | Boolean | FALSE |
| log_disconnections | on, off | Boolean | FALSE |
| log_checkpoints | on, off | Boolean | FALSE |
| log_temp_files | [-1, 2147483647] | Integer | FALSE |
| log_statement | none, ddl, mod, all | Enum | FALSE |
| pgaudit.log | read, write, function, role, ddl, misc, misc_set, all, none , -read, -write, -function, -role, -ddl, -misc, -misc_set, -all, -none |
Repeated string | FALSE |
| work_mem | [64, 2147483647] | Integer | FALSE |
| autovacuum | on, off | Boolean | FALSE |
| maintenance_work_mem | [1024, 2147483647] | Integer | FALSE |
| random_page_cost | [0, 2147483647] | Float | FALSE |
| log_min_messages | debug5, debug4, debug3, debug2, debug1, info notice, warning, error, log, fatal, panic |
Enum | FALSE |
| idle_in_transaction_session_timeout | [0, 2147483647] | Integer | FALSE |
| max_wal_size | [2, 2147483647],. | Integer | FALSE |
| autovacuum_vacuum_scale_factor | [0, 100] | Float | FALSE |
| log_autovacuum_min_duration | [-1, 2147483647] | Integer | FALSE |
| autovacuum_vacuum_cost_limit | [-1, 10000] | Integer | FALSE |
| autovacuum_max_workers | [1, 262143] | Integer | TRUE |
| autovacuum_analyze_scale_factor | [0, 100] | Float | FALSE |
| track_activity_query_size | [100, 1048576] | Integer | TRUE |
| log_duration | on, off | Boolean | FALSE |
| autovacuum_vacuum_cost_delay | [-1, 100] | Integer | FALSE |
| checkpoint_completion_target | [0, 1] | Float | FALSE |
| log_statement_stats | on, off | Boolean | FALSE |
| max_worker_processes | [8, 4096] | Integer | TRUE |
| log_min_error_statement | debug5, debug4, debug3, debug2, debug1, info, notice, warning, error, log, fatal, panic |
Enum | FALSE |
| default_statistics_target | [1, 10000] | Integer | FALSE |
| checkpoint_timeout | [30, 86400] | Integer | FALSE |
| wal_buffers | [-1, 262143 ] | Integer | TRUE |
| effective_cache_size | [1, 2147483647] | Integer | FALSE |
| autovacuum_work_mem | [1, 2147483647] | Integer | FALSE |
| log_hostname | on, off | Boolean | FALSE |
| autovacuum_vacuum_threshold | [0, 2147483647] | Integer | FALSE |
| autovacuum_naptime | [1, 2147483] | Integer | FALSE |
| autovacuum_analyze_threshold | [0, 2147483647] | Integer | FALSE |
| pgaudit.log_client | on, off | Boolean | FALSE |
| pgaudit.log_parameter | on, off | Boolean | FALSE |
| pgaudit.log_level | debug5, debug4, debug3, debug2, debug1, info, notice, warning, error, log |
Enum | FALSE |
| pgaudit.log_relation | on, off | Boolean | FALSE |
| pgaudit.log_catalog | on, off | Boolean | FALSE |
| pgaudit.role | String | FALSE | |
| autovacuum_freeze_max_age | [100000, 2000000000] | Integer | TRUE |
| autovacuum_multixact_freeze_max_age | [10000, 2000000000] | Integer | TRUE |
| pgaudit.log_statement_once | on, off | Boolean | FALSE |
The following table specifies default values for flags different from the vendor default:
| Flag | Value/Formula | |
|---|---|---|
| shared_buffers | 1/3 * totalMemory(MiB) | |
| max_wal_size | 1504MB | |
| max_connections | Total memory >= ? | Value |
| 120GB | 1000 | |
| 60GB | 800 | |
| 15GB | 500 | |
| 7.5GB | 400 | |
| 6GB | 200 | |
| 3.75GB | 100 | |
| 1.7GB | 50 | |
| 0 | 25 | |
| effective_cache_size | 2/5 * totalMemory | |
| temp_file_limit | 1/10 * storageSize | |
| log_connections | on | |
| log_disconnections | on | |
| pgaudit.log | all, -misc | |
| log_hostname | on | |
| pgaudit.log_parameter | on | |
Oracle database flags
| Flag | Range | Type | Need restart |
|---|---|---|---|
| aq_tm_processes | [0, 40] | Integer | FALSE |
| background_core_dump | FULL, PARTIAL | Enum | FALSE |
| bitmap_merge_area_size | [0, 2147483647] | Integer | TRUE |
| control_management_pack_access | NONE, DIAGNOSTIC, DIAGNOSTIC+TUNING | Enum | FALSE |
| cursor_sharing | FORCE, EXACT, SIMILAR | Enum | FALSE |
| db_cache_size | [0, 10995116277760] | Integer | FALSE |
| db_files | [200, 20000] | Integer | TRUE |
| db_flashback_retention_target | [30, 2147483647] | Integer | FALSE |
| db_keep_cache_size | [0, 10995116277760] | Integer | FALSE |
| db_recovery_file_dest_size | [0, 10995116277760] | Integer | FALSE |
| event | String | TRUE | |
| large_pool_size | [0, 10995116277760] | Integer | FALSE |
| log_buffer | [2097152, 10995116277760] | Integer | TRUE |
| open_cursors | [5, 65535] | Integer | FALSE |
| pga_aggregate_limit | [0, 10995116277760] | Integer | FALSE |
| pga_aggregate_target | [10485760, 10995116277760] | Integer | FALSE |
| processes | [100, 20000] | Integer | TRUE |
| recyclebin | ON, OFF | Enum | TRUE |
| resource_limit | TRUE, FALSE | Boolean | FALSE |
| sec_max_failed_login_attempts | [1, 2147483647] | Integer | TRUE |
| sga_max_size | [377487360, 10995116277760] | Integer | TRUE |
| sga_target | [377487360, 10995116277760] | Integer | FALSE |
| shared_pool_size | [0, 10995116277760] | Integer | FALSE |
| undo_retention | [0, 2147483647] | Integer | FALSE |
| global_names | TRUE, FALSE | Boolean | FALSE |
| DBFIPS_140 | TRUE, FALSE | Boolean | TRUE |
| parallel_max_servers | [0, 32767] | Integer | FALSE |
| _fix_control | String | FALSE | |
| _sql_plan_directive_mgmt_control | [0, 65535] | Integer | FALSE |
| _optimizer_dsdir_usage_control | [0, 126] | Integer | FALSE |
| skip_unusable_indexes | TRUE, FALSE | Boolean | FALSE |
The following table specifies default values for flags different from the vendor default:
| Flag | Value/Formula |
|---|---|
| sga_target | 4/5* (totalMemory-1GiB) |
| pga_aggregate_target | 1/5* (totalMemory-1GiB) |
| open_cursors | 300 |
| processes | 300 |
| DBFIPS_140 | TRUE |
| global_names | TRUE |
AlloyDB Omni database flags
| Flag | Range | Type | Need restart |
|---|---|---|---|
| google_columnar_engine.enabled | on, off | Boolean | TRUE |
| google_columnar_engine.memory_size_in_mb | [128, 2147483647] | Integer | TRUE |
Configure high availability
The purpose of a high availability configuration is to reduce downtime when a database cluster instance becomes unavailable. This might happen when an instance runs out of memory. With high availability, your data continues to be available to client applications.
Within a site, the configuration is made up of a primary instance and a standby replica. All writes made to the primary instance are replicated to the standby replica before a transaction is reported as committed. In the event of an instance failure, you can request that the standby replica become the new primary instance. Application traffic is then rerouted to the new primary instance. This process is called a failover.
You can manually trigger a failover at any time. The failover involves the following process, in order:
GDC takes the primary instance offline.
GDC turns the standby replica into the new active database cluster.
GDC deletes the previous active database cluster.
GDC creates a new standby replica.
For PostgreSQL database clusters, you can enable or disable same zone high availability. For information on enabling high availability when creating a database cluster, see Choose a database engine type and create a database cluster.
Update an existing cluster
You can update your high availability settings for an existing database cluster:
Console
In the navigation menu, select Database Service.
From the database cluster list, click the database cluster to update.
Select edit Edit in the High availability section.

Select Enable same zone standby to either toggle on or off the availability of a standby instance in the same zone as your primary database cluster.
Click Save.
Verify your database cluster reflects your high availability update by viewing its status in the High availability column of the database cluster list.
gdcloud
Update your database cluster's high availability configuration:
gdcloud database clusters update CLUSTER_NAME \
    --availability-type HA_TYPE
Replace the following:
CLUSTER_NAME: the name of the database cluster.HA_TYPE: the high availability level for the database cluster. You can setzonalorzonal_ha. Thezonalvalue is set by default.
Verify your database cluster reflects your high availability update:
gdcloud database clusters list
Trigger a failover
If you have configured high availability for your database cluster, you can trigger a failover. To trigger a failover, complete the following steps:
Console
In the navigation menu, select Database Service.
From the database cluster list, click the database cluster to trigger a failover for. Your database cluster must have high availability enabled to be eligible for a failover.
Click Failover.
Type the cluster's ID for the confirmation phrase and click Failover to trigger the failover process.
gdcloud
Trigger the failover for the database cluster:
gdcloud database clusters failover CLUSTER_NAMEReplace
CLUSTER_NAMEwith the name of the database cluster.
Delete database clusters
You can delete database clusters with the GDC console or the Distributed Cloud CLI.
Console
- From the main menu of the GDC console, choose Database Service.
- Select the database cluster to delete.
- Click DELETE.
- Optional: If backup was previously enabled, select Delete all backups. This results in a permanent deletion. Otherwise, backups will be automatically deleted once the project's retention period expires.
- Confirm deletion by typing the cluster's ID.
- Click DELETE to finish.
gdcloud CLI
Use the following command to delete a database cluster:
gdcloud database clusters delete CLUSTER_NAME
Replace the following:
- CLUSTER_NAME with the name of the database cluster to delete.
Connect to a database cluster
By default, a database cluster only allows connection from within the user cluster and the same project.
To enable connections to all database clusters in your project from another project, see Enable cross-project connections.
To enable connections to a database cluster from IP addresses outside your GDC organization, see Enable external connections.
Sign in to the GDC console with an account bound to the
project-db-admin role to find the following information for connecting to your
database cluster. This information is in the Connectivity section of the
Database Service page.
- The password of the administrator account (the username is
dbsadmin) - IP address and port number of the cluster's load balancer
- Endpoint DNS name of the cluster's load balancer
- Whether the cluster allows external connections or not
- A
psqlcommand for connecting to the cluster - A string for connecting to the cluster with Java Database Connectivity (JDBC)
- A link to download the certification authority (CA) certificate of the database
Follow these steps to connect to the database with the psqlcommand:
Download the CA certificate from the GDC console.
Set the
PGSSLROOTCERTenvironment variable to the path of the certificate file:export PGSSLROOTCERT=path/to/accounts_cert.pemReplace
path/to/with the file path to theaccounts_cert.pemcertificate.Run the
psqlcommand:psql -h IP_ADDRESS_OR_HOSTNAME -p PORT -U USERNAME postgresReplace the following variables:
IP_ADDRESS_OR_HOSTNAMEwith the value from the console.PORTwith the port number from the console.USERNAMEwith the username from the console.
Enter the password from the Connectivity section of the Database Service page at the prompt.
Create a user
To create a user, connect to the database cluster and complete the following steps:
- At the
psqlprompt, create the user:CREATE USER USER_NAME WITH PASSWORD PASSWORD ATTRIBUTE1 ATTRIBUTE2...;Enter the password when prompted.
For more information about role attributes, see the PostgreSQL documentation.
- You can confirm the user creation by displaying the user table:
SELECT * FROM pg_roles;
Clone a database cluster
You can clone a database cluster to create a new database cluster that contains the same data as the original cluster. Cloning is a good way to make database clusters for testing purposes.
You can specify any point in time to base the clone on. You aren't limited to cloning the present state of a database cluster. The database service clones a new database cluster at the exact point in time you specify.
You can clone a database cluster with the GDC console or with the gdcloud CLI tool:
Console
- From the main menu of the GDC console, choose Database Service.
- Select the database cluster to clone.
- Click add_box CLONE.
- In the Create a clone dialog, specify the point in time to clone from and specify an ID for the new database cluster.
- Click CLONE. This takes you to the Database cluster overview page for the new cluster where you can monitor its status.
gdcloud CLI
Use the following command to clone a database cluster:
gdcloud database clusters clone SOURCE \
   DESTINATION --point-in-time POINT_IN_TIME
Replace the following:
- SOURCE with the name of the database cluster to create a clone from.
- DESTINATION with the name of the new database cluster to create.
- POINT_IN_TIME with the timestamp of the point in time to use as
the basis of the clone. Use the
RFC 3339 timestamp
format (
yyyy-MM-dd'T'HH:mm:ss'Z').
Plan maintenance windows
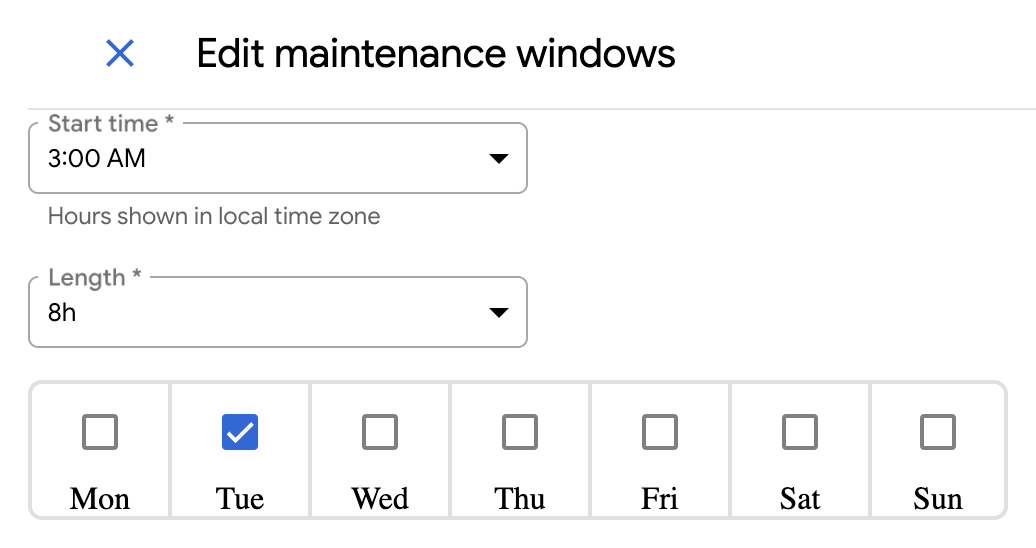
GDC offers you the ability to configure maintenance windows to schedule times for automatic updates. Maintenance windows are designed to target times where a brief downtime causes the lowest impact to your database clusters. You can schedule maintenance windows based on day of the week and hour, and length in which the maintenance window is open. For example, you could set a maintenance window to start at 3:00 AM on Tuesdays that spans eight hours.
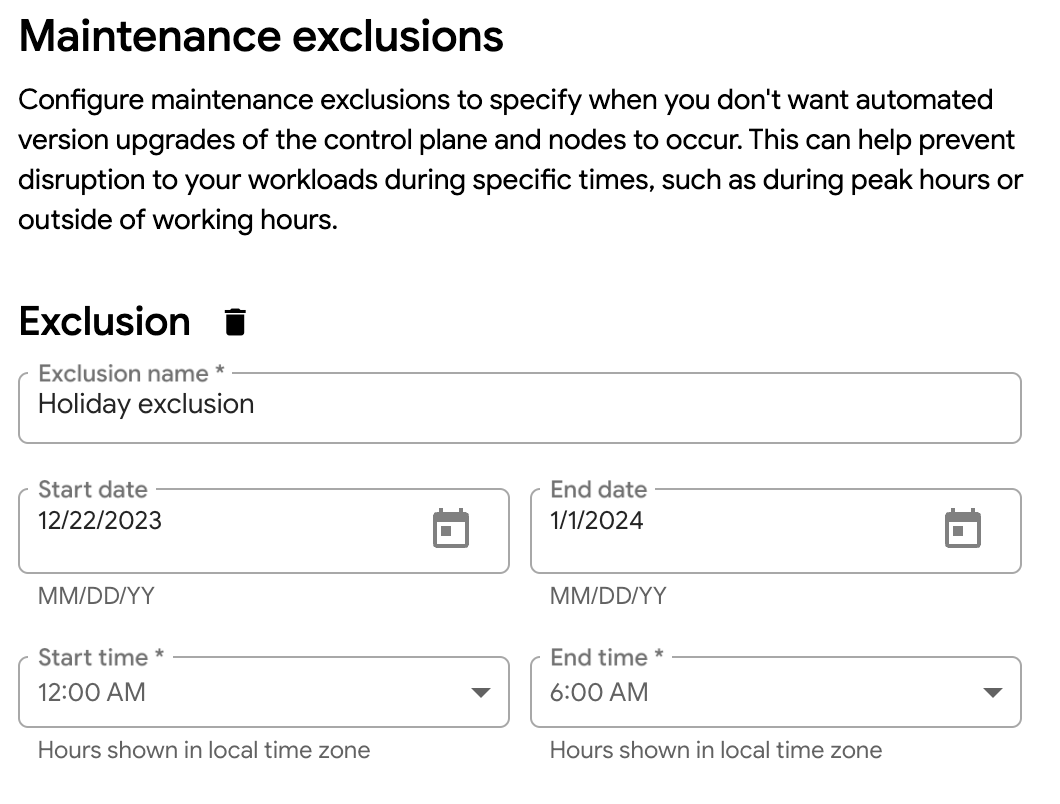
You can also plan maintenance exclusions, which prevents disruptions to your workloads during date ranges where, due to unique circumstances, you don't want to allow the set maintenance window.
Create a maintenance window
To create a maintenance window for your database cluster, complete the following steps:
Console
From the navigation menu of the GDC console, choose Database Service.
Select the database cluster that you want to plan maintenance settings for.
In the Maintenance section, click edit Edit.
Select the Start time and Length for the maintenance window. Also select the days of the week to apply the maintenance window for.
To apply a maintenance exclusion, click Add Maintenance Exclusion.
Give the exclusion a name and define the time window to exclude for your maintenance window.
Click Save.
gdcloud
To create a maintenance window for your database cluster, run:
gdcloud maintenance policies create POLICY_NAME \
    --project PROJECT_ID \
    --weekly-cycle-days DAYS_OF_WEEK \
    --weekly-cycle-start-time START_TIME \
    --weekly-cycle-duration DURATION
Replace the following:
POLICY_NAME: The name of the maintenance policy.PROJECT_ID: The ID of the project in which to create the maintenance policy.DAYS_OF_WEEK: Comma-separated list of days of the week when maintenance can begin. Accepted values are RFC-822 formatted days of the week, such asMon.START_TIME: The time of the day, in UTC timezone, when maintenance can begin. The value must follow thehh:mmformat, such as20:36.DURATION: The maximum duration that the maintenance can last for, such as2h3m.
To apply a maintenance exclusion to your maintenance window, run:
gdcloud maintenance policies update POLICY_NAME \
    --project PROJECT_ID \
    --add-exclusion-name EXCLUSION_NAME \
    --add-exclusion-start START_TIME \
    --add-exclusion-end END_TIME
Replace the following:
POLICY_NAME: The name of the maintenance policy.PROJECT_ID: The ID of the project in which to create the maintenance policy.EXCLUSION_NAME: The name of the new maintenance exclusion to add.START_TIME: The start date and time for the new maintenance exclusion. Accepted values must follow the RFC-3339 formatted timestamp, such as2006-01-02T15:04:05Z.END_TIME: The end date and time for the new maintenance exclusion. Accepted values must follow the RFC-3339 formatted timestamp, such as2006-01-02T15:04:05Z.
Verify the maintenance policy exists and reflects your intended configuration:
gdcloud maintenance policies list --project PROJECT_IDTo attach the maintenance policy to your database cluster, run:
gdcloud maintenance policy-bindings create POLICY_BINDING_NAME \
    --project PROJECT_ID \
    --policy-name POLICY_NAME \
    --resource-name RESOURCE_NAME
Replace the following:
POLICY_BINDING_NAME: The name of the policy binding resource.PROJECT_ID: The ID of the project in which to create the maintenance policy.POLICY_NAME: The name of the maintenance policy created in the previous step.RESOURCE_NAME: The resource name to bind to. For example, for a database cluster namemy-cluster, the resource name for each of the available database engines would be the following:- AlloyDB Omni:
DBCluster.alloydbomni.dbadmin.gdc.goog/my-cluster - Oracle:
DBCluster.oracle.dbadmin.gdc.goog/my-cluster - PostGreSQL:
DBClusters.postgresql.dbadmin.gdc.goog/my-cluster
- AlloyDB Omni:
Verify the policy binding exists, and its
Validcondition isTrue:gdcloud maintenance policy-bindings list --project PROJECT_IDReplace
PROJECT_IDwith the ID of the project in which to create the maintenance policy.
Remove a maintenance window
To remove a maintenance window for your database cluster, complete the following steps:
Console
From the navigation menu of the GDC console, choose Database Service.
Select the database cluster that you want to plan maintenance settings for.
In the Maintenance section, click edit Edit.
In the Length field, select 24h.
Select all the days of the week.
Click Save.
This removes the defined maintenance window and allows maintenance updates to start at any time.
gdcloud
To remove a maintenance window from your database cluster, run:
gdcloud maintenance policies delete POLICY_NAME \
    --project PROJECT_ID
Replace the following:
POLICY_NAME: The name of the maintenance policy.PROJECT_ID: The ID of the project in which the maintenance policy exists.
Remove the maintenance policy binding from the database cluster:
gdcloud maintenance policy-bindings delete POLICY_BINDING_NAME \
    --project PROJECT_ID
Replace the following:
POLICY_BINDING_NAME: The name of the maintenance policy binding.PROJECT_ID: The ID of the project in which the maintenance policy exists.
Manage maintenance exclusions
If you created a maintenance exclusion for your maintenance window, you can edit or remove the exclusion without affecting the maintenance window. To edit or remove a maintenance exclusion, complete the following steps:
Console
From the navigation menu of the GDC console, choose Database Service.
Select the database cluster that you want to manage a maintenance exclusion for.
In the Maintenance section, click edit Edit.
Edit the date ranges and start times of the exclusion. If you want to delete the exclusion, click delete Delete.
Click Save to save your maintenance exclusion modifications to the maintenance window.
gdcloud
The gdcloud CLI only supports adding and deleting maintenance exclusions. Therefore, you must delete the existing exclusion and add a new one if you want to modify your exclusion date range or times.
To delete a maintenance exclusion, run:
gdcloud maintenance policies update POLICY_NAME \
    --project PROJECT_ID \
    --remove-exclusion-name EXCLUSION_NAME
Replace the following:
POLICY_NAME: The name of the maintenance policy.PROJECT_ID: The ID of the project in which to delete the maintenance policy's exclusion.EXCLUSION_NAME: The name of the maintenance exclusion to delete.
To add a new maintenance exclusion to apply any previous exclusion edits, run:
gdcloud maintenance policies update POLICY_NAME \
    --project PROJECT_ID \
    --add-exclusion-name EXCLUSION_NAME \
    --add-exclusion-start START_TIME \
    --add-exclusion-end END_TIME
Replace the following:
POLICY_NAME: The name of the maintenance policy.PROJECT_ID: The ID of the project in which the maintenance policy exists.EXCLUSION_NAME: The name of the new maintenance exclusion to add.START_TIME: The start date and time for the new maintenance exclusion. Accepted values must follow the RFC-3339 formatted timestamp, such as2006-01-02T15:04:05Z.END_TIME: The end date and time for the new maintenance exclusion. Accepted values must follow the RFC-3339 formatted timestamp, such as2006-01-02T15:04:05Z.
Enable cross-project connections
By default, a database cluster only allows connections from within the user cluster and the same project. To allow connections from workloads in another project to all database clusters in your project:
- Sign in to the GDC console with an account bound to the
project-networkpolicy-adminrole to create firewall rules. - From the main menu of the GDC console, choose Firewall.
- In the User created rules section, click Create.
- In Firewall rule details, create a name for your firewall rule.
- In the Direction of traffic dialog, choose INGRESS.
- In the Target dialog, choose Service and then select dbs.
- In the From dialog, choose Another project and select the project ID from which you would like to allow connectivity.
- Click Create.
- Wait for the Status column of the new rule to show Ready.
Enable external connections
By default, a database cluster only allows connections from within the user cluster and the same project. To allow external connections from IP addresses outside of your Google Distributed Cloud air-gapped organization:
- Sign in to the GDC console with an account bound to the
project-networkpolicy-adminrole to create firewall rules. - From the main menu of the GDC console, choose Firewall.
- In the User created rules section, click Create.
- In Firewall rule details, create a name for your firewall rule.
- In the Direction of traffic dialog, choose INGRESS.
- In the Target dialog, choose Service and then select dbs.
- In the From dialog, choose Outside the organization and input the CIDR range from which you would like to allow external connectivity.
- Click Create.
- Wait for the Status column of the new rule to show Ready.
- Sign in to the GDC console with an account bound to the
project-db-admin - From the main menu of the GDC console, choose Database Service.
- Select the database cluster that you want to enable external connections to.
- Check the Allow external connections line of the Connectivity section of the Database cluster overview to see whether external connections are already allowed.
- In the Connectivity section of the Database cluster overview, click edit Edit.
- Select the Allow external connections checkbox.
- Click SAVE.
Export a database cluster
You can export a database cluster to a data dump file using either the GDC console or the Distributed Cloud CLI:
Console
- From the main menu, choose Database Service.
- Select the database cluster you want to export. This takes you to the Database cluster overview page for that cluster.
- Click EXPORT. The Export data panel opens.
- In the Export data panel, specify the storage location to export to.
- Click EXPORT. On screen messages indicate the status of the export process.
gdcloud CLI
- Before using Distributed Cloud CLI, install and initialize it. Then, authenticate with your organization.
Run the following command to export a database file to a dump file:
gdcloud database export sql DATABASE_CLUSTER \
     s3://BUCKET_NAME/SAMPLE.dmp --project=PROJECT_NAME
Replace the following:
- DATABASE_CLUSTER with the name of the database cluster to export.
- BUCKET_NAME/SAMPLE.dmp with the destination for the exported dump file.
- PROJECT_NAME with the name of the project that the database cluster is in.
Import from a dump file
Before importing data, you must:
Create a database cluster to import the data to.
Upload the dump file to a storage bucket. See Upload objects to storage buckets for instructions.
The Database Service import service account must have access to the dump file. The service account is named
postgresql-import-DATABASE_CLUSTER_NAMEororacle-import-DATABASE_CLUSTER_NAME, depending on the type of database you are importing.Replace
DATABASE_CLUSTER_NAMEwith the name of the database cluster where you are importing data.
You can import a dump file into a database cluster using either the GDC console or the Distributed Cloud CLI:
Console
Open the Database cluster overview page in the GDC console to see the cluster that contains the database you are importing.
Click Import. The Import data to accounts panel opens.
In the Source section of the Import data to accounts panel, specify the location of the SQL data dump file you uploaded previously.
In the Destination field, specify an existing destination database for the import.
Click Import. A banner on the GDC console shows the status of the import.
gdcloud CLI
Before using Distributed Cloud CLI, install and initialize it. Then, authenticate with your organization.
Run the following command to import a dump file into a database:
gdcloud database import sql DATABASE_CLUSTER s3://BUCKET_NAME/sample.dmp \
    --project=PROJECT_NAME
Replace the following:
- DATABASE_CLUSTER with the name of the database cluster to import data into.
- BUCKET_NAME/SAMPLE.dmp with the location of the dump file.
- PROJECT_NAME with the name of the project that the database cluster is in.
Preserve database clusters before an upgrade
In GDC 1.11.0, existing database clusters will not be migrated forward from previous GDC versions. These database clusters are automatically deleted after the GDC instance is upgraded to version 1.11.0.
Before applying the release, you must confirm that there is no critical data that must be preserved. For data that must be preserved, follow these steps to migrate them forward:
- List database clusters and identify the ones that must be preserved.
- For each database cluster, export the data and store it in a GDC bucket.
- Optional: To avoid additional changes, completely delete the database cluster before applying the new GDC version.
- After the upgrade is complete, recreate the database cluster and import the dump file into it.
Manage advanced migration
Advanced migration is a solution for migrating data for large-sized databases with less downtime. This feature is only available for PostgreSQL.
A user with the Project DB Admin role must perform the following steps. Use either the GDC console or the Distributed Cloud CLI to manage migrations:
Console
- From the main menu, choose Database Service.
- Click Create Migration.
- In the Get started dialog, review requirements for the PostgreSQL source and connectivity.
- In the Specify your source database dialog, specify the source database hostname or IP address, username, password, encryption type, and certificate.
- In the Configure your cluster dialog, specify the Cluster ID, password, database version, CPU, memory, and storage capacity of the target database cluster. Ensure you choose enough memory to hold your largest table.
- Click Create. Creating the migration and target database cluster can take a few minutes.
The status changes from
ReconcilingtoReadywhen the cluster is ready. The migration status changes toUnsyncedwhen migration is set up successfully. Use the following options to manage your migration:- Start: This starts the migration and changes the migration status to
Running. - Stop: This stops the migration and changes the migration status to
Stopped. - Promote: This promotes the target database cluster to a stand alone database.
- Delete: This deletes the migration and target database cluster created for this migration.
- Start: This starts the migration and changes the migration status to
Periodically rotate the source database replication user password with the following steps:
- Click edit Edit to the right of Source database to access the form where this setting can be modified.
- After making the required changes to rotate the replication user password, click Save.
After the change is applied, the migration backend uses the new password.
gdcloud
Before using Distributed Cloud CLI, install and initialize it. Then, authenticate with your organization.
Create a migration:
gdcloud database connection-profiles create postgresql SOURCE_CONNECTION_PROFILE \
    --username REPLICATION_USERNAME \
    --password REPLICATION_PASSWORD \
    --ca-certificate CA_CERT_FILE_PATH

gdcloud database migrations create MIGRATION_NAME \
    --source SOURCE_CONNECTION_PROFILE \
    --destination DESTINATION_DBCLUSTER

gdcloud database clusters create DESTINATION_DBCLUSTER \
    --database-version DB_VERSION \
    --admin-password ADMIN_PASSWORD
Replace the following variables:
SOURCE_CONNECTION_PROFILEis the name for the new connection profile.REPLICATION_USERNAMEis the name for the replication user of the source database.REPLICATION_PASSWORDis the password for the replication user of the source database.CA_CERT_FILE_PATHis the file path for the source database CA certificate.MIGRATION_NAMEis the name for the new migration.DESTINATION_DBCLUSTERis the name for the target database cluster.DB_VERSIONis the version string for the new cluster. For example,POSTGRESQL_13.ADMIN_PASSWORDis the admin password for the new cluster.
Start a migration:
gdcloud database migrations start MIGRATION_NAMEStop a migration:
gdcloud database migrations stop MIGRATION_NAMEPromote a migration:
gdcloud database migrations promote MIGRATION_NAMEList existing connection-profiles:
gdcloud database connection-profiles list postgresqlList the existing migration:
gdcloud database migrations list --destination DESTINATION_DBCLUSTER
Observe metrics
You can observe Database Service metrics with the monitoring instance. See Monitoring and visualizing metrics for general information about the monitoring and visualizing processes for Application Operators (AO) in GDC.
You must create a database cluster before you can observe its metrics.
View diagnostic logs
Navigate to the monitoring instance UI to access the database diagnostic logs for a database cluster.
Click the explore Explore button from the menu to open the Explore page.
Enter a query to search for Database Service logs using LogQL.
Using the Label filters drop-down menu, create a filter for
service_name=ods.Click the add Operations button and select Line contains. Enter the database cluster's name in the text box.
Click the add Operations button again and select Line contains. Enter PROJECT_NAME in the text box.
Click the Run query button.
View metrics
Navigate to the monitoring instance UI to access the metrics for a database cluster.
From the drop-down menu, select prometheus as the data source to retrieve metrics.
Application operators can access Database Service metrics that have the
ods_prefix. Enterods_in the Select a metric text box in the Metrics browser panel to view all Database Service metric types.Application operators can also access metrics with the
pg_prefix.